
Tools and keyboard shortcuts
Every tool in the Photo Editor's toolbox, the options bar, foreground and background colours, and a complete list of keyboard shortcuts.
The toolbox on the left holds every tool of the Photo Editor. The options bar above the picture shows the settings of the tool you chose. This page lists every tool, the healing tools, and every keyboard shortcut, so you can come back whenever you forget one.
The toolbox
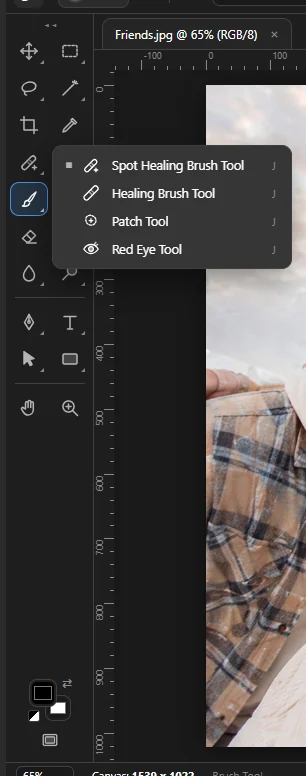 1234567
- 1 ▸▸ / ◂◂ — show the tools in two columns or in one.
- 2 A small triangle means more tools share this button.
- 3 The flyout — right-click the button, or hold the mouse button down on it, to see the tools of the group and their key. Click one to choose it. The square marks the one in use.
- 4 Foreground and background colours — the front square is the colour you paint with, the back square is the background colour. Click a square to open the Color Picker.
- 5 ⇄ swaps the two colours (X).
- 6 Default colours — black and white (D).
- 7 Screen Mode — Standard Screen Mode, Full Screen Mode with Menu Bar or Full Screen Mode (F goes through them).
To choose a tool, click it or press its letter. Press Shift + the letter to go through the tools that share a button. SnazzyFoto remembers which tool of a group you used last. The name of the current tool is shown in the status bar at the bottom.
The first time you hover over a tool, a card explains what it does, with a Learn more link to this Help Center. Later hovers show just its name and key. To switch the cards off, choose View › Rich Tooltips (or Turn off these tips on a card).
When the window isn't tall enough for one column, the toolbox switches to two columns by itself. To choose, click ▸▸ / ◂◂ at the top, or use Window › Toolbar (also in the View menu): Automatic (double column when short), Single Column or Double Column. If the tools still don't fit, scroll them with the mouse wheel; the colour squares and the screen-mode button always stay in view.
Every tool
| Key | Tool | What it does |
|---|---|---|
| V | Move Tool | Drag to move the active layer, or the selected pixels when something is selected. See The Move tool below. |
| V | Transform Layer Tool | Click something in the picture to pick its layer and transform it with handles (see Free Transform). |
| M | Rectangular Marquee Tool, Elliptical Marquee Tool | Select a box or an oval. See Selections. |
| L | Lasso Tool, Polygonal Lasso Tool | Select by drawing around an area by hand, or by clicking its corners. |
| W | Magic Wand Tool, Quick Selection Tool | Select by clicking a colour, or by painting over an area. |
| C | Crop Tool | Crop and straighten. See Resize, crop and rotate. |
| I | Eyedropper Tool | Click the picture to take that colour as the foreground colour; Alt + click sets the background colour. |
| J | Spot Healing Brush Tool, Healing Brush Tool, Patch Tool, Red Eye Tool | Remove spots and flaws so you can't see where they were. See Healing tools. |
| S | Clone Stamp Tool | Alt + click where you want to copy from, then paint elsewhere to copy it there. |
| B | Brush Tool, Pencil Tool | Paint with the foreground colour; the Pencil has hard edges. See Brushes and painting. |
| Y | History Brush Tool | Paints back the picture as it was when you opened it. |
| E | Eraser Tool | Erases to transparency (on the Background layer or a layer with locked transparency: paints the background colour). |
| G | Gradient Tool, Paint Bucket Tool | Drag to fill with a blend of colours; click to fill an area of similar colour with the foreground colour or a pattern (see The Paint Bucket). |
| R | Blur Tool, Sharpen Tool, Smudge Tool, Liquify | Soften, sharpen, push colour along, or reshape gently. |
| O | Dodge Tool, Burn Tool, Sponge Tool | Lighten, darken, or change the colour strength where you paint. |
| P | Pen Tool, Add Anchor Point Tool, Delete Anchor Point Tool, Convert Point Tool | Draw and edit paths and shapes point by point. The three anchor-point tools have no key of their own: pick them from the flyout; P always gives the Pen. See Text and shapes. |
| T | Horizontal Type Tool, Vertical Type Tool, Vertical Type Mask Tool, Horizontal Type Mask Tool | Click and type text; the mask tools make a selection in the shape of the letters. Ctrl + drag moves the text. See Text and shapes. |
| A | Path Selection Tool, Direct Selection Tool | Select and move whole shapes and paths, or their points and curve handles. |
| U | Rectangle Tool, Ellipse Tool, Triangle Tool, Polygon Tool, Line Tool, Custom Shape Tool | Drag to draw a shape. See Text and shapes. |
| H | Hand Tool | Drag to move the view. Holding Space does the same with any tool. |
| Z | Zoom Tool | Click to zoom in, Alt + click to zoom out. |
The Move tool
- Drag to move the active layer. The arrow keys move it 1 pixel (Shift: 10 pixels). Shift while dragging keeps the move straight; Alt + drag moves a copy.
- Auto-Select: — when ticked, clicking the picture picks the Layer (or its Group) under the mouse. Holding Ctrl while you click does the same for one click.
- Show Transform Controls — shows the handles of Free Transform around the layer; drag a handle to start transforming.
- The align buttons line the selected layers up; the distribute buttons space three or more layers evenly.
- With a selection, the Move tool moves the selected pixels.
- The Background layer is locked: without a selection, the Move tool offers to Convert to Layer first.
The Paint Bucket
Press G (or Shift + G from the Gradient Tool) and click an area: the pixels of a similar colour are filled.
- Fill: — the Foreground colour or a Pattern (choose it in the list next to it).
- Mode: and Opacity: — how the fill mixes with the picture; Behind fills only see-through parts. The digit keys set the opacity.
- Tolerance: — how different a colour may be and still be filled, 0–255 (32 to start with).
- Anti-alias — a soft edge around the fill. Contiguous — only touching pixels; untick it to fill that colour everywhere. All Layers — find the area in the whole visible picture, but fill the active layer.
- With a selection, only the inside of the selection is filled. On a mask it fills grey.
- Alt + click takes the colour under the mouse as the foreground colour.
- Text, shape, fill and group layers can't be filled: rasterize them first (Layer › Rasterize).
The options bar
 123456789
- 1 The icon of the current tool.
- 2 The brush preset picker: tip, size and hardness.
- 3 The Brush Settings panel (F5).
- 4 Mode: — how the paint mixes with the picture.
- 5 Opacity, with pen pressure for opacity.
- 6 Flow:, with the airbrush.
- 7 Smoothing:.
- 8 The brush angle, with pen pressure for size.
- 9 Edit in Develop (Layer) and Edit in Develop (Merged) — always there, whatever the tool (in a narrow window, behind »; see Edit in Develop and back).
All of these are explained in Brushes and painting. The bar changes with the tool:
| Tools | Options |
|---|---|
| Brush, Pencil, History Brush, Eraser, Clone Stamp | Brush preset, Mode:, Opacity, Flow:, Smoothing:, angle, pressure; Eraser: Erase to History; Clone: Aligned, Sample:, Show Overlay |
| Blur, Sharpen, Smudge | Mode:, Strength:, Sample All Layers, Protect Detail / Finger Painting |
| Dodge, Burn, Sponge | Range: and Exposure: (Sponge: Mode:, Flow:), Protect Tones / Vibrance |
| Gradient | Gradient and presets, five kinds, Mode:, Opacity, Reverse, Dither, Method: |
| Healing tools | See Healing tools |
| Selection tools | Selection mode, Feather:, Anti-alias, Style:, Magic Wand and Quick Selection settings with Select Subject and Select Sky, Select and Mask… (see Selections) |
| Move | Auto-Select:, Show Transform Controls, align and distribute buttons, Transform (Ctrl + T) |
| Free Transform | Reference point, X: / Y:, W: / H: with the link, angle, cancel and commit (see Free Transform) |
| Crop | Ratio or size, Clear, Straighten, overlay, Delete Cropped Pixels, Fill: (see Crop) |
| Eyedropper | Sample Size: (a single pixel or the average of a square), Sample: (Current Layer, Current & Below, All Layers, All Layers No Adjustments), Show Sampling Ring |
| Type, shapes, Pen, path selection | See Text and shapes |
| Paint Bucket | Fill:, Mode:, Opacity:, Tolerance:, Anti-alias, Contiguous, All Layers (see The Paint Bucket) |
| Hand, Zoom | Fit Screen and 100% |
The options bar is always one row. When a tool's options don't fit the window, « and » appear at its ends: click them, or turn the mouse wheel over the bar, to scroll it. In a narrow window the Edit in Develop buttons may be behind ».
Healing tools
The four tools under J remove spots, blemishes, dust, wires and red eyes. They don't just copy pixels: the texture they bring in takes on the colour and light of the place it goes, so the repair blends in. Press J for the tool you used last, Shift + J to go through all four.
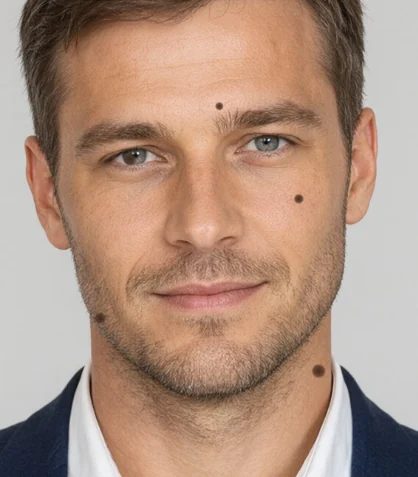
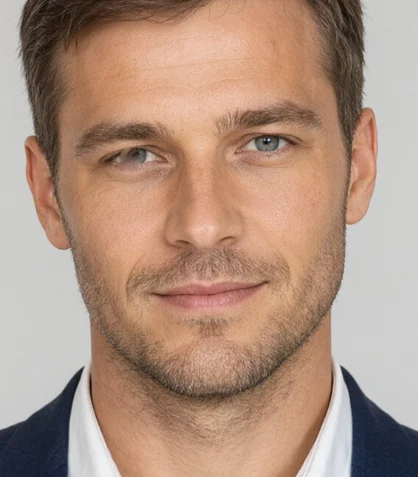
Spot Healing Brush
The quickest: make the brush a little bigger than the spot ([ ]) and click it, or paint over a scratch or a wire. While you paint, the area shows dark; when you let go it is replaced with texture from close by.

- Type: — Content-Aware (the default: looks around for the best matching area), Create Texture (builds a texture from several places, good for even surfaces like skin or sand) or Proximity Match (takes the nearest clean area).
- Sample All Layers — heals from the whole visible picture. Use it to heal on an empty layer above the photo, so the photo itself stays untouched.
- Mode: — Normal, or Replace for a hard edge (keeps grain at the edge), and blend modes such as Lighten or Darken.
Healing Brush
- Hold Alt and click a clean area with the right texture (for skin: skin nearby). This source is shared with the Clone Stamp.
- Paint over the flaw. The source texture is blended into the colour and light of the place you paint.
- Aligned — the source moves with every stroke; untick it to start from the same source each time.
- Sample: — Current Layer, Current & Below or All Layers. Show Overlay shows the source under the brush.
- Diffusion: (1–7) — how fast the texture takes on the colour around it: low for grainy, detailed pictures, high for smooth ones.
- Mode: — as for the Spot Healing Brush.
Patch
- Choose the Patch Tool and draw around the flaw, like with the Lasso (or make any selection first).
- Drag the selection to a clean area. While you drag, the selection shows what will come in.
- Let go: the flaw is healed with the texture from where you dragged to.
Patch: Source (the default) heals the selected area with texture from where you drag it. Destination works the other way round: what you selected is copied, blended in, to where you drag it — handy to duplicate a cloud or a stone. Diffusion: and Sample All Layers work as above.
Red Eye
Click a red pupil, or drag a box around both eyes. Pupil Size: sets how much of the red is taken, Darken Amount: how dark the pupil becomes. It works on photo layers (not on a mask). If it says No red pupil found there, click closer to the middle of the pupil.
For a bigger object — a person, a sign, a lamp post — Remove with AI is quicker. Use the healing tools for small things and for finishing touches.
Colours
- Foreground colour — used by the Brush, Pencil, Paint Bucket, shapes, text and new fill layers. Background colour — the second colour of a gradient, and what Ctrl + Backspace fills with.
- Color Picker — click a colour square in the toolbox (or a colour box elsewhere) to open it. Drag in the big square and the strip, or type values; Add to Swatches keeps the colour. The top of the window compares the new colour with the current one.
- Color panel (F6) — click the small front or back square to choose which colour you change, then drag in the big square and the strip, or type a colour code after #.
- Swatches panel — click a swatch to make it the foreground colour. Add foreground color keeps your current colour at the start of the list; Alt + click removes one of your own swatches.
- Eyedropper (I) — take a colour from the picture; with the Brush, Pencil or Gradient, hold Alt for the same.
- While a layer mask is targeted, the colour squares show grey: masks are painted with the grey of your colours (see Paint on a mask).
Handy keys while painting
| Key | What it does |
|---|---|
| [ / ] | Smaller / bigger brush |
| Shift + [ / Shift + ] | Softer / harder brush |
| 1 … 9, 0 | Opacity 10 % … 90 %, 100 % (two quick digits: an exact value). For Blur, Sharpen, Smudge and Dodge/Burn it is the strength or exposure. With a tool that has no opacity of its own (Move, selection tools, Type…), these keys set the layer's opacity. |
| Shift + 1 … 0 | Flow |
| F5 | Show or hide the Brush Settings panel |
| Alt | Brush, Pencil, Gradient: pick a colour · Clone Stamp, Healing Brush: set the source · Eraser: erase to history · Dodge ↔ Burn · Blur ↔ Sharpen · Smudge: finger painting |
| Ctrl | Selection and Type tools: move (like the Move tool) while held |
| Shift + click | A straight line from the end of the last stroke |
| Right-click the picture | The brush preset picker |
| Caps Lock | A crosshair instead of the brush outline |
| D / X | Default colours / swap colours |
| Space (hold) | Move the view |
All keyboard shortcuts
You can also see the list in SnazzyFoto: Help › Keyboard Shortcuts… (Alt + Shift + Ctrl + K). The menus show each command's shortcut next to it.
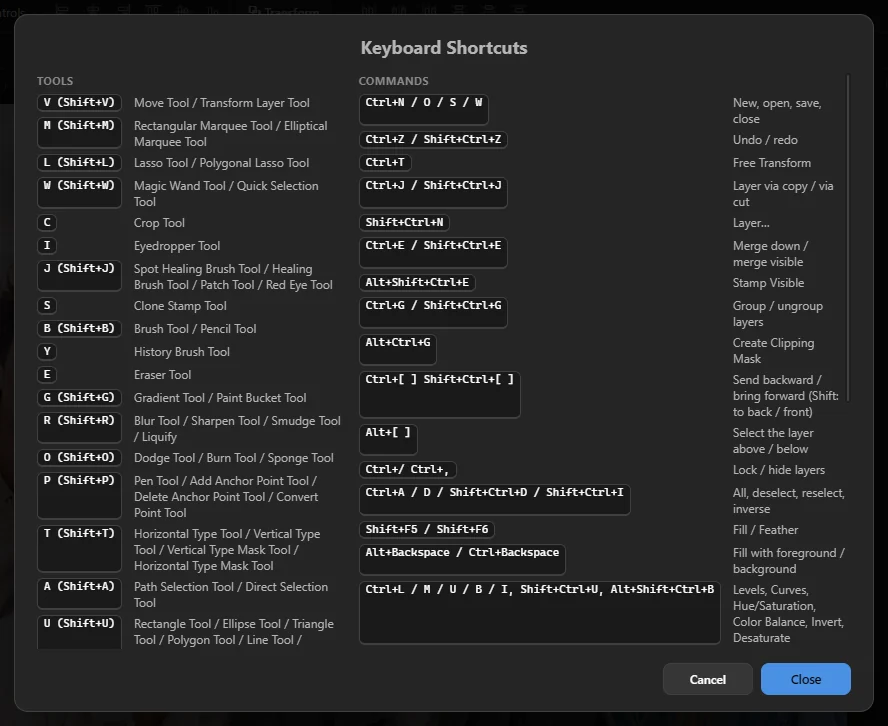
File
| Keys | Command |
|---|---|
| Ctrl + N | New canvas |
| Ctrl + O | Open a photo |
| Shift + Ctrl + O | Open a project |
| Ctrl + W | Close the document |
| Ctrl + S / Shift + Ctrl + S | Save / Save As (project) |
| Shift + Ctrl + ' / Alt + Shift + Ctrl + ' | Quick Export (PNG) / Export As (PNG, JPEG or WebP) |
Edit
| Keys | Command |
|---|---|
| Ctrl + Z | Undo (also Alt + Ctrl + Z, Step Backward) |
| Shift + Ctrl + Z or Ctrl + Y | Redo |
| Ctrl + X / C / V | Cut / Copy / Paste |
| Shift + Ctrl + C | Copy Merged |
| Delete or Backspace | Clear the selected pixels. With the Move tool and nothing selected: delete the layer. |
| Shift + F5 | Fill… |
| Alt + Backspace / Ctrl + Backspace | Fill with the foreground / background colour |
| Shift + Ctrl + Delete | Remove with AI (see Remove with AI) |
| Ctrl + T | Free Transform |
| Ctrl + K | Appearance & custom colours… (see Colour themes) |
| Alt + Shift + Ctrl + K | Keyboard Shortcuts… |
Image
| Keys | Command |
|---|---|
| Ctrl + L | Levels… |
| Ctrl + M | Curves… |
| Ctrl + U | Hue/Saturation… |
| Ctrl + B | Color Balance… |
| Alt + Shift + Ctrl + B | Black & White… |
| Ctrl + I | Invert |
| Shift + Ctrl + U | Desaturate |
| Shift + Ctrl + L | Auto Tone |
| Alt + Shift + Ctrl + L | Auto Contrast |
| Shift + Ctrl + B | Auto Color |
| Alt + Ctrl + I | Image Size… |
| Alt + Ctrl + C | Canvas Size… |
| Shift + Ctrl + A | Edit Layer in Develop… |
Layer
| Keys | Command |
|---|---|
| Shift + Ctrl + N | New layer |
| Ctrl + J / Shift + Ctrl + J | Layer via Copy / Layer via Cut |
| Ctrl + G / Shift + Ctrl + G | Group / Ungroup |
| Alt + Ctrl + G | Create or release a clipping mask |
| Ctrl + E / Shift + Ctrl + E | Merge Down / Merge Visible |
| Alt + Shift + Ctrl + E | Stamp Visible |
| Ctrl + ] / Ctrl + [ | Bring Forward / Send Backward |
| Shift + Ctrl + ] / Shift + Ctrl + [ | Bring to Front / Send to Back |
| Alt + ] / Alt + [ | Choose the layer above / below |
| Ctrl + / | Lock or unlock the layer |
| Ctrl + , | Hide or show the chosen layers |
| 1 … 0 | Layer opacity 10% … 100% (when the tool has no opacity of its own) |
| Arrow keys | Move the layer 1 pixel with the Move tool (Shift: 10 pixels) |
Select
| Keys | Command |
|---|---|
| Ctrl + A | Select all |
| Ctrl + D or Esc | Deselect |
| Shift + Ctrl + D | Reselect |
| Shift + Ctrl + I | Inverse |
| Alt + Ctrl + A | All layers |
| Alt + Ctrl + R | Select and Mask… |
| Shift + F6 | Feather… |
Type and paths
| Keys | Command |
|---|---|
| Ctrl + Shift + > / < | Bigger / smaller text (2 pt; with Alt: 10 pt), also with a type layer selected |
| Ctrl + Enter | Commit the text you are typing (or click ✓) |
| Esc | While typing: cancel the changes. While drawing with the Pen: end the path. |
| Enter | While typing: a new line. With the Pen: end the path. |
Filter
| Keys | Command |
|---|---|
| Alt + Ctrl + F | Last Filter (repeat it with the same settings) |
| Shift + Ctrl + A | Develop Filter… |
| Shift + Ctrl + R | Lens Correction (Develop)… |
| Shift + Ctrl + X | Liquify |
View and panels
| Keys | Command |
|---|---|
| Ctrl + + / Ctrl + -, mouse wheel | Zoom in / out |
| Ctrl + 0 / Ctrl + 1 | Fit on Screen / 100% |
| Ctrl + R | Rulers |
| Ctrl + ' | Grid |
| Ctrl + ; | Guides |
| Ctrl + H | Extras (guides, grid and selection outline) |
| Ctrl + 2 … 5 | View RGB, Red, Green, Blue |
| F | Next screen mode |
| Tab | Hide or show the tools and panels |
| F5 / F6 / F7 | Brush Settings / Color panel / Layers panel |
Finishing and cancelling
| When | Keys |
|---|---|
| Cropping, transforming | Enter (or a double-click inside the box) applies, Esc cancels |
| Drawing with the Pen | Enter or Esc ends the path |
| Typing text | Ctrl + Enter, ✓ or a click outside the text commits; Esc cancels your changes; Enter starts a new line |
| In a dialog | Enter = OK, Esc = Cancel |
Shortcuts don't work while you type in a box (for example a layer name, a number field or text on the picture), while a dialog is open, or while the Home screen is showing. Switching to another tool first finishes what the current one has open — a crop box, a transform, text being typed or a path.