
Layers and masks
The Layers panel, kinds of layers, blend modes, opacity and fill, locks, groups, clipping masks, layer masks, the right-click menu, and merging and flattening.
Layers are like clear sheets stacked on top of each other: a photo at the bottom, text and other pictures above it. You can change, move or hide one layer without touching the others. A mask hides part of a layer without deleting anything.
The Layers panel
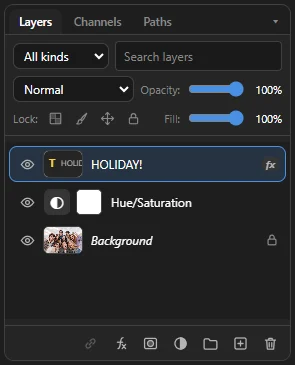 1234567
- 1 Filter — show only one kind of layer (Pixel, Adjustment, Type, Shape, Group, Fill), or type part of a name in Search layers. Set it back to All kinds to see everything.
- 2 Blend mode — how the layer mixes with the layers below (see Blend modes).
- 3 Opacity: — how see-through the layer is, from 0% (invisible) to 100%.
- 4 Lock: — protect the layer (see Locks).
- 5 Fill: — like Opacity, but layer styles such as a shadow or outline stay fully visible.
- 6 The layers — the top of the list is the front of the picture.
- 7 Buttons, from left to right: Layer style (fx), Add a mask, New fill or adjustment layer, New group, New layer and Delete layer.
Each row shows an eye (click it to hide or show the layer), a small picture of the layer, a mask picture if the layer has a mask, and the name. Small badges tell you more: fx means the layer has a style, a lock means it is locked, and ↳ means it is a clipping mask.
Select, rename and reorder
- Choose a layer — click it. Most commands work on this active layer.
- Choose several — Ctrl + click more layers, for example to group or hide them together. Select › All Layers (Alt + Ctrl + A) chooses all of them.
- Move up or down — drag a layer up or down the list: a line shows where it will land. Drop it on the middle of a group row to put it into the group. Esc while dragging cancels. Several chosen layers move together. Or use Layer › Arrange: Bring to Front (Shift + Ctrl + ]), Bring Forward (Ctrl + ]), Send Backward (Ctrl + [), Send to Back (Shift + Ctrl + [).
- Step through layers — Alt + ] chooses the layer above, Alt + [ the one below.
- Rename — double-click the name, type, press Enter (or Esc to keep the old name). On the locked Background, a double-click first turns it into Layer 0.
- Edit text or a shape — double-click the row or the small picture of a text or shape layer.
- Hide — click the eye, or press Ctrl + , to hide or show the chosen layers.
- Colour label — right-click a layer › Color and pick a colour to mark it in the list. It doesn't change the picture.
Kinds of layers
| Kind | What it is |
|---|---|
| Pixel layer | A normal picture layer you can paint on, such as your photo. A photo you open usually becomes the locked Background layer (see The Background layer). |
| Text layer | Text you can still edit. See Text and shapes. |
| Shape layer | A rectangle, ellipse, polygon, line or custom shape, or a Pen drawing in Shape mode. Its outline stays sharp and editable. See Text and shapes. |
| Adjustment layer | Changes the colours or tones of everything below it, without changing those pixels. See Adjustments. |
| Fill layer | A layer filled with one colour (Layer › New Fill Layer › Solid Color…). It uses the foreground colour; double-click its small picture to change the colour in the Color Picker. |
| Group | A folder that holds other layers (see Groups). |
Layer › New Fill Layer › Gradient… adds a pixel layer filled with a gradient from the foreground colour at the top to the background colour at the bottom.
The Background layer
A photo without see-through parts opens as a locked layer named Background. A new white or black canvas and Flatten Image make one too. A picture with transparency (for example a cut-out PNG) opens as a normal layer named Layer 0 instead, and .snazzy files saved by older versions keep a normal bottom layer.
- The Background always stays at the bottom of the list and has no opacity, blend mode or Fill. A lock in its row shows that it is locked.
- You can paint, adjust and filter it as usual. Where other layers would become see-through, it gets the background colour instead: the Eraser, Delete, Cut, a bigger Canvas Size… and a crop with Delete Cropped Pixels fill it with the background colour.
- It can't be moved, transformed or given a layer style. The Move tool (without a selection), Ctrl + T and Layer Style show The Background layer is locked, with a Convert to Layer button that turns it into a normal layer and goes on (see Free Transform). To move only part of it, select that part first.
It becomes a normal layer named Layer 0 when you double-click it, click its lock, add a mask, put it in a group, or crop with Delete Cropped Pixels off (so the hidden parts can be kept). Layer › New › Layer from Background does the same; Background from Layer turns the active pixel layer into the Background (it moves to the bottom and see-through parts get the background colour).
Add, copy and delete layers
| Command | What it does |
|---|---|
| Layer › New › Layer… Shift + Ctrl + N | An empty, transparent layer above the active one. The New layer button does the same. |
| Layer via Copy Ctrl + J | Copies the selected part onto a new layer. With nothing selected, it duplicates the whole layer. |
| Layer via Cut Shift + Ctrl + J | Moves the selected part onto a new layer and leaves a hole in the original. |
| Duplicate Layer… | An exact copy of the active layer, named "… Copy". |
| Delete Layer | Removes the active layer. You can't delete the last layer. With the Move tool, Delete also deletes the layer when nothing is selected. |
Blend modes
The blend mode decides how a layer's colours mix with the layers below. Choose it in the list at the top of the Layers panel. Try a few and watch the picture — it's the quickest way to learn them.
| Modes | Effect |
|---|---|
| Normal | The layer simply covers what is below. |
| Darken, Multiply, Color Burn | Make the picture darker. White disappears. Multiply is good for shadows and for putting a drawing on paper. |
| Lighten, Screen, Color Dodge, Linear Dodge (Add) | Make the picture lighter. Black disappears. Screen is good for light effects, sparkles and fire. |
| Overlay, Soft Light, Hard Light | Add contrast: light parts get lighter, dark parts darker. 50% grey disappears. |
| Difference, Exclusion | Compare the layers. Identical areas turn black. Handy for lining up two photos. |
| Hue, Saturation, Color, Luminosity | Take only the colour shade, the colour strength, both, or only the brightness from the layer. Color is good for tinting. |
The Dissolve, Linear Burn, Vivid Light, Linear Light, Pin Light, Hard Mix, Subtract, Divide, Darker Color and Lighter Color modes are not available.
Opacity and Fill
Opacity: fades the whole layer, including its layer style. Fill: fades only the layer's own pixels; its style stays. For example, set Fill to 0% on a text layer with an outline style to keep just the outline.
Quick keys: with a non-painting tool (such as the Move tool) chosen, press 1 … 9 for 10% … 90% opacity and 0 for 100%. With a painting tool, the same keys set the tool's opacity instead.
Locks
The four lock buttons protect the active layer:
| Lock | What it does |
|---|---|
| Lock transparent pixels | You can only paint where the layer already has pixels. Handy for recolouring a shape without painting outside it. |
| Lock image pixels | No painting, filters or adjustments on this layer. You can still move it. |
| Lock position | The layer can't be moved. |
| Lock all | Nothing can change. Also Layer › Lock Layers… or Ctrl + /. |
Groups
- Choose the layers you want together (Ctrl + click).
- Press Ctrl + G, click the New group button, or right-click › Group from Layers.
- The layers move into a group. Click ▾ to fold it, ▸ to unfold it.
Hide the group or change its opacity to hide or fade all its layers at once. An adjustment layer inside a group also changes the layers below the group, as long as the group is at 100% opacity and Normal. Click a layer inside the group to work on it like any other layer. To take the layers out of the group again, choose Layer › Ungroup Layers (Shift + Ctrl + G).
Align layers
Layer › Align moves the content of the active layer to the top, middle or bottom, or to the left, centre or right. It lines up with the selection, or with the whole canvas when nothing is selected. With the Move tool chosen, the same six buttons are in the options bar.
Clipping masks
A clipping mask shows a layer only where the layer directly below it has pixels. Use it to put a photo inside text, or to let an adjustment change only one layer.
- Put the layer you want to show (for example a photo) directly above the shape or text it should fill.
- Choose Layer › Create Clipping Mask or press Alt + Ctrl + G.
- The layer gets a ↳ arrow and now only shows inside the layer below.
To undo it, right-click the layer › Release Clipping Mask, or press Alt + Ctrl + G again.
Layer masks
A layer mask is a black-and-white picture attached to a layer. White shows the layer, black hides it, and grey makes it partly see-through. Because nothing is deleted, you can always bring hidden parts back.
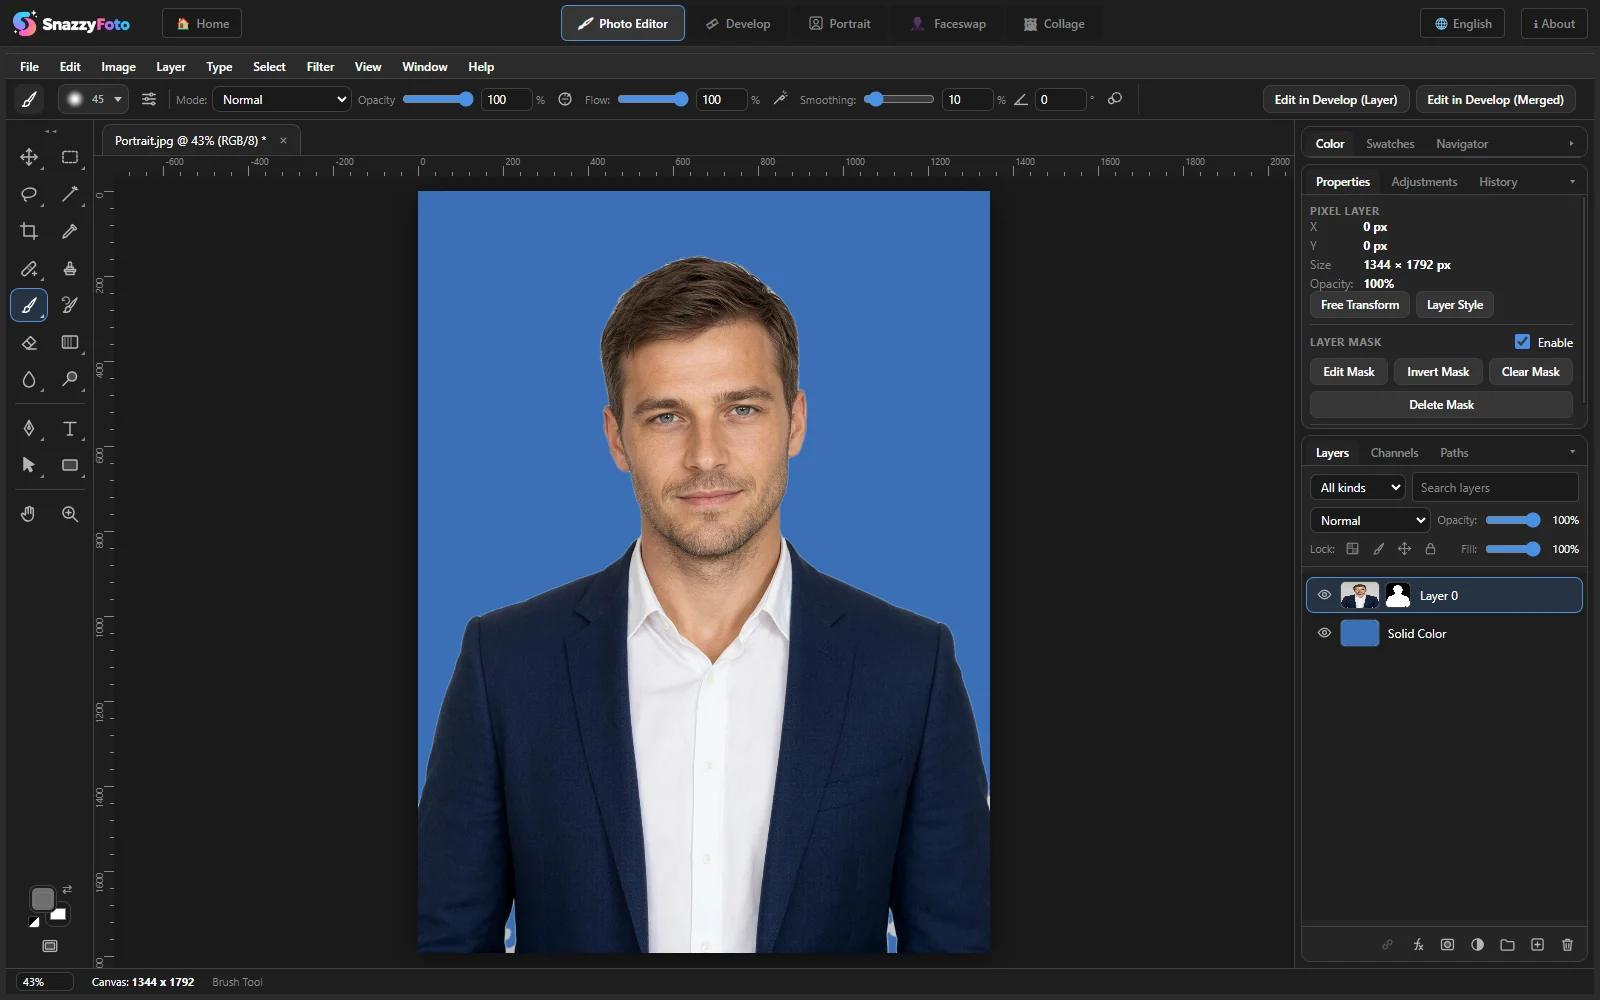 123
- 1 Mask picture — click it to switch between painting on the mask and painting on the layer. While you edit the mask, it has an outline.
- 2 The colour squares show grey while the mask is the target (see Paint on a mask).
- 3 Layer mask in Properties — Enable turns the mask on or off (its pixels are kept). Below it: Edit Mask / Edit Pixels, Invert Mask, Clear Mask (makes it all white again) and Delete Mask.
Add a mask
- Click the Add a mask button at the bottom of the Layers panel. If something is selected, the mask shows only the selection. If not, the mask is white (everything visible). Alt + click makes a black mask (everything hidden).
- Or choose Layer › Layer Mask › Reveal All, Hide All, Reveal Selection or Hide Selection.
- Select Subject can make a mask around a person for you.
Paint on a mask
A mask is painted in grey: black hides, white shows, and greys in between show partly. The painting tools use the grey of your colours while a mask is the target.
- Click the mask picture in the layer row (or choose Layer › Layer Mask › Edit Mask). A mask you just added is already the target. The colour squares in the toolbox now show grey.
- Press D: the foreground becomes white and the background black. Press X to swap them.
- Paint with the Brush (B) in black to hide parts of the layer, in white to show them again. The Eraser paints the background colour.
- Click the layer's own picture (or Edit Pixels in Properties) to go back to painting on the layer.
Use a soft brush for soft edges, or lower the opacity to hide partly. The Gradient tool draws a smooth fade (its colours as grey), and Fill, Stroke and the Paint Bucket use the grey of the colour too.
Made a mistake on the mask? Just paint over it with the other tool. That's the beauty of masks: nothing is lost until you apply them.
More mask commands
| Command | What it does |
|---|---|
| Layer Mask › Disable / Enable | Turns the mask off without deleting it, and on again. A turned-off mask shows a red cross on its small picture. Shift + click on the mask picture, or unticking Enable in Properties, does the same. |
| Invert Mask | Swaps what is shown and hidden. |
| Apply Layer Mask | Makes the hidden parts really transparent and removes the mask. You can't bring those parts back afterwards (except with Undo). |
| Layer Mask › Delete | Throws the mask away; the whole layer is visible again. |
Adjustment layers already come with a mask. Painting on an adjustment layer always paints on its mask.
The layer right-click menu
Right-click a layer in the Layers panel for the most-used commands:
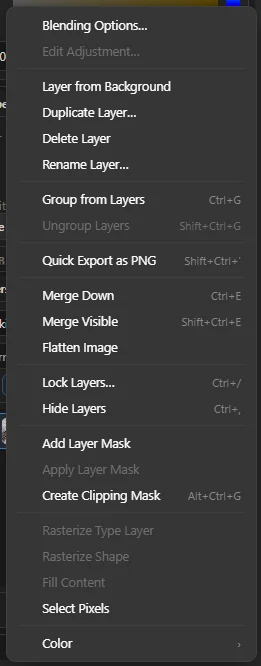
| Command | What it does |
|---|---|
| Blending Options… | Opens the Layer Style dialog (see Layer styles). |
| Edit Adjustment… | Shows the settings of an adjustment layer in Properties. |
| Duplicate Layer…, Delete Layer, Rename Layer… | As described above. |
| Group from Layers, Ungroup Layers | Make or undo a group. |
| Quick Export as PNG | Saves the whole visible picture as a PNG, the same as File › Export › Quick Export (see Export a picture). |
| Merge Down, Merge Visible, Flatten Image | See Merge and flatten. |
| Lock Layers… / Unlock Layers, Hide Layers / Show Layers | Lock or hide the layer. |
| Add Layer Mask, Disable Layer Mask / Enable Layer Mask, Apply Layer Mask | See Layer masks. |
| Create Clipping Mask / Release Clipping Mask | See Clipping masks. |
| Rasterize Type Layer, Fill Content | Turn a text layer or a colour fill layer into a normal pixel layer. |
| Select Pixels | Selects everything on the layer that isn't transparent. Ctrl + click on the layer's small picture does the same. |
| Color | A colour label for the row. |
Merge and flatten
| Command | What it does |
|---|---|
| Merge Down Ctrl + E | Joins the active layer with the layer below into one pixel layer. Both must be unlocked. |
| Merge Visible Shift + Ctrl + E | Joins all visible layers into one. Hidden layers stay as they are. |
| Stamp Visible Alt + Shift + Ctrl + E | Adds a new layer called Stamp at the top with a merged copy of everything visible. Your layers stay as they are. |
| Flatten Image | Turns everything into one locked Background layer. Hidden layers are thrown away and transparent areas become white. |
Merging turns text, shapes, adjustments and styles into plain pixels, so you can't edit them as before. Save a project first if you might need them again. You don't need to merge before exporting: an export always includes all visible layers.