
Export from Develop
Export one photo or a series as JPEG, PNG or TIFF: location, file naming, quality and size limit, resizing, output sharpening, metadata, watermark, export presets and the free version's 2048 px limit.
Exporting turns your Develop edits into new image files you can share, print or upload. One photo or a whole series, as JPEG, PNG or TIFF, at full size or resized, with your name in the metadata or a watermark if you like. Your original photos are never changed.
Open the Export dialog
Select the photos to export in the filmstrip (or just open one), then click Export at the top right, press Ctrl + Shift + E, or right-click and choose Export › Export…. The dialog's title says how many files it will make: Export One File or Export 12 Files, for example.
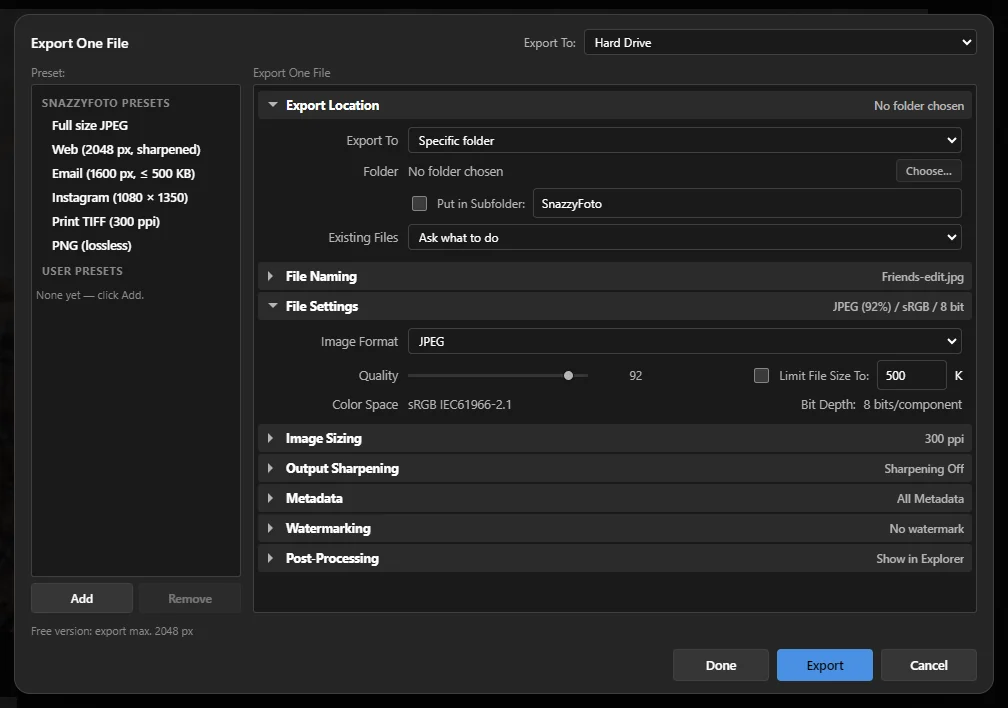 12345
- 1 Preset: — ready-made export settings. Click one to fill in the settings on the right.
- 2 Add / Remove — save the current settings as your own preset, or delete one of yours.
- 3 The settings, in sections. Click a section's title to open or close it. The grey text on the right of each title sums up its settings, so you can check everything without opening every section.
- 4 In the free version: Free version: export max. 2048 px.
- 5 Done keeps the settings without exporting. Export starts. Cancel closes without saving the settings.
Export presets
| Preset | Gives you |
|---|---|
| Full size JPEG | A high-quality JPEG at the photo's full size, with all metadata. |
| Web (2048 px, sharpened) | A JPEG of 2048 pixels on the long side, sharpened for screens. Good for websites and social media. |
| Email (1600 px, ≤ 500 KB) | A small JPEG of at most 500 KB, with only your copyright in the metadata. |
| Instagram (1080 × 1350) | Sized to fit Instagram's 4 : 5 portrait post. Crop to 4 : 5 first for a full frame. |
| Print TIFF (300 ppi) | A TIFF at full size, marked 300 pixels per inch and sharpened for glossy paper. |
| PNG (lossless) | A PNG at full size, without any loss of quality. |
A preset changes only the settings it is about; the rest (such as the folder) stays as you set it. To save your own: set everything up, click Add, type a name and click Save. It appears under User Presets.
The settings
Export Location
- Export To — Specific folder (click Choose… to pick it), Same folder as original photo, or Choose folder later (SnazzyFoto asks every time you export).
- Put in Subfolder: — puts the files in a folder inside it, for example "SnazzyFoto". It is created if needed.
- Existing Files — what to do when a file with the same name is already there: Ask what to do, Choose a new name for the exported file, Overwrite WITHOUT WARNING, or Skip.
With Ask what to do, a window asks for each such file: Overwrite, Use a new name or Skip. Tick Do this for the remaining files to answer once for the whole export.
SnazzyFoto never overwrites the original photo, even with Overwrite WITHOUT WARNING: if the new file would replace it, it gets a number added to its name instead.
File Naming
Tick Rename To: and choose a pattern. Without the tick, files keep the original name.
| Pattern | Example |
|---|---|
| Filename-edit | beach-edit.jpg |
| Filename - Sequence | beach-1.jpg |
| Custom Name - Sequence | holiday-1.jpg, holiday-2.jpg … |
| Custom Name (x of y) | holiday-1-of-12.jpg |
| Date - Filename | 20261015-beach.jpg (the date the photo was taken if the file has it, otherwise today) |
| Custom Name | holiday.jpg (with a number when there are several) |
Type your own text under Custom Text and the first number under Start Number. Example shows the name the first file will get. Extensions: sets Lowercase (.jpg) or Uppercase (.JPG).
File Settings
| Image Format | Use it for |
|---|---|
| JPEG | Almost everything: sharing, web, phones. Small files. |
| PNG | No quality loss at all, larger files. Good for graphics and further editing. |
| TIFF | Printing and other photo programs. No quality loss, compressed without loss. |
- Quality (JPEG) — 1 to 100. Around 85–92 looks the same as the original to the eye, with much smaller files.
- Limit File Size To: (JPEG) — tick it and enter a size in KB. SnazzyFoto picks the highest quality that stays under it.
- Color Space is always sRGB, the standard for screens and the web, and Bit Depth: is 8 bits per colour.
Image Sizing
Without a tick at Resize to Fit:, photos are exported at full size. Tick it and choose how:
| Option | What you enter |
|---|---|
| Width & Height | A box (W and H); the photo fits inside it, keeping its shape. |
| Dimensions | Like Width & Height, but turned to match the photo: portrait and landscape photos both fit. |
| Long Edge / Short Edge | The length of the longer or shorter side. |
| Megapixels | The total number of pixels, in millions. |
| Percentage | A percentage of the full size. |
Sizes can be in pixels, in or cm. Don't Enlarge leaves photos that are already smaller alone. Resolution (pixels per inch or per cm) is stored in the file for printing, and is used to work out inches and centimetres.
Output Sharpening
Resizing and printing make a photo look a little soft. Tick Sharpen For: and choose Screen, Matte Paper or Glossy Paper, with an Amount: of Low, Standard or High. This comes on top of the sharpening in the Detail panel.
Metadata
- Include — All Metadata (camera, lens, exposure settings and date), Copyright Only, or None.
- Creator and Copyright — your name and a copyright line, written into the file.
The location where the photo was taken (GPS) is never written into exported files.
Watermarking
SnazzyFoto never puts its own watermark on your photos. If you want one, tick Watermark: and type your text, for example "© Your Name". Then set its Size and Opacity (in %), the Position (click one of the nine squares), the Inset from the edge, and its colour.
Post-Processing
After Export:
- Do nothing.
- Show in Explorer — opens the folder with the new files.
- Open in SnazzyFoto Photo Editor — opens the (first) exported file in the Photo Editor.
- Open in Other Application… — click Choose… to pick a program; the exported files open in it.
During the export
A window shows which photo is being exported (3 of 12: beach.jpg). Each photo is rendered at full size with all its Develop settings, so a large series takes a while. Cancel stops after the current photo.
When it is done, a message says how many photos were exported (and skipped). If some could not be exported, a window lists them with the reason.
Export with Previous
Already happy with your settings? Export › Export with Previous in the right-click menu, or Ctrl + Alt + Shift + E, exports straight away with the settings you used last, without the dialog.
Free version: up to 2048 pixels
In the free version, every export is at most 2048 pixels on its long edge. A photo of 6000 × 4000 pixels, for example, is saved at 2048 × 1365. Smaller photos are not changed, and there is never a watermark. Supporters export at full size. Supporter See Free and Supporter.
2048 pixels is plenty for social media, websites and phone screens. The Web (2048 px, sharpened) preset is made for exactly that.
Questions
Where did my exported photos go?
Into the folder in Export Location (and its subfolder, if ticked). Set After Export to Show in Explorer to have the folder open by itself next time.
Can I export a 16-bit TIFF?
No: exports are 8 bits per colour, in sRGB. The 16-bit TIFFs that Photo Merge creates are kept as they are.
Can I export from the Photo Editor instead?
Yes, the Photo Editor has its own export for layered work. To take a Develop photo there, use ↗ Send to… ▾ › Photo Editor (Ctrl + E); see Send to the Photo Editor.