
The Develop panels
Every slider explained: Basic (profile, white balance, tone, presence), Tone Curve, Color Mixer and Point Color, Color Grading, Detail and Effects, plus crop and straighten, spot removal and red eye.
The panels on the right of Develop hold the sliders that change light and colour, and the tool strip above them has the tools for cropping, removing spots and fixing red eyes. This page explains each of them, from top to bottom.
How the sliders work
- Click a panel's title to open or close it. SnazzyFoto remembers which panels you keep open.
- Drag a slider and watch the photo.
- Type a value in the box next to it and press Enter. In the box, ↑ and ↓ change the value step by step (with Shift: ten steps).
- Double-click a slider or its name to put it back to its starting value.
- With the keyboard: , and . pick the previous or next slider in the Basic panel, + and − move it (with Shift: bigger steps).
The Basic panel
Most photos need nothing more than this panel. Work from top to bottom.
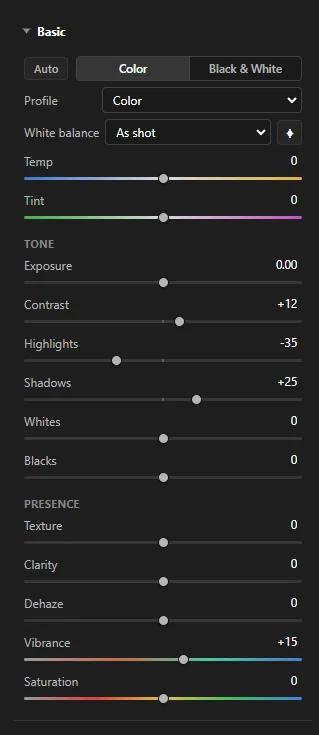 123456
- 1 Auto — sets the tone sliders for you (Ctrl + U). A good start; adjust from there.
- 2 Color / Black & White — turns the photo into black and white, and back (V).
- 3 Profile — the starting look the other sliders build on.
- 4 White balance — the colour of the light.
- 5 Tone — brightness and contrast.
- 6 Presence — detail, haze and colour strength.
Profile
| Profile | What it gives you |
|---|---|
| Color | The normal look. Start here. |
| Neutral | Flatter and softer, with less contrast: room to build your own look. For a RAW file it also leaves out the camera's own tone curve. |
| Vivid | More contrast and richer colour. |
| Monochrome | Black and white. |
When a creative LUT is in use, a Creative LUT line appears below the profile, with its Amount and a ✕ to remove it. See Presets and LUTs.
White balance
White balance makes white things look white. A photo taken under lamps often looks too orange, one in shade too blue.
- As shot — the colours as the camera saw them.
- Auto — SnazzyFoto evens out the colours (Ctrl + Shift + U).
- The picker ⌖ (W) — click it, then click something in the photo that should be grey or white, like a wall or a shirt. The colours are corrected around it. Esc cancels.
- Temp — drag left for cooler (bluer), right for warmer (more yellow).
- Tint — drag left for greener, right for more magenta.
As soon as you move Temp or Tint yourself, the setting changes to Custom.
Tone
| Slider | What it changes |
|---|---|
| Exposure | The overall brightness, in camera stops (+1 is twice as bright). |
| Contrast | The difference between dark and bright parts. |
| Highlights | The bright areas only. Drag left to bring back detail in a bright sky. |
| Shadows | The dark areas only. Drag right to see into the shadows. |
| Whites | Where pure white starts. Raise until the brightest spots just reach white. |
| Blacks | Where pure black starts. Lower for deeper blacks and more punch. |
Presence
| Slider | What it changes |
|---|---|
| Texture | Fine detail like skin, fabric or leaves. Lower it to soften skin. |
| Clarity | Contrast in the mid-tones: more "bite". A little goes a long way. |
| Dehaze | Cuts through haze and mist. Negative values add a soft, hazy look. |
| Vibrance | Makes dull colours stronger, but leaves colours that are already strong (and skin) mostly alone. |
| Saturation | Makes every colour stronger or weaker. All the way left gives black and white. |
Tone Curve
The tone curve is a finer way to shape brightness and contrast. The bottom left of the graph is black, the top right white. Lifting the line makes those tones brighter, lowering it makes them darker.
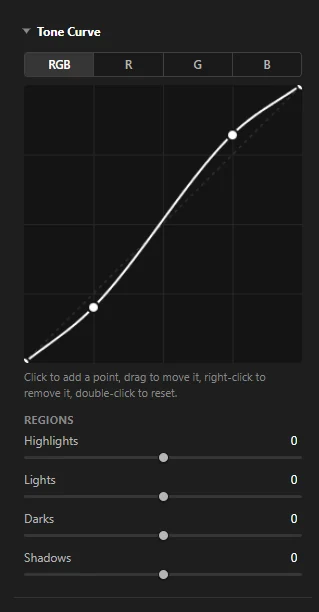 123
- 1 Channel — RGB changes brightness. R, G and B change one colour, for colour effects.
- 2 The curve — click to add a point, drag to move it, right-click a point to remove it, double-click to straighten the line again.
- 3 Regions — four sliders that bend the curve for you: Highlights, Lights, Darks and Shadows.
A gentle "S" (lower the dark part a little, raise the bright part a little) gives a photo more contrast without losing detail.
Color Mixer
The Color Mixer changes one colour at a time: make a sky deeper blue, grass less yellow, or skin a little lighter.
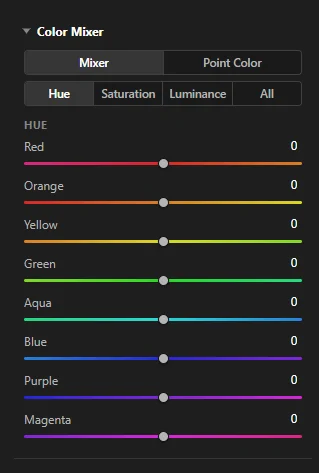 123
- 1 Mixer / Point Color — two ways of working (Point Color is below).
- 2 Hue, Saturation, Luminance or All — which sliders to show.
- 3 One slider per colour: Red, Orange, Yellow, Green, Aqua, Blue, Purple and Magenta.
- Hue shifts a colour towards its neighbours, for example green towards yellow.
- Saturation makes that colour stronger or weaker.
- Luminance makes that colour brighter or darker.
Point Color
Point Color changes exactly the colour you pick, for example one red dress, and nothing else.
- Click Point Color, then the picker ⌖.
- Click the colour in the photo. A swatch of it appears next to the picker.
- Move Hue shift, Saturation shift and Luminance shift. Only similar colours change.
- Range sets how similar a colour must be to change too. Remove this colour deletes the swatch.
You can pick up to 8 colours. Click a swatch to edit that colour again.
B&W Mix
In black and white the panel is called B&W Mix. Its sliders (Grey level per colour) decide how light or dark each original colour becomes in grey. Darken Blue for a dramatic sky; lighten Orange for brighter skin.
Color Grading
Color grading tints the dark, middle and bright parts of the photo with different colours, the way films do: cool blue shadows and warm highlights, for example.
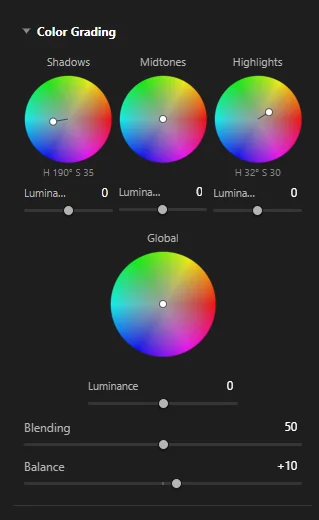 123
- 1 Shadows, Midtones and Highlights — one colour wheel each.
- 2 Global — tints the whole photo.
- 3 Blending — how much the three ranges overlap. Balance — moves the line between shadows and highlights.
- Drag in a wheel: the direction picks the colour, the distance from the centre its strength.
- Hold Shift while dragging to change only the colour and keep the strength.
- Double-click a wheel to clear it. The Luminance slider under each wheel makes that range brighter or darker.
Detail: sharpening and noise reduction
Zoom to 100 % first (Z): this is where you can see the effect.
| Slider | What it does |
|---|---|
| Sharpening — makes edges crisper. | |
| Amount | How strong the sharpening is. |
| Radius | How wide the edges are that get sharpened. Small for fine detail. |
| Detail | How much the finest textures are sharpened. |
| Masking | Keeps sharpening off smooth areas like skin or sky. Raise it to sharpen only clear edges. |
| Noise reduction — removes the grainy speckles of photos taken in low light. | |
| Luminance | Smooths grainy brightness noise. Detail and Contrast below it bring back some detail. |
| Color | Removes coloured speckles. Detail and Smoothness fine-tune it. |
For very noisy photos there is also AI Denoise at the bottom of the panel Supporter. See Camera RAW and AI Denoise.
Effects: vignette and grain
Post-crop vignetting darkens (or, to the right, lightens) the edges of the photo, to draw the eye to the middle. It follows your crop.
- Style — Highlight priority (keeps bright areas bright), Color priority (keeps colours natural) or Paint overlay (a plain dark or light frame).
- Amount — how dark or light the edges get. Midpoint — how far in it reaches. Roundness — from rectangular to round. Feather — how soft its edge is. Highlights — keeps bright spots inside a dark vignette bright.
Grain adds film-like grain: Amount, Size of the grains and Roughness.
Sky, Lens Blur, Lens Corrections, Transform and Masking
These have pages of their own: Sky Replacement (a new sky), Lens Blur and depth haze (a soft background), Lens fixes and Upright (straight lines, distortion, coloured fringes) and Masks (edit only part of a photo). A 360° photo also gets the 360° Photo panel; see 360° photos.
Crop and straighten
Click ⛶ in the tool strip under the histogram, or press R. The whole photo appears with a crop box over it.
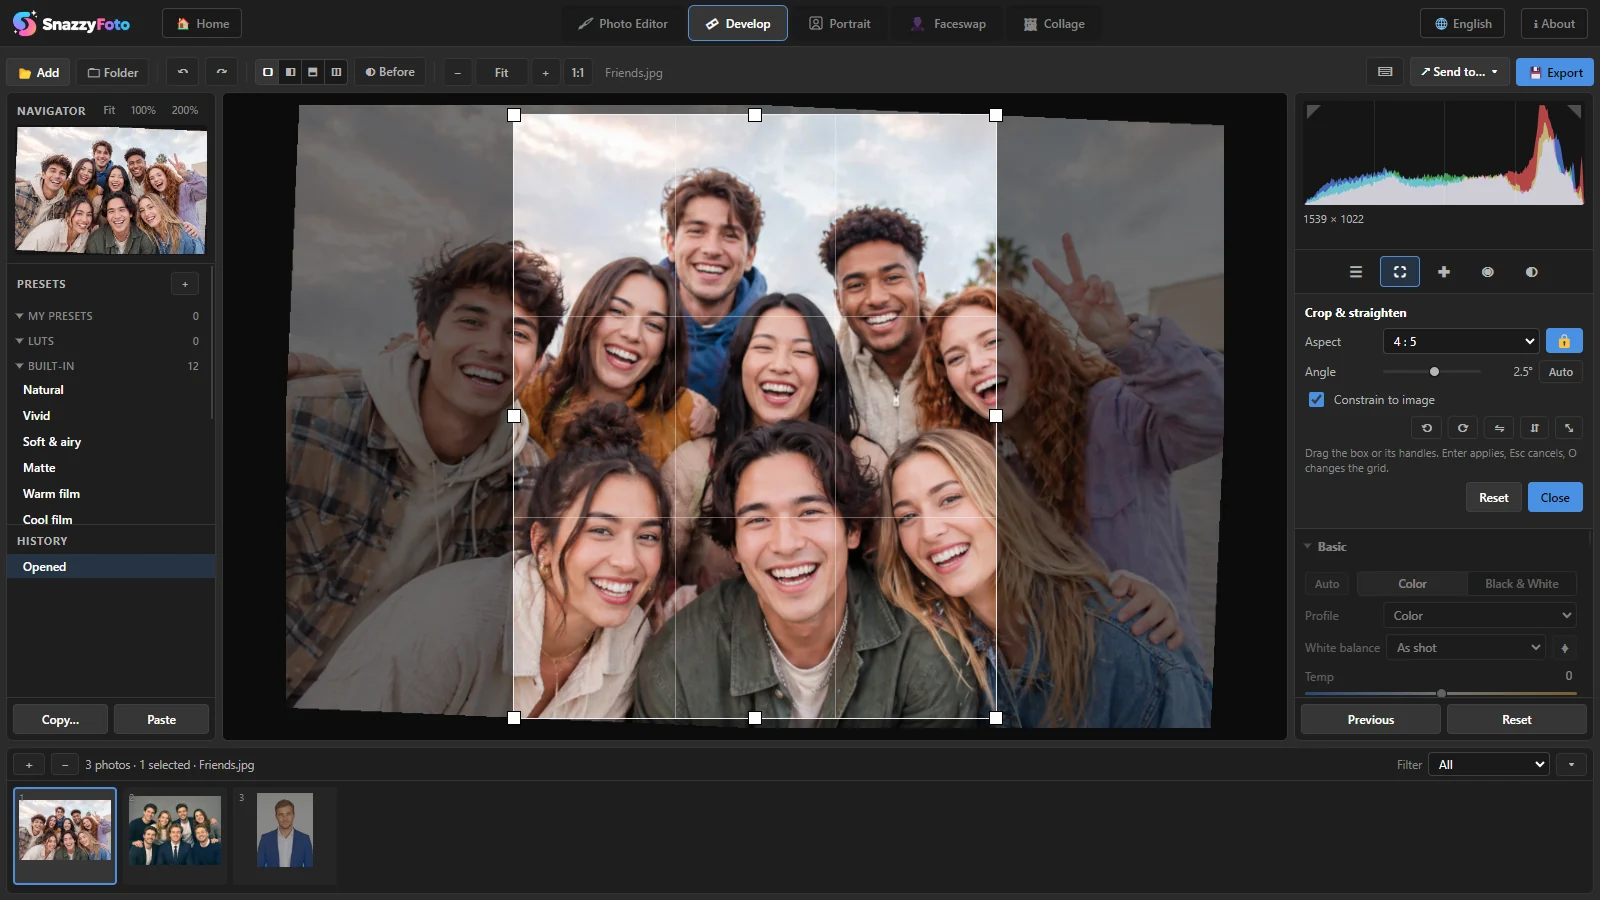 123456
- 1 The crop box — drag inside it to move it, drag a corner or edge to resize it. The lines help you place things on the thirds.
- 2 Aspect — the shape: Original, As shot / current, Free, or a ratio such as 1 : 1, 4 : 5 or 16 : 9. The 🔒 keeps the shape while you drag (A).
- 3 Angle — straightens a tilted horizon. Auto straightens from the lines in the photo.
- 4 Constrain to image — keeps empty corners out of the crop when you rotate.
- 5 Turn left, turn right, flip horizontally, flip vertically, and swap portrait / landscape (X).
- 6 Reset removes the crop and rotation; Close applies it.
Press Enter to apply the crop or Esc to cancel it. O switches the guide lines between thirds, a grid and none. Outside the crop tool, Ctrl + [ and Ctrl + ] turn the photo left and right.
Remove spots (heal and clone)
The Remove tool takes away small things: dust on the lens, a spot on the skin, a bird in the sky.
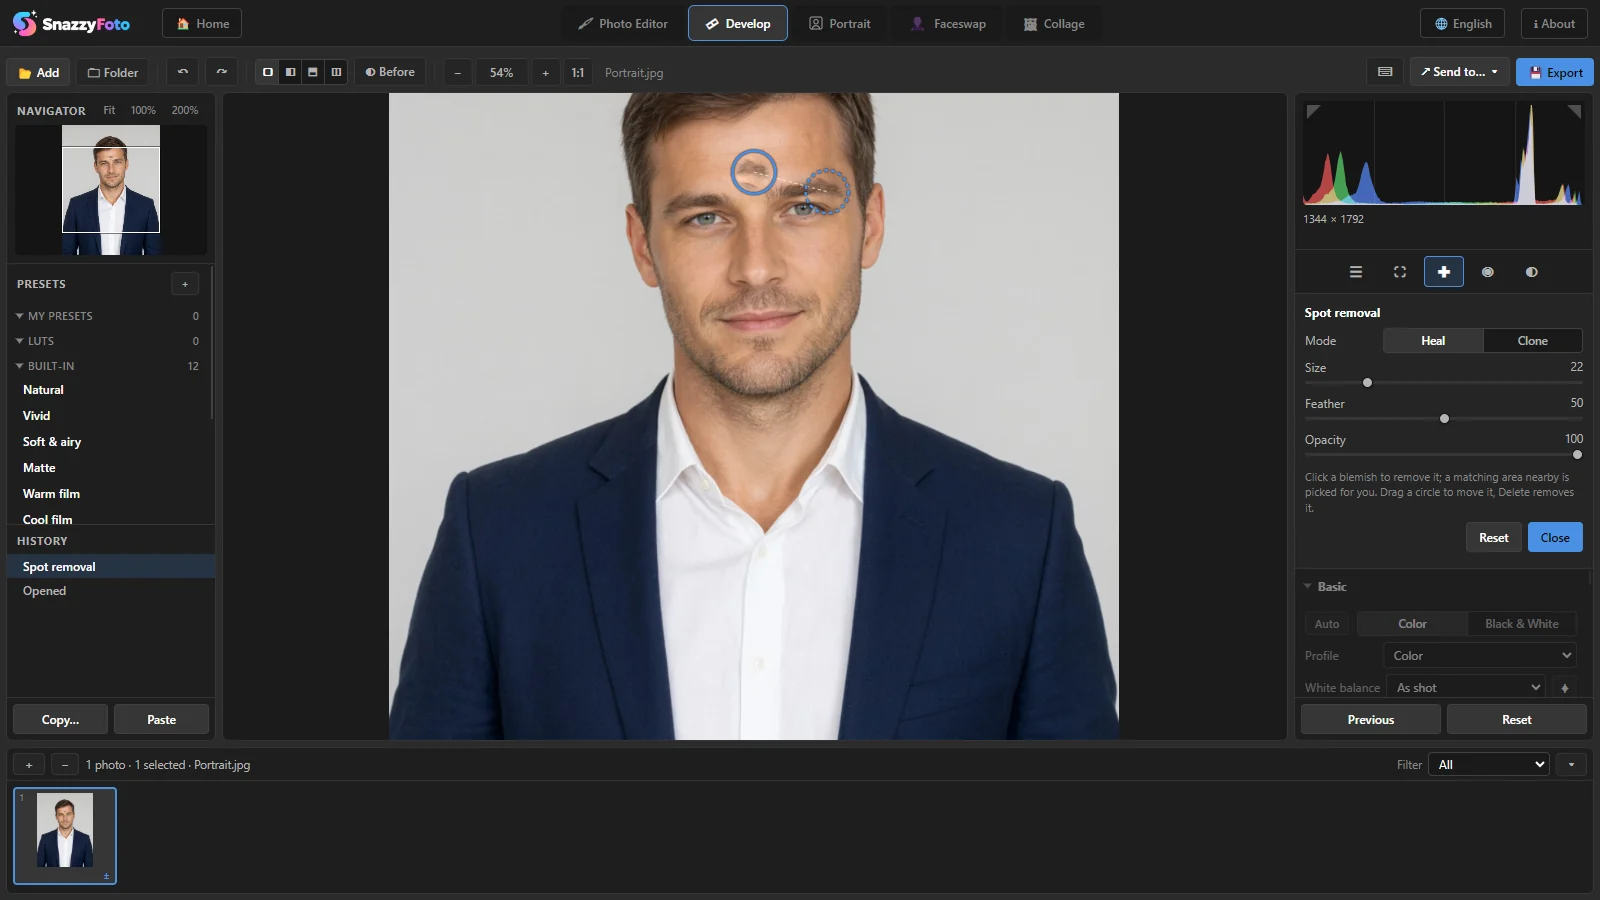 123
- Click ✚ in the tool strip, or press Q.
- Set the Size a little bigger than the spot.
- Click the spot. 1 It disappears: SnazzyFoto copies a matching area nearby over it. 2 A second circle shows where it copied from.
- If the result is not right, drag that second circle to a better area. Drag the first circle to move the whole fix.
3 In the panel:
- Heal blends the copied area with its surroundings (best for skin). Clone copies it exactly (best for patterns and edges).
- Feather softens the edge of the fix; Opacity makes it partly see-through.
- Click a circle to select that fix, then change its settings or press Delete to remove it. Reset removes all fixes.
One photo can have up to 32 fixes.
Red eye
- Click ◉ in the tool strip, or press Shift + R.
- Click the centre of each red eye.
- Adjust Pupil size and Darken. Delete removes the selected eye.
Click Close, or the tool's button again, to go back to the panels.