
Lens fixes and Upright
Correct distortion, coloured fringes and dark corners with .lcp lens profiles or by hand, and straighten buildings and horizons with Transform and Upright (Auto, Level, Vertical, Full, Guided).
Every lens bends the picture a little: straight lines curve, corners get darker, high-contrast edges get coloured fringes. And buildings photographed from below seem to fall backwards. The Lens Corrections and Transform panels fix all of this, by hand or automatically. Both are free.
The Lens Corrections panel
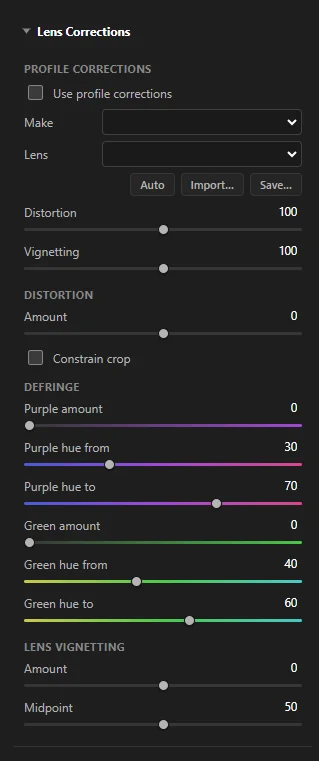 1234
- 1 Profile corrections — automatic correction from a lens profile.
- 2 Distortion — straightens curved lines by hand.
- 3 Defringe — removes purple and green edges.
- 4 Lens vignetting — brightens dark corners.
Lens profiles
A lens profile is a small file that describes exactly how one lens distorts and darkens the picture. With it, SnazzyFoto can undo both in one click. SnazzyFoto reads profiles in the common .lcp format, so it can use thousands of existing profiles.
- Open Lens Corrections and tick Use profile corrections.
- SnazzyFoto looks for the profile of your lens. If it finds it, it says Using and the lens name.
- If not (No matching profile — choose the lens yourself.), choose the Make and the Lens from the lists.
- Use the Distortion and Vignetting sliders under it to apply less (or more) than the full correction. 100 is the profile as made.
- Auto — finds the profile from the lens name stored in the photo. Camera RAW files carry it, and so do most JPEG and TIFF photos straight from the camera. If the photo has no lens information (many edited or downloaded pictures don't), choose the lens yourself.
- Import… — adds
.lcpprofile files you downloaded. - Save… — saves the current lens corrections (the profile plus your manual Distortion) as a profile of your own. Next time, choose it from the list like any other; your own profiles have a ★.
In the Lens list, a profile marked (JPEG) is made for the camera's JPEG photos, the others for RAW files. When the photo's focal length is between two entries of a zoom lens profile, SnazzyFoto blends the two.
SnazzyFoto finds the .lcp profiles that other photo software installed on this computer (for example Adobe Camera Raw), and the ones you imported or saved. Without such software the list starts empty: import .lcp files, or correct by hand. The first time you open the panel, reading thousands of profiles can take a few seconds.
Correct by hand
- Distortion › Amount — drag until lines that should be straight (a horizon, a door frame) look straight. One direction fixes lines that bulge outwards (barrel distortion, typical of wide angles), the other lines that bend inwards. Constrain crop trims the empty edges the correction leaves.
- Defringe — fringes are thin purple or green edges along high-contrast lines, such as branches against a bright sky. Raise Purple amount or Green amount until they are gone. The Purple hue from / Purple hue to and Green hue from / Green hue to sliders narrow down which shades of purple or green count as a fringe.
- Lens vignetting › Amount — drag right to brighten corners that the lens made dark (left darkens them). Midpoint sets how far towards the middle the correction reaches.
Want dark corners as an effect? Use the vignette in the Effects panel instead: it follows your crop.
The Transform panel
Transform corrects perspective: walls that lean, buildings that narrow towards the top, a photo taken slightly from the side.
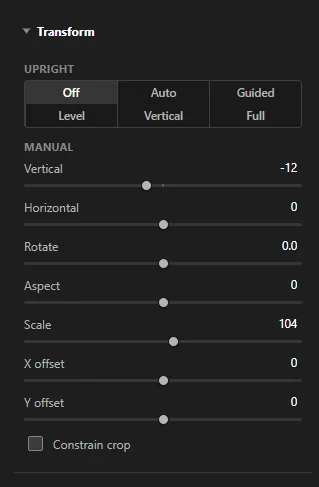 123
- 1 Upright — automatic straightening (see below).
- 2 Manual — the sliders, for fine-tuning or doing it by hand.
- 3 Constrain crop — trims the empty edges a correction leaves.
| Slider | What it does |
|---|---|
| Vertical | Tilts the photo forward or back. Drag left to widen the top: buildings stop leaning backwards. |
| Horizontal | Turns the photo left or right, for a wall photographed from the side. |
| Rotate | Turns the photo by up to 10° either way. |
| Aspect | Makes the photo narrower or wider, if a correction stretched it. |
| Scale | Zooms in or out (50–150 %), for example to bring back an edge that a correction pushed out. |
| X offset / Y offset | Moves the photo sideways or up and down in the frame. |
Upright: straighten automatically
Upright finds the straight lines in the photo (Finding lines…) and sets Vertical, Horizontal and Rotate for you. Click one of its buttons:
| Button | What it straightens |
|---|---|
| Off | Nothing. Clicking it removes an Upright correction. |
| Auto | A balanced correction that avoids big changes. Try this first. |
| Guided | The lines you draw yourself (see below). |
| Level | Only the rotation, so horizontal lines become level. |
| Vertical | The rotation, and vertical lines become truly vertical. |
| Full | Rotation, vertical and horizontal perspective, all at once. Strongest. |
The sliders then show what Upright chose; you can still change them. If the photo has no clear straight lines, SnazzyFoto says No clear lines found in this photo. Try Guided.
Upright only looks at lines that are already close to vertical or level (within 20°), and in every mode (Auto, Level, Vertical and Full) it corrects the perspective only when long straight lines on both sides of the photo agree. A photo of people, without such lines, is left as it is. When part of a correction is left out this way, SnazzyFoto says The lines in this photo don't agree on a correction, so part of it was left out.
Guided Upright
With Guided Upright you show SnazzyFoto which lines should be straight. It works when the automatic modes pick the wrong lines.
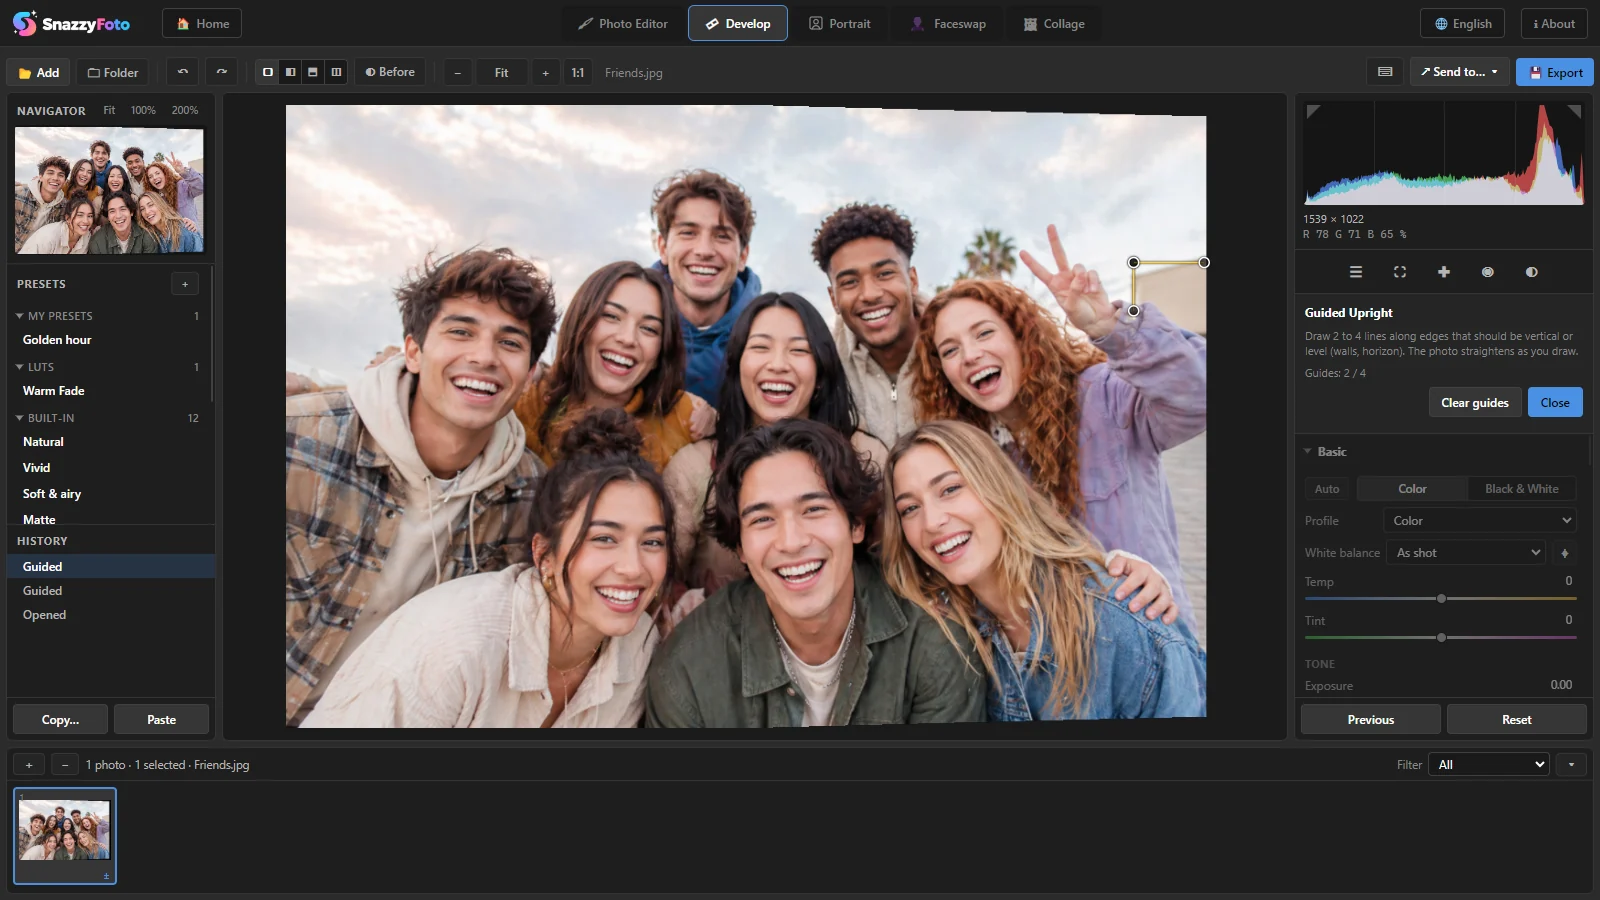 12
- Click Guided in the Transform panel, or press Shift + T. The Guided Upright panel opens in place of the panels, and shows how many guides you have drawn.
- 1 Drag along an edge that should be vertical or level, such as a wall, a door frame or the horizon.
- Draw a second line. The photo straightens as soon as there are two. Add up to four.
- 2 The panel counts your guides. Drag the end of a line to adjust it. Clear guides starts again; Close goes back to the panels.
Two vertical lines straighten the verticals; add a horizontal line to straighten the sides too.
Guided follows your lines as far as Upright's limits allow. If they can't all be met, SnazzyFoto says These guides need more correction than Upright can apply; check that they follow straight lines. Move the ends of the guides onto real straight edges, or start again with Clear guides.
Questions
The Make list is empty.
No lens profiles were found on this computer. Download the .lcp profile for your lens and click Import…, or correct with the sliders under Distortion and Lens vignetting.
After a correction there are empty edges.
Tick Constrain crop in Lens Corrections or Transform. Or raise Scale, or crop the photo yourself (R).