
Camera RAW and AI Denoise
Open camera RAW files with the camera's own look, and remove noise from low-light photos with AI Denoise. Both are Supporter features.
Camera RAW files hold everything the camera's sensor recorded, so you can rescue a bright sky or a dark corner far better than in a JPEG. AI Denoise cleans up grainy photos taken in low light while keeping the detail. Both are Supporter features.
Camera RAW Supporter
A RAW file is the unprocessed picture from the camera's sensor, before the camera turns it into a JPEG. It has more detail in the brightest and darkest parts and lets you set the white balance freely. Most cameras and many phones can save RAW files.
SnazzyFoto opens the RAW formats of almost every camera, for example:
| Make | File types |
|---|---|
| Sony | ARW, SRF, SR2 |
| Canon | CR3, CR2, CRW |
| Nikon | NEF, NRW |
| Panasonic Lumix | RW2 |
| Fujifilm | RAF |
| Olympus / OM System | ORF |
| Pentax | PEF |
| Leica | RWL, DNG |
| Phones and others | DNG, and the RAW formats of Samsung, Sigma, Hasselblad, Phase One and more |
Open a RAW file
Open it like any photo (see Open photos in Develop). A RAW file always opens in Develop, even when you open it from the Photo Editor or the Home screen.
- First, Reading the RAW file…: within a second you see the camera's own preview, so you can already look at the photo.
- Then Decoding RAW data (full quality)…: after a few seconds the full-quality picture replaces the preview.
- Edit as usual. While you work, SnazzyFoto already prepares the next RAW photo in the filmstrip, so moving on is quicker.
The camera's look
An untouched RAW file opens looking like the picture your camera showed you: SnazzyFoto matches its brightness, colours and contrast to the preview stored in the file. You start from a familiar picture, not from a flat, grey one.
- Want a flatter starting point, with more room in the highlights and shadows? Set Profile to Neutral in the Basic panel: it leaves out the camera's tone curve.
- RAW files start with a little sharpening (Amount 40) and colour noise reduction (Color 25) in the Detail panel, as camera RAW photos need them.
- As shot white balance is the camera's setting. Temp and Tint move from there.
In the free version
RAW photos still appear in the filmstrip (with "RAW" instead of a thumbnail), but opening one shows a window about Supporter features. A one-off donation unlocks RAW files on your computer; see Free and Supporter.
Without it you can still edit TIFF and JPEG files in Develop. Most cameras come with software that converts RAW files to TIFF.
AI Denoise Supporter
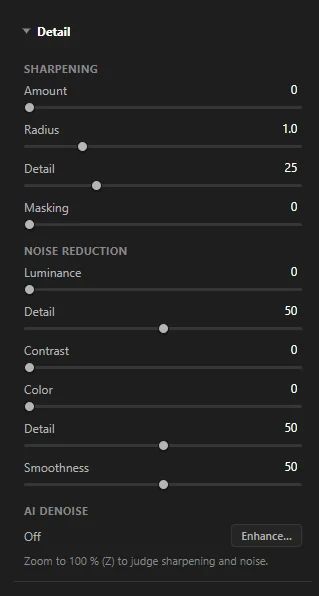
Photos taken in low light or at a high ISO are grainy: they show "noise", fine speckles of brightness and colour. The normal noise reduction in the Detail panel smooths the noise away but also some of the detail. AI Denoise uses a neural network, trained to tell noise from detail, that runs on your computer.
 123
- 1 Sharpening — see Detail.
- 2 Noise reduction — the normal sliders.
- 3 AI Denoise — shows Off or On (amount …), with the Enhance… button.
Use AI Denoise
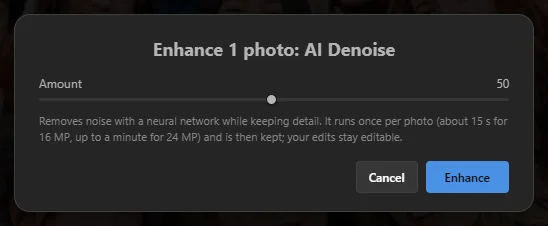
- Click Enhance… in the Detail panel, or right-click the photo and choose Enhance… (AI Denoise), or press Ctrl + Alt + I.
- Set the Amount (1–100). 50 suits most photos; use more for very grainy ones.
- Click Enhance. SnazzyFoto shows Applying AI Denoise… and then the cleaned-up photo.
 12
It takes a while the first time: about 15 seconds for a 16-megapixel photo, up to a minute for 24 megapixels. The result is kept, so opening the photo again later is quick. SnazzyFoto keeps up to 5 GB of these results; when there are more, the oldest are removed and are made again (taking the same time) the next time you open that photo. All your other edits stay editable, and exports use the cleaned-up photo.
- Several photos — select them in the filmstrip first (Ctrl-click). The dialog says how many, and they are done one after the other.
- Another amount — open the dialog again, set a new Amount and click Enhance.
- Undo it — open the dialog and click Remove, or press Ctrl + Z.
AI Denoise works on RAW files and on ordinary photos such as JPEGs.
After AI Denoise you rarely need the normal Luminance noise reduction. Leave it low and check the result at 100 % (Z).
Questions
My RAW file takes long to open.
The full-quality decode takes a few seconds, more for very large files. You can look at the camera preview in the meantime. SnazzyFoto keeps the five most recently decoded files ready, so going back to one of them is quick.
"Couldn't read this RAW file."
The file may be damaged, or come from a camera too new for SnazzyFoto. Try converting it to DNG with a free DNG converter, then open the DNG.
Does AI Denoise copy to other photos with Copy and Sync?
Only when you tick AI Denoise in the Copy settings or Synchronize dialog; it is not ticked by default. See Edit many photos at once.