
Photo albums for print
Design a photo album in Collage › Album: page size, spreads and cover, bleed and safe area, Auto layout, layouts and photo frames, text and shapes, then export a print-ready PDF, JPEG or TIFF for the lab.
Collage › Album designs a whole photo album for print: a cover, pages or spreads, photos in frames, titles and shapes. Auto layout fills the album for you, and the export makes the files a printing house or photo book lab asks for. Designing albums is free; print-ready CMYK files are a Supporter feature.
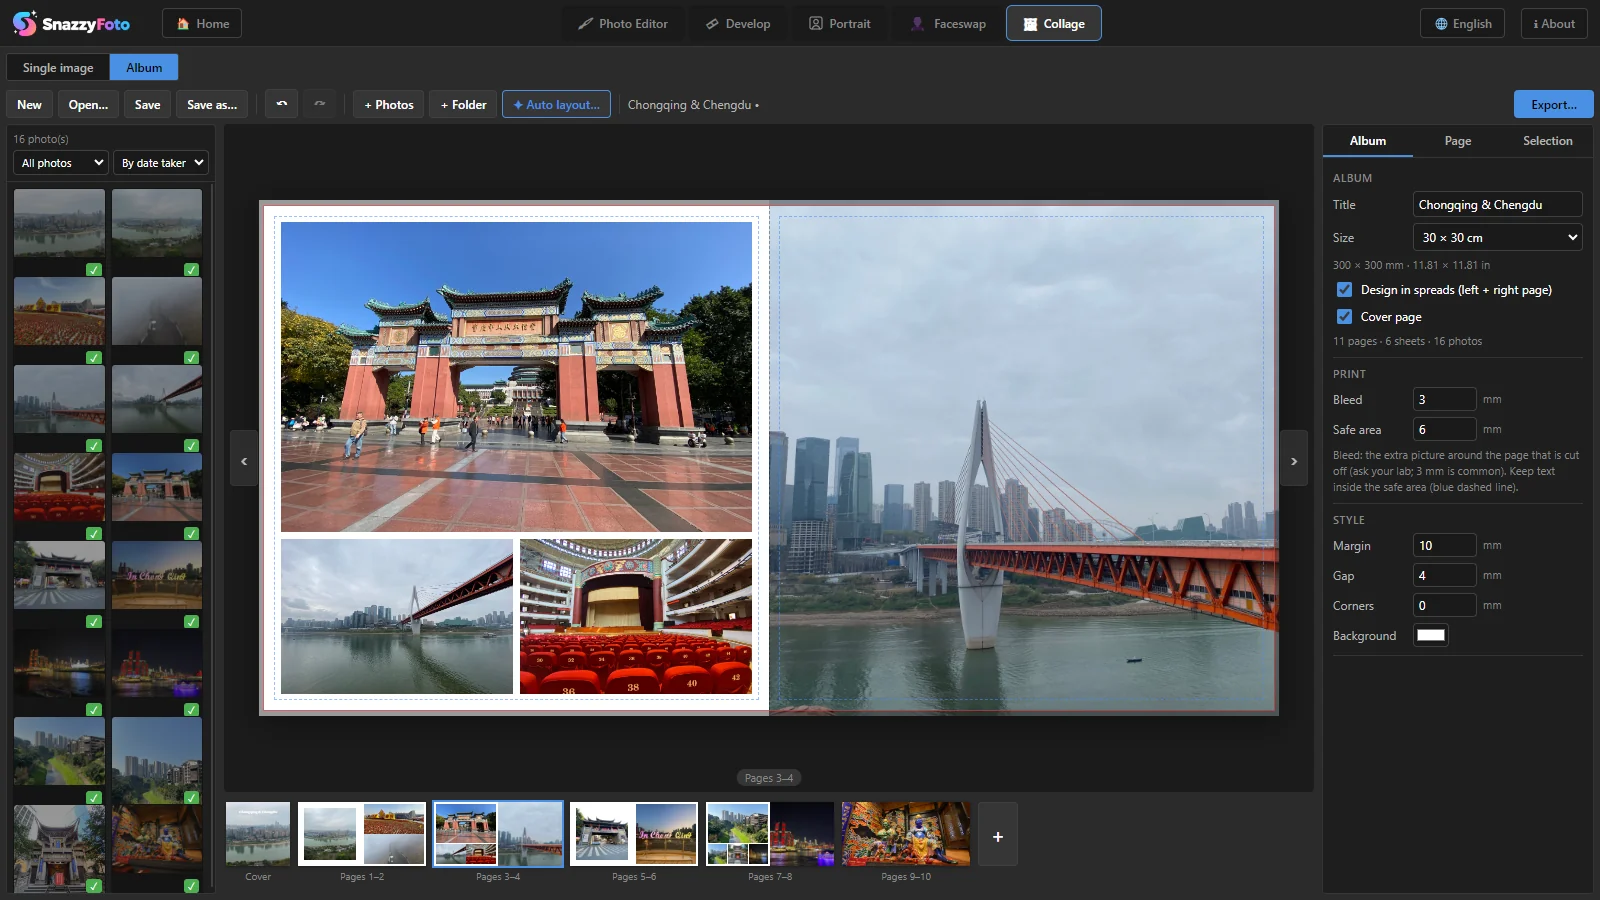 123456
- 1 Single image | Album — switches Collage between the one-picture collage and the album.
- 2 The toolbar: New, Open…, Save, Save as…, undo and redo, + Photos, + Folder, ✦ Auto layout…, the album's name and Export….
- 3 The photos of the album. A ✓ marks the ones already placed on a page.
- 4 The open page or spread, with the bleed, the safe area and the fold in the middle.
- 5 All pages in a strip. Click one to open it, + adds one at the end.
- 6 The settings, in three tabs: Album, Page and Selection.
Open the album editor
Click the Collage tab at the top, then Album in the bar above the collage. Or click Photo album on the Home screen. SnazzyFoto remembers which of the two you used last.
An album here is a row of sheets. A sheet is what you design as one piece:
- a page, when the album is designed page by page;
- a spread — the left and right page you see side by side when the album lies open. Photos can run across both pages;
- the cover, an optional single page at the front.
A new album starts at 30 × 30 cm, in spreads, with a cover. You can change all of that on the Album tab.
Size, spreads and print settings
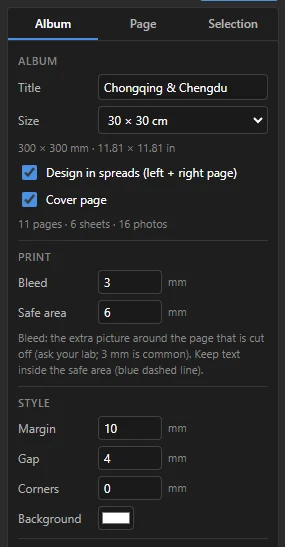 12345
- 1 Size — the size of one page after cutting: square (20 × 20 cm, 25 × 25 cm, 30 × 30 cm, 8, 10 or 12 inches), landscape (30 × 20 cm landscape, A4 landscape, A3 landscape…), portrait (20 × 30 cm portrait, A4 portrait) or Custom… with your own width and height in millimetres. The line below shows the size in mm and inches. Use the size your lab sells.
- 2 Design in spreads (left + right page) — on: you design two pages at a time. Off: page by page.
- 3 Cover page — adds a cover as the first sheet. The line below counts the pages, sheets and photos.
- 4 Print:
- Bleed — extra picture around each page that the printer cuts off. Pages are never cut exactly on the line, so a photo that should reach the edge must go a little beyond it. Photos that touch the edge reach into the bleed by themselves. 3 mm is common, but ask your lab. On the page, the bleed is the dimmed band outside the page edge.
- Safe area — the blue dashed line on the page. Keep text and important details inside it, so nothing is cut off or lost in the fold.
- 5 Style for all pages: Margin (the space around the photos), Gap (between photos), Corners (round corners; 0 = square) and Background (the paper colour). All in millimetres.
The Title at the top is the album's name; it is also suggested as the file name when you export.
Add your photos
- + Photos picks single photos, + Folder adds every photo of a folder. You can also drop files from your file manager onto Collage.
- The list is sorted By date taken (or By file name), so the story stays in order.
- Choose Not used yet instead of All photos to see only photos that are not on a page yet.
- A ✓ on a photo means it is on a page; ✓2 means it is used twice.
- Right-click a photo for Place in the selected frame, Edit in Develop, Edit in Photo Editor, Show in folder and Remove from the album (only for unused photos). Double-clicking a photo also places it in the selected or first empty frame.
The album links to your photo files where they are; it does not copy them. Don't move or rename them while you work on the album.
Auto layout
With the photos in the list, click ✦ Auto layout…. It spreads the photos over the pages and, for every page, picks a layout whose frames suit the photos' shapes — upright photos get upright frames, wide ones wide frames. The cover gets a photo of its own shape.
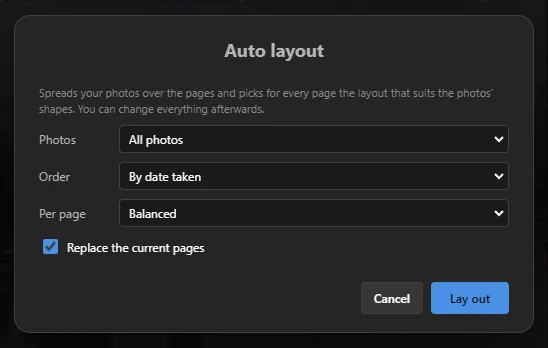 1234
- 1 Photos — All photos, or Only photos not used yet (to fill new pages with what is left).
- 2 Order — By date taken, By file name or As in the list.
- 3 Per page — Few, large photos, Balanced or Many photos.
- 4 Replace the current pages — on: the album is laid out from scratch. Off: the new pages are added after the existing ones, and the cover stays.
Click Lay out. Everything stays editable: change layouts, swap photos, add text. Not happy? Undo with Ctrl + Z and run it again — each run mixes the layouts a little differently.
Layouts and photo frames
Open the Page tab to choose the layout of the open page or spread.
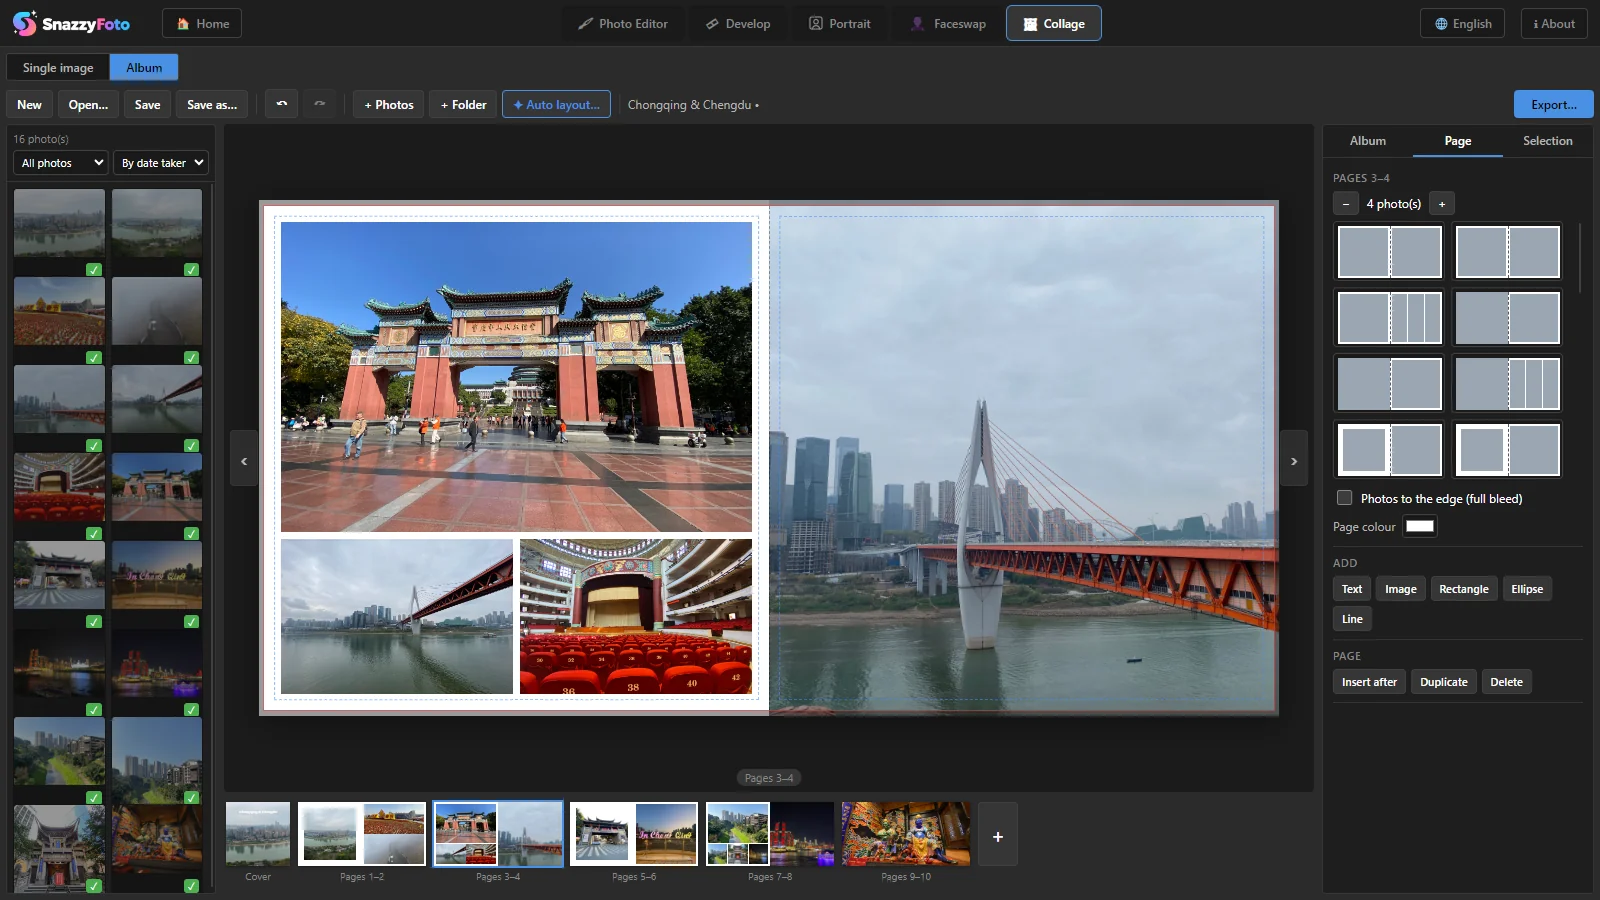 12345
- 1 − / + — how many photos this page or spread holds.
- 2 The layouts for that number of photos. Click one to use it; the photos stay in their frames where they can. On a spread, some layouts run a photo across both pages, others give each page its own grid.
- 3 Photos to the edge (full bleed) — no margin: the photos run off the page edges. Page colour gives this page its own background (Use the album's goes back).
- 4 Add — Text, Image, Rectangle, Ellipse and Line (see Text, images and shapes).
- 5 Page — Insert after, Duplicate and Delete for the open page.
Put photos in the frames
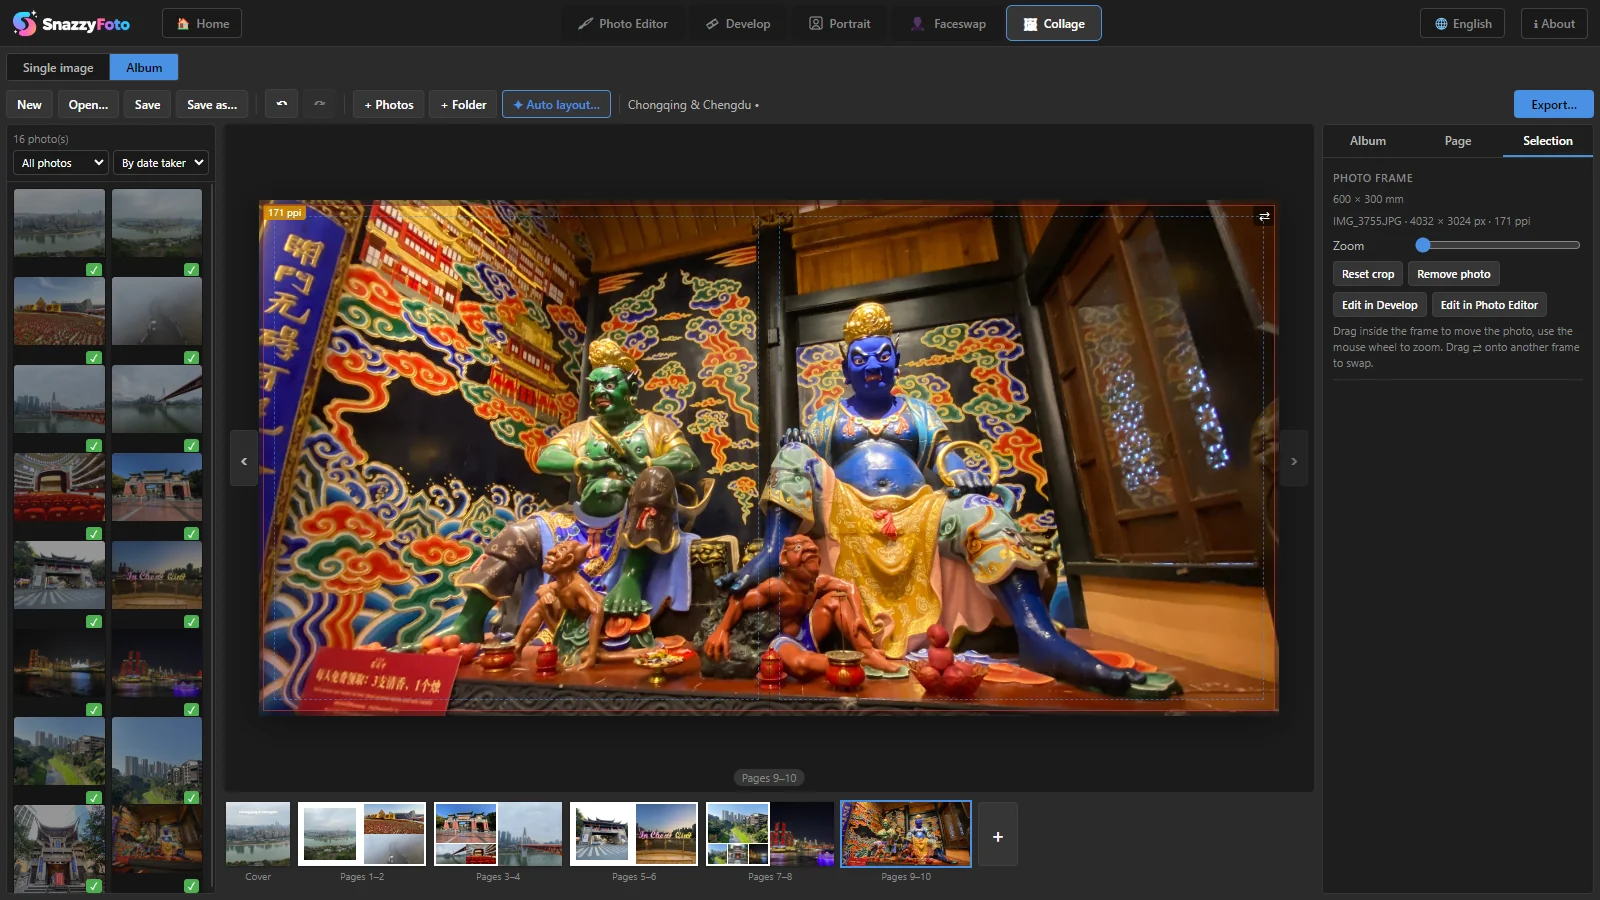 12345
- 1 A frame. Drag a photo from the list onto it. An empty frame says Drop a photo here; double-click it to choose a file. A photo dropped on the page outside the frames becomes a free image.
- 2 ⇄ — appears when you point at a frame. Drag it onto another frame to swap the two photos.
- 3 The ppi badge. ppi (pixels per inch) says how sharp the photo will print at the size of its frame. 300 ppi is ideal; below 200 ppi the badge turns amber (it may look a little soft), below 150 ppi red (it will look soft). Make the frame smaller, zoom out, or use a larger photo.
- 4 Zoom, Reset crop and Remove photo. The line above shows the frame's size in mm, the photo's pixels and its ppi.
- 5 Edit in Develop and Edit in Photo Editor (see below).
A photo always fills its frame. To choose the part that shows, click the frame once to select it, then drag inside it to move the photo and turn the mouse wheel to zoom in or out. Right-click a frame for the same commands and Show in folder.
Text, images and shapes
Elements lie on top of the photo frames and can go anywhere on the page. Add them on the Page tab under Add: Text, Image (a picture you choose, for example a logo), Rectangle, Ellipse or Line.
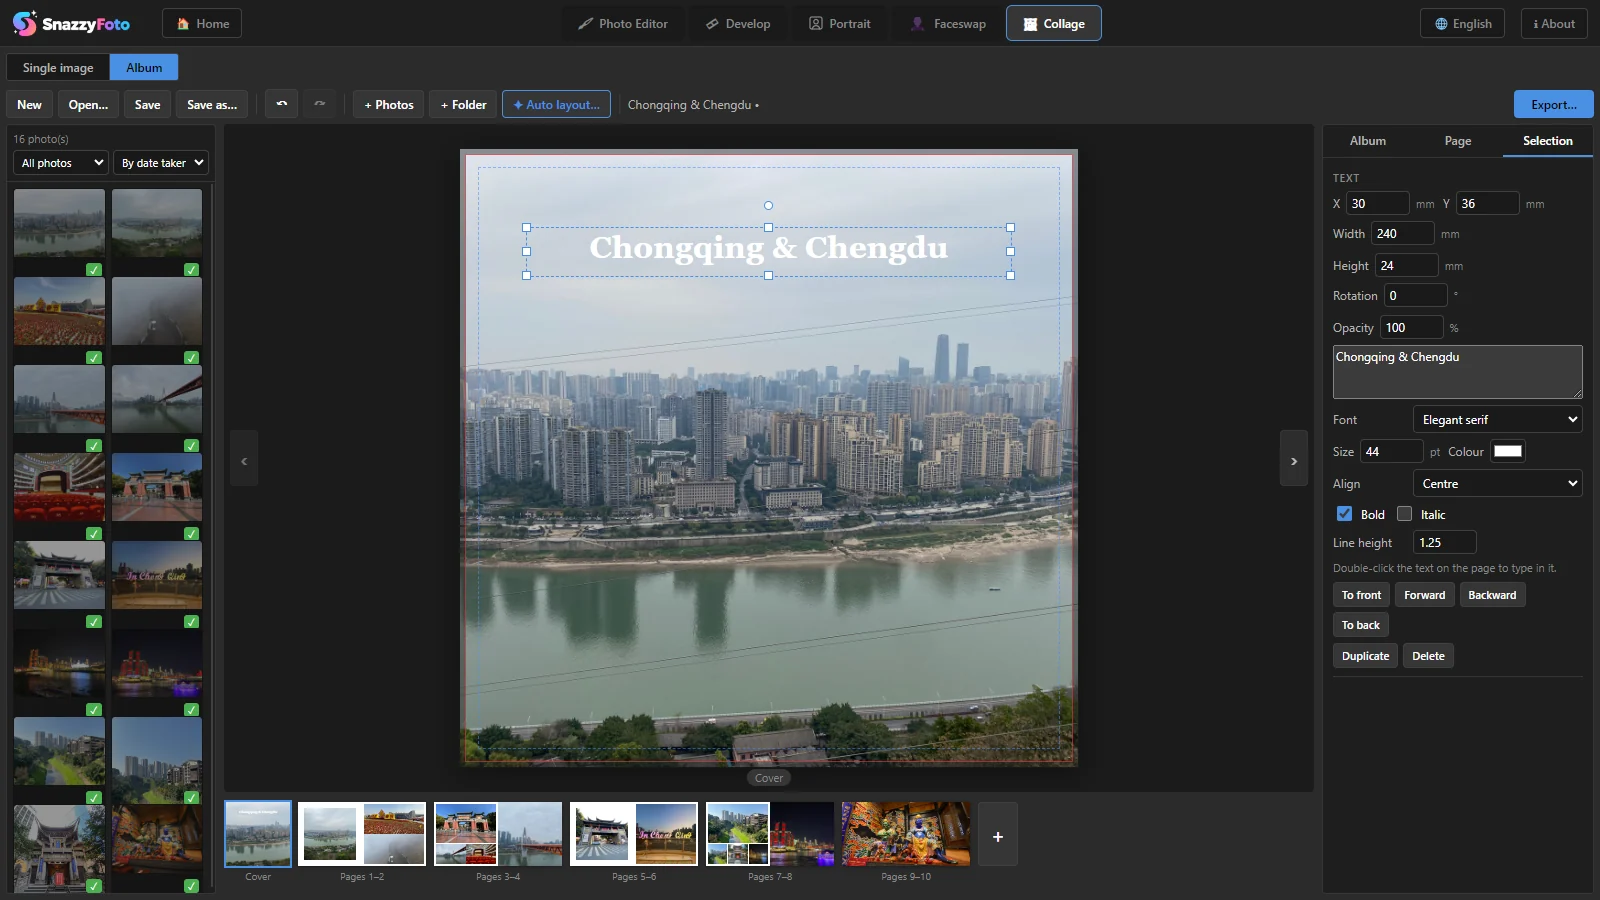 12345
- 1 Move and resize — drag the element to move it (hold Shift to keep it in line); drag a square handle to change its size. The arrow keys move it by 1 mm, with Shift by 5 mm.
- 2 Rotate — drag the round handle above it. Hold Shift to turn in 15° steps.
- 3 The text — type it in this box, or double-click the text on the page and type there.
- 4 Font (Elegant serif, Classic, Modern, Light, Condensed, Script, Typewriter), Size in points, Colour, Align, Bold, Italic and Line height.
- 5 Arrange — To front, Forward, Backward, To back; then Duplicate (Ctrl + D) and Delete (Delete).
Every element also has X, Y, Width, Height (mm), Rotation and Opacity. Shapes have a Fill and an Outline with its Line width (tick None for no fill or no outline); an image can show the Whole picture or Fill the box.
Keep titles inside the blue dashed safe area, and away from the fold in the middle of a spread.
Pages
- Open a page — click it in the strip at the bottom, use the ‹ › arrows beside the page, or press PageUp / PageDown.
- Change the order — drag a page in the strip to another place. The cover always stays first.
- Insert, duplicate, delete — right-click a page in the strip, or use the buttons under Page on the Page tab. + at the end of the strip adds an empty page or spread.
- Undo — Ctrl + Z undoes, Ctrl + Y redoes (also the ↶ ↷ buttons).
Together with Develop and the Photo Editor
- From Develop — select photos in the filmstrip, right-click and choose Add to album. They are added with their Develop settings applied (as full-size JPEGs in the album's folder), and the album remembers the original, so your Develop edits stay editable.
- Edit a photo that is already in the album — select its frame and click Edit in Develop or Edit in Photo Editor. The photo opens there. When you are done, click ↩ Update the photo in the album in the bottom-right corner: the edited version replaces the photo in that frame, and you are back in the album.
- From Develop, Portrait, Faceswap and Collage — ↗ Send to… › Album adds the current picture to the album and places it in the first empty frame of the open page (with no empty frame, it just joins the photo list). In the Photo Editor it is Image › Send to › Album. See Send a picture to another module.
Save the album
Click Save (Ctrl + S) or Save as… (Ctrl + Shift + S) to save the album as a .snazzyalbum file. Open… opens one again; you can also drop a .snazzyalbum file onto Collage. New starts an empty album with the same size.
Next to the album file, SnazzyFoto makes a folder called name files. It holds the pictures that came from Develop, the Photo Editor or Send to. Keep this folder with the album file — copy or move them together. Your own photos stay where they are; if one is moved or deleted, the album tells you how many it could not find.
SnazzyFoto also saves the open album by itself after every change, so it is still there when you open SnazzyFoto again — even if you never clicked Save. A • after the album's name means there are changes not yet saved to the file.
Export for print
Click Export….
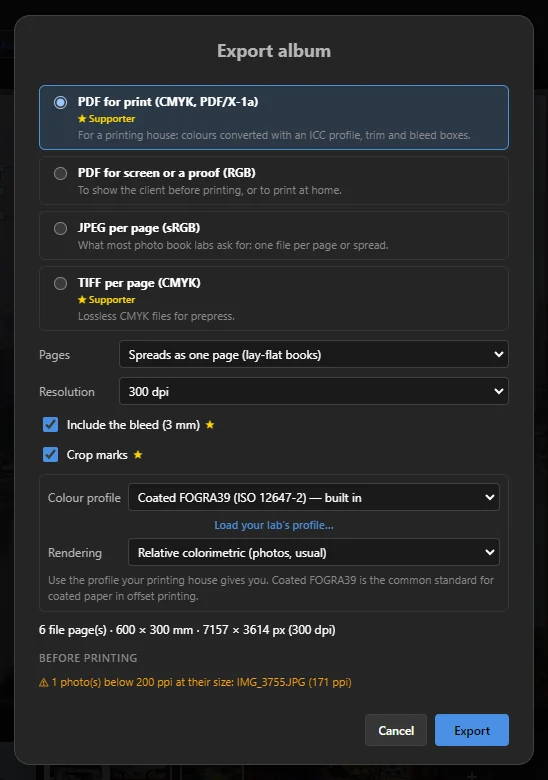 123456
- 1 The format:
Format Use it for PDF for print (CMYK, PDF/X-1a) Supporter A printing house (offset or a professional press). The colours are converted to CMYK with a colour profile, and the PDF carries the page size and bleed in the way print software expects. PDF for screen or a proof (RGB) A proof to show the client before printing, or printing at home. JPEG per page (sRGB) What most photo book labs ask for: one image file per page or spread, which you upload to their website. TIFF per page (CMYK) Supporter Prepress: CMYK files without lossy compression, for a printer who wants images instead of a PDF. - 2 Pages (only for an album in spreads) — Spreads as one page (lay-flat books) makes one wide file per spread; Single pages makes a file for every page. Ask your lab which one it wants — lay-flat albums usually take spreads.
- 3 Resolution — 300 dpi is the usual print quality; 240, 200 or 150 dpi make smaller files.
- 4 Include the bleed (3 mm) and Crop marks (PDF only; thin lines in the corners that show where to cut). Both Supporter. Leave crop marks off unless the printer asks for them.
- 5 Colour (for the CMYK formats):
- Colour profile — describes the printer's paper and inks. Coated FOGRA39 is built in and is the common standard for coated paper in offset printing. If your printing house gives you its own profile (an
.iccor.icmfile), click Load your lab's profile…. CMYK profiles installed on your computer are in the list too, marked installed. - Rendering — how colours the paper cannot show are handled. Relative colorimetric (photos, usual) keeps all other colours exact and is right for most photos. Perceptual (very saturated colours) shifts all colours a little to keep detail in very bright, saturated areas, such as neon lights or flowers.
- Colour profile — describes the printer's paper and inks. Coated FOGRA39 is built in and is the common standard for coated paper in offset printing. If your printing house gives you its own profile (an
- 6 Before printing — the checks: empty frames (they print as background), photos below 200 ppi at their size (with their names), photos that cannot be found, and text that is outside the safe area. With nothing to fix it says Every frame has a photo with enough resolution.
Click Export and choose the PDF's name, or a folder for the JPEG or TIFF files (00-cover, spread-01… or page-001…). When it is done, the folder with the new files opens.
Working with a print lab
- Ask the lab before you start: the page size, the bleed, the file format (PDF or JPEG; spreads or single pages), the resolution and the colour profile they want. Set up the album to match.
- Check the Before printing list and fix amber or red ppi badges.
- Send the client a proof first: PDF for screen or a proof (RGB). Make their changes.
- Export the final files in the lab's format, and keep the
.snazzyalbumwith its files folder for reprints.
Free and Supporter
| Free | Supporter | |
|---|---|---|
| The whole album editor: sizes, spreads, cover, Auto layout, layouts, text and shapes, saving | ✓ | ✓ |
| PDF for screen (RGB) and JPEG per page | Up to 2048 px on the long side | Print resolution (150–300 dpi) |
| PDF for print (CMYK, PDF/X-1a) and TIFF (CMYK) | — | ✓ |
| Bleed and crop marks in the export | — | ✓ |
In the free version the toolbar shows Free version: pages up to 2048 px, RGB. That is fine for a proof or for sharing online, but too small for print. Choosing a Supporter format or option opens the Supporter feature window. See Free and Supporter.