
Selections
Select part of a picture with the marquee, lasso and magic wand tools, add and subtract, use the Select menu (Color Range, Inverse, Modify, Feather), and fill, stroke, copy, crop or mask what you selected.
A selection marks the part of the picture you want to work on. While something is selected, painting, adjustments, filters, Fill, Delete and Copy only affect that part. The selection is shown with a moving dotted outline, often called "marching ants".
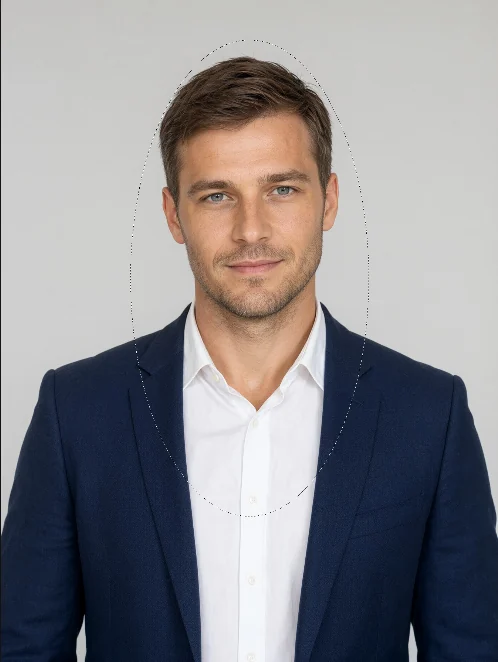
The selection tools
| Tool | How to use it |
|---|---|
| Rectangular Marquee Tool M | Drag a box. Hold Shift for a square, Alt to draw from the centre. |
| Elliptical Marquee Tool M | Drag an oval. Hold Shift for a circle, Alt to draw from the centre. |
| Lasso Tool L | Hold the mouse button and draw around the area by hand. Let go to close the outline. |
| Polygonal Lasso Tool L | Click corner after corner, for areas with straight edges (a window, a box). Double-click or press Enter to close it. |
| Magic Wand Tool W | Click a colour. Pixels of a similar colour are selected. |
| Quick Selection Tool W | Paint over an area: the selection grows to similar colours and stops at edges. Paint again to add more; hold Alt to take parts away. |
Tools that share a button are switched with Shift + the letter (Shift + M, Shift + L, Shift + W) or by right-clicking the button. More ways to select are in the Select menu, such as Color Range and Subject.
- Move the outline — with a selection tool, drag inside the selection to move just the outline (not the pixels) to another place.
- Move the pixels — hold Ctrl and drag inside the selection (or use the Move Tool) to move the selected pixels.
Options bar for selection tools
 1234
- 1 Selection mode — Replace (a new selection), Add, Subtract or Intersect (keep only the overlap) with the selection you already have.
- 2 Feather: — a soft edge, in pixels, for the next selection you make. Anti-alias (ovals, lassos, Magic Wand) smooths the jagged pixels of curved edges.
- 3 Style: (marquees) — Normal (drag any size), Fixed Ratio (for example 4 : 5, typed in Width: and Height:) or Fixed Size in pixels — then a click places the box. The ⇄ button swaps width and height.
- 4 Select and Mask… — refine the edge of the selection (see below).
The Magic Wand also has: Sample Size: (a single pixel or the average of a square around it), Tolerance: (how different a colour may be and still be selected, 0–255; low values pick only very similar colours), Contiguous (only touching pixels; untick it to select that colour everywhere) and Sample All Layers (look at the whole visible picture instead of the active layer). The Quick Selection Tool has a brush Size and Sample All Layers. Both show Select Subject, the AI selection of the main subject Supporter (see Select Subject), and Select Sky (see Select Sky).
You don't need the buttons for the modes. While you start a selection, hold:
| Key | Mode |
|---|---|
| Shift | Add to the selection |
| Alt | Subtract from the selection |
| Shift + Alt | Intersect: keep only where both overlap |
Build difficult selections in small steps: start with the Quick Selection Tool or the Magic Wand, then hold Shift and lasso the parts it missed, or hold Alt and lasso away the parts that are too much.
Select and Mask
Choose Select and Mask… in the options bar or the Select menu, or press Alt + Ctrl + R, to fine-tune the edge of a selection you have made (without one, SnazzyFoto says Make a selection first).
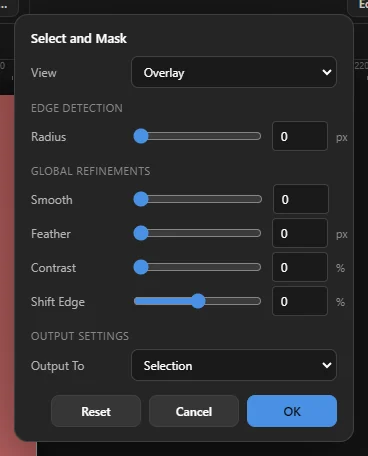
- View — how the result is shown while you work: Overlay, On Black, On White or Black & White.
- Edge Detection › Radius — looks for the real edge within this distance, good for hair and fur.
- Global Refinements — Smooth (calmer outline), Feather (softer edge), Contrast (crisper edge) and Shift Edge (move the edge in or out).
- Output To — a new Selection, a Layer Mask on the active layer, a New Layer, or a New Layer with Layer Mask.
Reset puts the sliders back; OK applies.
The Select menu
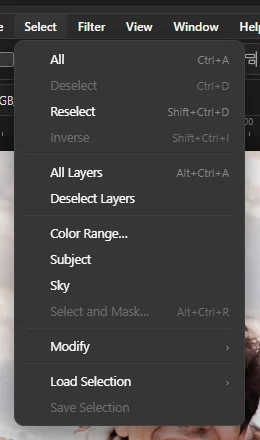
| Command | What it does |
|---|---|
| All Ctrl + A | Selects the whole canvas. |
| Deselect Ctrl + D | Removes the selection. Esc does the same. |
| Reselect Shift + Ctrl + D | Brings back the selection you removed last. |
| Inverse Shift + Ctrl + I | Selects everything that was not selected, and the other way round. For example: select a person, then Inverse to select the background. |
| All Layers, Deselect Layers | Choose all layers in the Layers panel, or none. This is about layers, not pixels. |
| Color Range… | Selects every pixel close to one colour (see below). |
| Subject Supporter | AI finds the people or the main object (see Select Subject). |
| Sky | Selects the sky (see Select Sky). |
| Select and Mask… Alt + Ctrl + R | Refines the edge of the selection (see above). |
| Modify | Changes the edge of the selection (see below). |
| Load Selection, Save Selection | Keep a selection to use again later (see below). |
Color Range
- Choose the Eyedropper (I) and click the colour you want to select, for example a blue wall. It becomes your foreground colour.
- Choose Select › Color Range…. Sampled color already shows that colour; click it to pick another.
- Set Fuzziness (1–200): higher values also select colours that are less similar.
- Click OK. Pixels close to the colour are selected; pixels that are only a bit similar are selected partly, for soft edges.
Color Range looks at the whole visible picture, not just the active layer.
Modify the edge
Each of these opens a small window where you type a number of pixels:
| Command | What it does |
|---|---|
| Border… | Turns the selection into a ring along its edge, as wide as Width (px). |
| Smooth… | Rounds off jagged corners and removes small bits. |
| Expand… | Makes the selection bigger by the amount. |
| Contract… | Makes it smaller. |
| Feather… Shift + F6 | Softens the edge, so changes fade out gently instead of stopping at a hard line. |
What you can do with a selection
- Paint inside it — the brush, eraser and other painting tools only change the selected area. The selection stays when you switch tools.
- Adjust or filter only that part — Image › Adjustments and the Filter menu only change the selected area. A new adjustment layer gets a mask in the shape of the selection.
- Delete it — press Delete (Edit › Clear) to make the selected pixels transparent (on the Background layer they get the background colour).
- Fill it — Edit › Fill… (Shift + F5). Choose the Contents (Foreground Color, Background Color, Color, Black, 50% Gray or White), a Mode and an Opacity (%). Quicker: Alt + Backspace fills with the foreground colour, Ctrl + Backspace with the background colour.
- Draw its outline — Edit › Stroke…: choose the Width (px), the Color and the Location (Inside, Center or Outside the edge).
- Copy it — Ctrl + C, or straight onto a new layer with Ctrl + J (see Layers and masks).
- Move the selected pixels — with the Move tool (V), drag to move what is selected on the active layer.
- Crop to it — Image › Crop cuts the canvas down to the box around the selection.
- Turn it into a mask — click Add a mask in the Layers panel. The selection stays visible and the rest is hidden (see Layer masks).
To select exactly what is on a layer, Ctrl + click the layer's small picture in the Layers panel, or right-click the layer › Select Pixels.
Save a selection for later
A careful selection can take time. Save it so you can load it again.
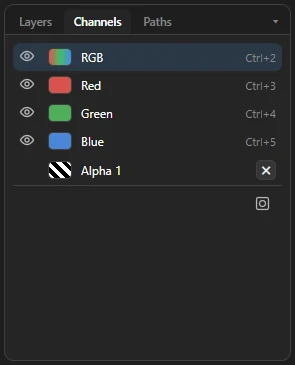 123
- 1 RGB, Red, Green, Blue — views of the colour channels (see The panels).
- 2 Saved selections, named Alpha 1, Alpha 2 and so on. Click one to load it as the selection. Click ✕ to delete it.
- 3 Save the selection as a channel.
You can also use Select › Save Selection and Select › Load Selection.
Saved selections are kept only while the document is open. They are not stored in the .snazzy project. To keep a selection with your project, turn it into a layer mask.