
Presets and LUTs
Apply built-in looks with an Amount slider, save your own presets, import .xmp presets and .cube LUTs, and export your look as an .xmp preset or a LUT.
A preset is a saved set of Develop settings: a whole look in one click. A LUT is a colour recipe from another program or a camera maker. SnazzyFoto has both in the Presets panel, imports .xmp presets, and can save your own look as an .xmp preset or as a LUT for video editors.
The Presets panel
The Presets panel is on the left of Develop, under the Navigator.
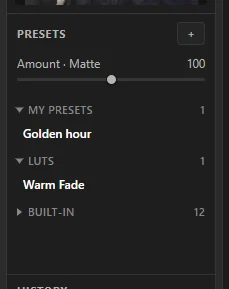 123
- 1 + — create, import and export presets (see below).
- 2 Amount — how strongly the preset you just clicked is applied.
- 3 Groups — click a group's name to open or close it. The number is how many presets it holds.
| Group | What is in it |
|---|---|
| My presets | Presets you created or imported. A ✕ next to each deletes it. |
| LUTs | The .cube LUT files you imported. |
| Built-in | Twelve looks that come with SnazzyFoto: Natural, Vivid, Soft & airy, Matte, Warm film, Cool film, Teal & orange, Landscape, Portrait, B&W classic, B&W high contrast and B&W soft. |
| LR · … | Presets found on your computer, one group per folder (see Presets already on your computer). |
Try and apply a preset
- Hover the mouse over a preset. The photo shows that look at once; move away and it goes back.
- Click the preset to apply it.
- Drag Amount to make the look weaker or stronger: 100 is the preset as made, 0 is your photo before you clicked it, and up to 200 goes further than the preset itself.
- Fine-tune with the sliders as usual. Not right? Press Ctrl + Z, or click another preset.
A preset sets only the values it contains; every other setting stays as it was. A built-in preset changes a handful of tone and colour sliders, and leaves everything else alone. A preset never changes the photo's crop, masks, Point Color swatches, spot and red-eye fixes or AI Denoise, even if it was saved with them.
Apply a preset to many photos at once: select them in the filmstrip, apply the preset to one, then use Sync…. See Edit many photos at once.
Save your own preset
- Edit a photo until you like the look.
- Click + in the Presets panel and choose Create Preset…, or press Ctrl + Shift + N.
- Type a name in the box that appears (Preset name, then Enter) and press Enter. Esc cancels.
Your preset appears under My presets. It keeps every setting except the ones that belong to one photo only: the crop and rotation, the Remove and Red eye fixes, masks and AI Denoise. Saving with a name that already exists replaces that preset.
The + menu
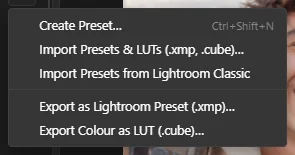 12345
- 1 Create Preset… — saves the current settings as a preset.
- 2 Import Presets & LUTs (.xmp, .cube)… — adds preset and LUT files you downloaded or bought.
- 3 Import Presets from Lightroom Classic — reads the presets on this computer again.
- 4 Export as Lightroom Preset (.xmp)… — saves your current look as an
.xmppreset. - 5 Export Colour as LUT (.cube)… — saves the colours of your look as a LUT.
Import preset and LUT files
- Click + › Import Presets & LUTs (.xmp, .cube)….
- Select one or more files. You can mix
.xmppresets and.cubeLUTs. - A short message says how many were imported. Presets go to My presets, LUTs to LUTs.
SnazzyFoto keeps its own copy of each LUT, so you can delete or move the file you imported from. A file it cannot read is skipped and counted in the message.
Presets already on your computer
If you have .xmp presets installed for another photo program (for example Lightroom Classic), SnazzyFoto finds them the first time Develop starts and lists them in groups named LR · followed by the folder name. Presets you made yourself there are under LR · My Lightroom · …. These groups start closed, because there can be hundreds of presets; click one to open it.
Installed more presets since? Click + › Import Presets from Lightroom Classic to read them again.
A preset .xmp file from anywhere else (a preset pack you bought, for example) is imported with Import Presets & LUTs (.xmp, .cube)….
Most settings in an .xmp preset carry over exactly. A few cannot: a white balance written in kelvin (a fixed colour temperature), and camera and creative profiles. A preset that turns the photo black and white does so in SnazzyFoto too. A preset that changes only a few sliders changes only those sliders here as well.
LUTs
A LUT (look-up table) is a colour recipe: it turns every colour into another colour, in one step. Film emulations, cinema looks and camera "log" conversions are often shared as .cube LUT files.
- Import the
.cubefile (see above). - Open the LUTs group and hover a LUT to preview it, then click it.
- Use Amount to set how strong it is.
The LUT is applied after all your other settings, like a finishing filter. While a LUT is in use, the Basic panel shows a Creative LUT line with its name, its own Amount, and a ✕ that removes it.
SnazzyFoto reads 3D LUTs in the .cube format. 1D LUTs are not supported.
Save your look as an .xmp preset
- Edit a photo until you like the look.
- Click + › Export as Lightroom Preset (.xmp)….
- Choose where to save it. The file name starts as the name of the preset you used last, or the photo's name.
Programs that read .xmp presets import the file like any other preset.
Turn your look into a LUT
A LUT lets you use your look in programs that have no presets, such as video editors (SnazzyCut, for example) or other photo apps.
- Edit a photo until you like the colours.
- Click + › Export Colour as LUT (.cube)… and choose where to save it.
A LUT can only hold colour. Effects that depend on the pixels around each pixel are left out: Clarity, Texture, Dehaze, sharpening, noise reduction, vignette, grain, masks, spot fixes and the crop. The message after saving reminds you of this.
Questions
I can't find my .xmp presets.
SnazzyFoto looks in the usual preset folders on this computer. If your presets live in a cloud app or somewhere else, export them as .xmp files and import them with + › Import Presets & LUTs (.xmp, .cube)….
An imported preset looks different than in the program it came from.
White balance in kelvin and camera or creative profiles are not carried over (see Presets already on your computer). Adjust Temp, Tint and Profile by hand after applying it.