
Text and shapes
Add and edit text with the Type tool, choose fonts and spacing, rasterize text, draw outlines with the Rectangle, Ellipse and Line tools, and draw editable shapes with the Pen and Direct Selection tools.
Text and shapes in the Photo Editor stay editable: you can change the words, the font, the size and the colours at any time. You type straight on the picture. Shapes and paths are made of points you can move, so they stay sharp at any size.
Add text
- Press T (the Horizontal Type Tool).
- Click on the picture where the text should start — that makes point text, one line that grows as you type. Or drag a box — that makes paragraph text, which wraps inside the box.
- Type. Enter starts a new line. You can select letters with the mouse or Shift + arrows, copy and paste, and undo while typing.
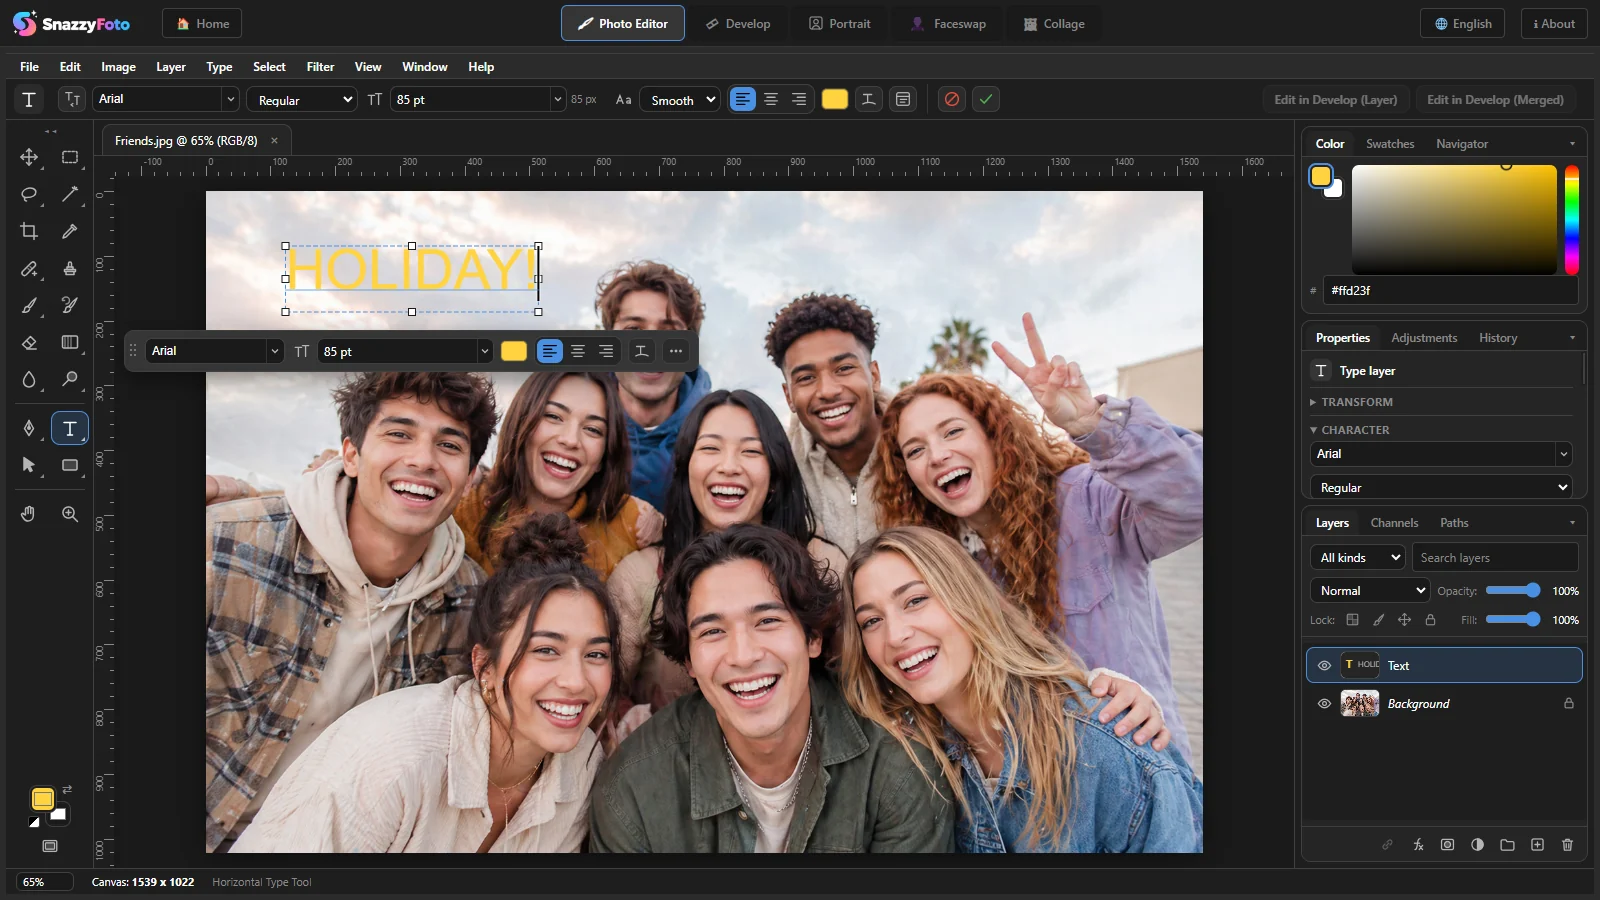
- Click ✓ in the options bar, press Ctrl + Enter, or click somewhere outside the text (dragging from farther away starts a new paragraph box). The text becomes its own T layer in the Layers panel. (⊘ or Esc cancels what you typed.)
 12
- 1 The task bar follows the text while you type, with the most used settings: font, size, colour, alignment, Warp Text… and more under …. Drag its handle on the left to move it out of the way.
- 2 ⊘ cancels and ✓ commits what you typed.
While you type, the handles around the text change it directly: on paragraph text they resize the box (with Ctrl: scale the letters too); on point text the corners change the font size and the sides stretch the letters. To move the text while you type, point just outside it — the move cursor appears — and drag; or hold Ctrl and drag anywhere. You keep typing afterwards, and each move is one step in History. With the Type tool and no text being edited, Ctrl + drag moves the selected text layer.
To change text later, click it with the Type tool, or select its layer and choose Type › Edit Text. Clicking another text layer with the Type tool edits that one. If you delete all the letters, the empty layer is removed when you commit.
The Vertical Type Tool writes from top to bottom. The two mask tools — Horizontal Type Mask Tool and Vertical Type Mask Tool — don't make a layer: when you commit, you get a selection in the shape of the letters, for example to cut text out of a photo.
Text options

From left to right: text orientation (horizontal / vertical), font (type a name; ↑ / ↓ try the next font), style (Regular, Bold, Italic… as the font has them), size in points with the size in pixels next to it, Anti-aliasing (None, Sharp, Crisp, Strong, Smooth), alignment, Text color, Warp Text… and the Character and Paragraph panels.
The options change the layer you are typing in, or the selected type layer — even without typing: select the layer and change the font or size in the bar.
Every way to change the font size
- Type a size in the size box: points by default, or with a unit —
48px,2cm. - ↑ / ↓ in the size box (Shift: 10 at a time), or the mouse wheel over it.
- Open the list next to the box: common sizes, and Fits this image, a size that suits the picture.
- Drag left or right on the TT icon in front of the box.
- Ctrl + Shift + > / < — 2 points bigger or smaller (Alt: 10), while typing or with a type layer selected. Also in the Type menu: Increase Font Size / Decrease Font Size.
- Drag a corner handle of point text while typing, or scale the text with Free Transform (Ctrl + T) — the font size changes, the text stays sharp and editable.
A new text starts at a size that fits the picture (a twelfth of its shorter side) until you choose your own.
Character and Paragraph panels
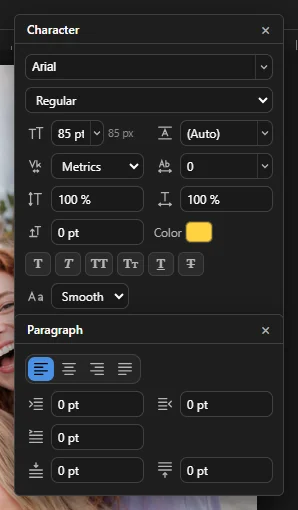
- Character: font, style and size; Leading (line spacing) ((Auto) follows the size); Kerning (Metrics, Optical or 0); Tracking (1/1000 em) — the space between all letters; Vertically scale and Horizontally scale; Baseline shift; colour; Faux Bold, Faux Italic, All Caps, Small Caps, Underline and Strikethrough; anti-aliasing.
- Paragraph: left, centre, right, or Justify (last line left); indents (left, right, first line) and space before and after paragraphs.
Open them with the last button of the Type options bar, or Type › Panels. Drag a panel by its title; × closes it. The same settings are in the Properties panel while a type layer is selected. Type › Convert to Paragraph Text (or Convert to Point Text) switches between the two kinds.
Warp text
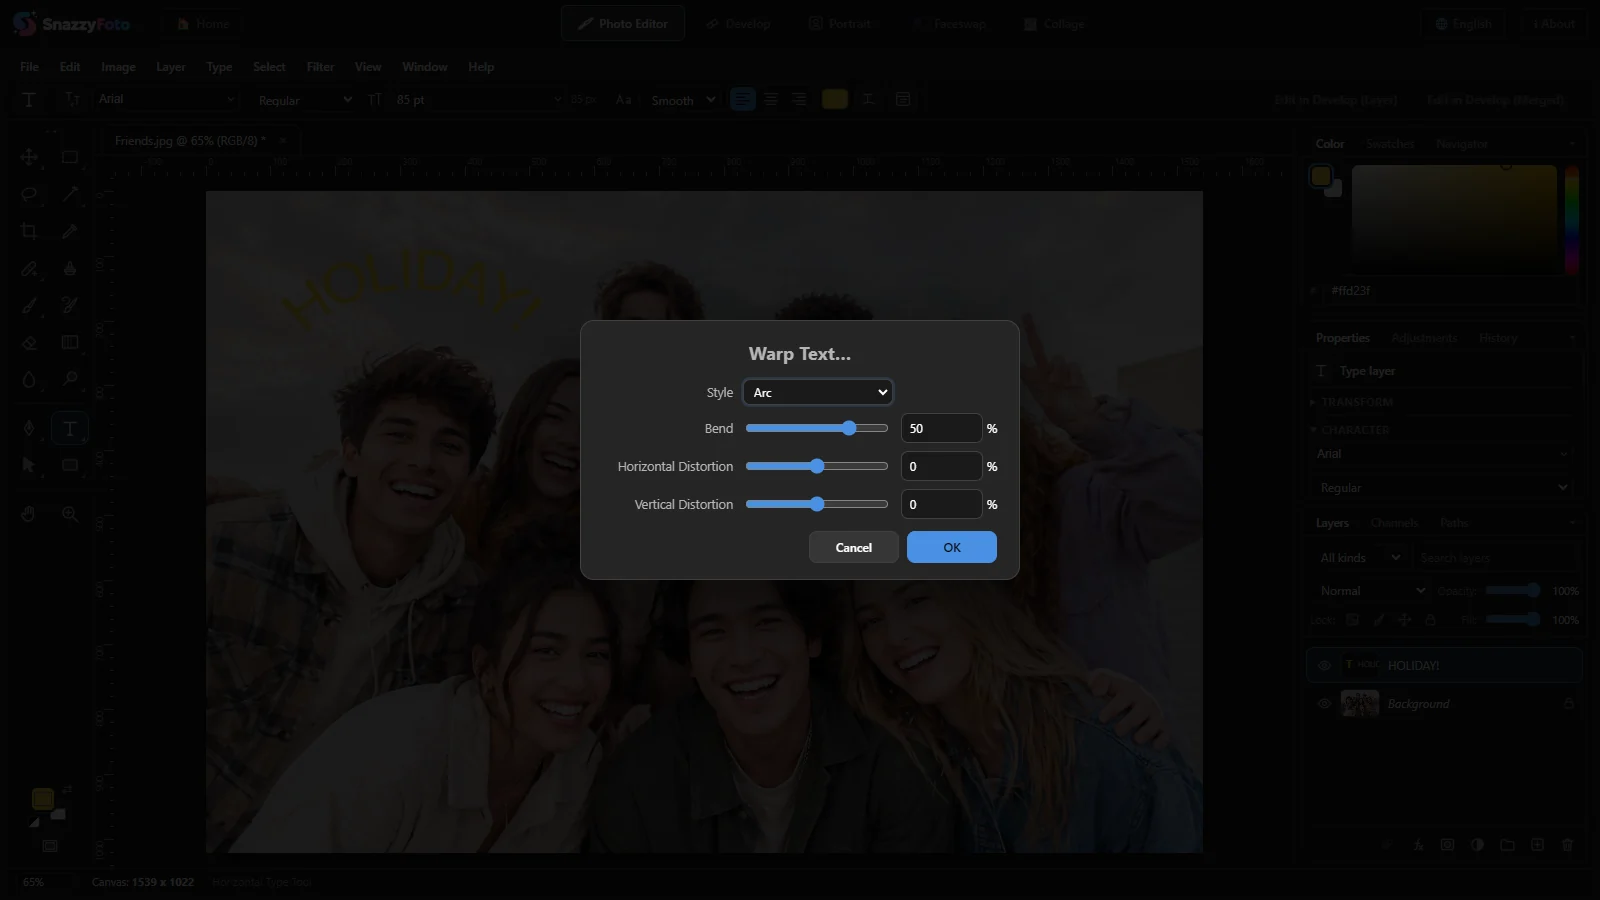
Click Warp Text… and choose a Style: Arc, Arc Lower, Arc Upper, Arch, Bulge, Shell Lower, Shell Upper, Flag, Wave, Fish, Rise, Inflate or Squeeze. Bend sets how strong, Horizontal Distortion and Vertical Distortion add perspective. The picture updates as you change them; the text stays editable. Choose None to straighten it again.
Make text stand out
- Add an outline, a shadow or a glow with layer styles — the text stays editable.
- Put a photo inside the letters: place the photo layer directly above the text layer and press Alt + Ctrl + G (see Clipping masks).
- Use the Move tool's align buttons to centre the text on the picture (see Align layers).
Turn text into pixels
Painting tools and filters work on pixels, not on editable text. Choose Type › Rasterize Type Layer (also in the layer's right-click menu) to turn the text into a normal pixel layer. After that you can't edit the words any more, so keep a copy of the text layer if you might need it.
Shapes
Press U for the shape tools: Rectangle Tool, Ellipse Tool, Triangle Tool, Polygon Tool, Line Tool and Custom Shape Tool (Shift + U goes through them).
- Choose a tool and set the fill and stroke in the options bar (see below).
- Drag on the picture. Hold Shift for a square or a circle, Alt to draw from the centre. Or just click once: a window asks for the exact width and height.
- The shape becomes a shape layer. Its size, colours and corners stay editable.
 123
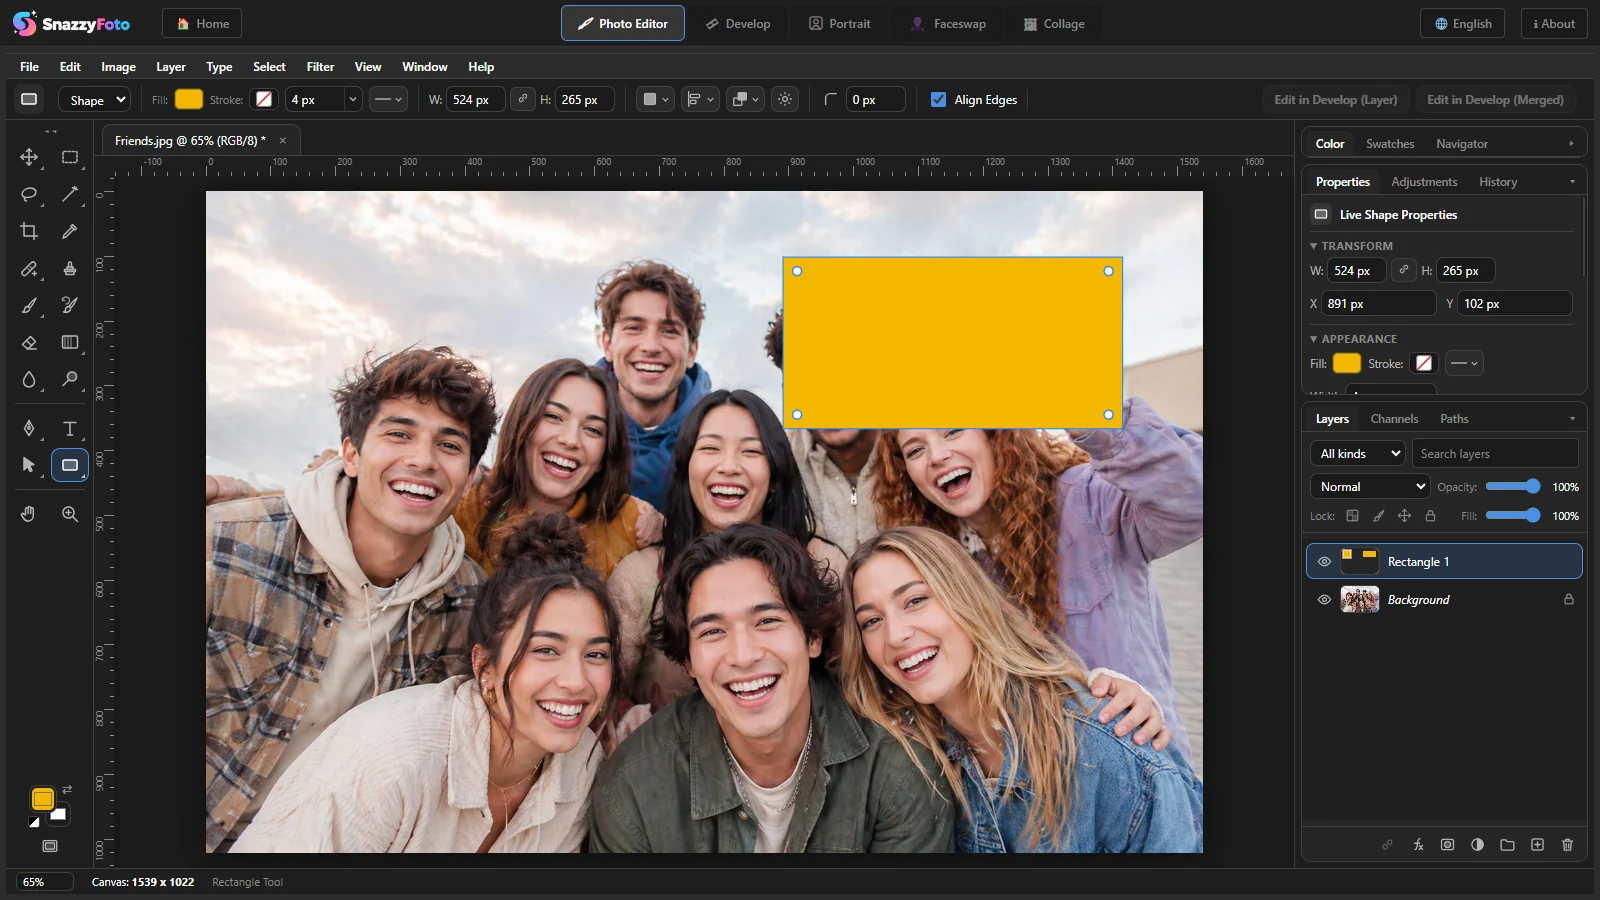
- 1 The shape with its corner widgets: drag a round dot inside a corner to round all corners (Alt: only that one).
- 2 Live Shape Properties in the Properties panel: size and position, fill and stroke, corner radius.
- 3 The shape layer. Double-click its thumbnail to change the fill colour.

- Tool mode — Shape makes a shape layer; Path draws a path only (for selections and masks, see the Pen below); Pixels paints the shape straight into the active pixel layer in the foreground colour.
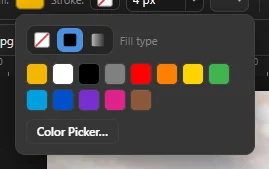
- Fill: and Stroke: — click to choose No color, a Solid color (swatches or Color Picker…) or a Gradient. Next to the stroke: its width, and Stroke options (solid, dashed or dotted; inside, centre or outside the edge; caps and corners).
- W: and H: — the exact size; the link keeps the proportions.
- Path operations — draw a new layer, or combine with the selected shape: Combine Shapes, Subtract Front Shape, Intersect Shape Areas, Exclude Overlapping Shapes. Then Path alignment and Path arrangement.
- Per tool: Corner radius (Rectangle), Number of sides and star options (Polygon), Weight and arrowheads (Line, under More shape and path options), and the shape picker (Custom Shape: heart, stars, arrows, speech bubbles, check mark…).
If you move single points of a shape with the Direct Selection tool, it becomes a plain path: change its size with W / H or Free Transform from then on. To paint on a shape, use Rasterize Shape (Properties panel or the layer's right-click menu).
The Pen and paths
A path is an outline made of points. Draw one with the Pen Tool (P) to select something exactly, mask it, or make a shape of any form.
- Press P. Click to place corner points. Drag instead of clicking to make a smooth curve (the handles you pull out set its direction).
- To close the path, click the first point again. Enter or Esc ends an open path.
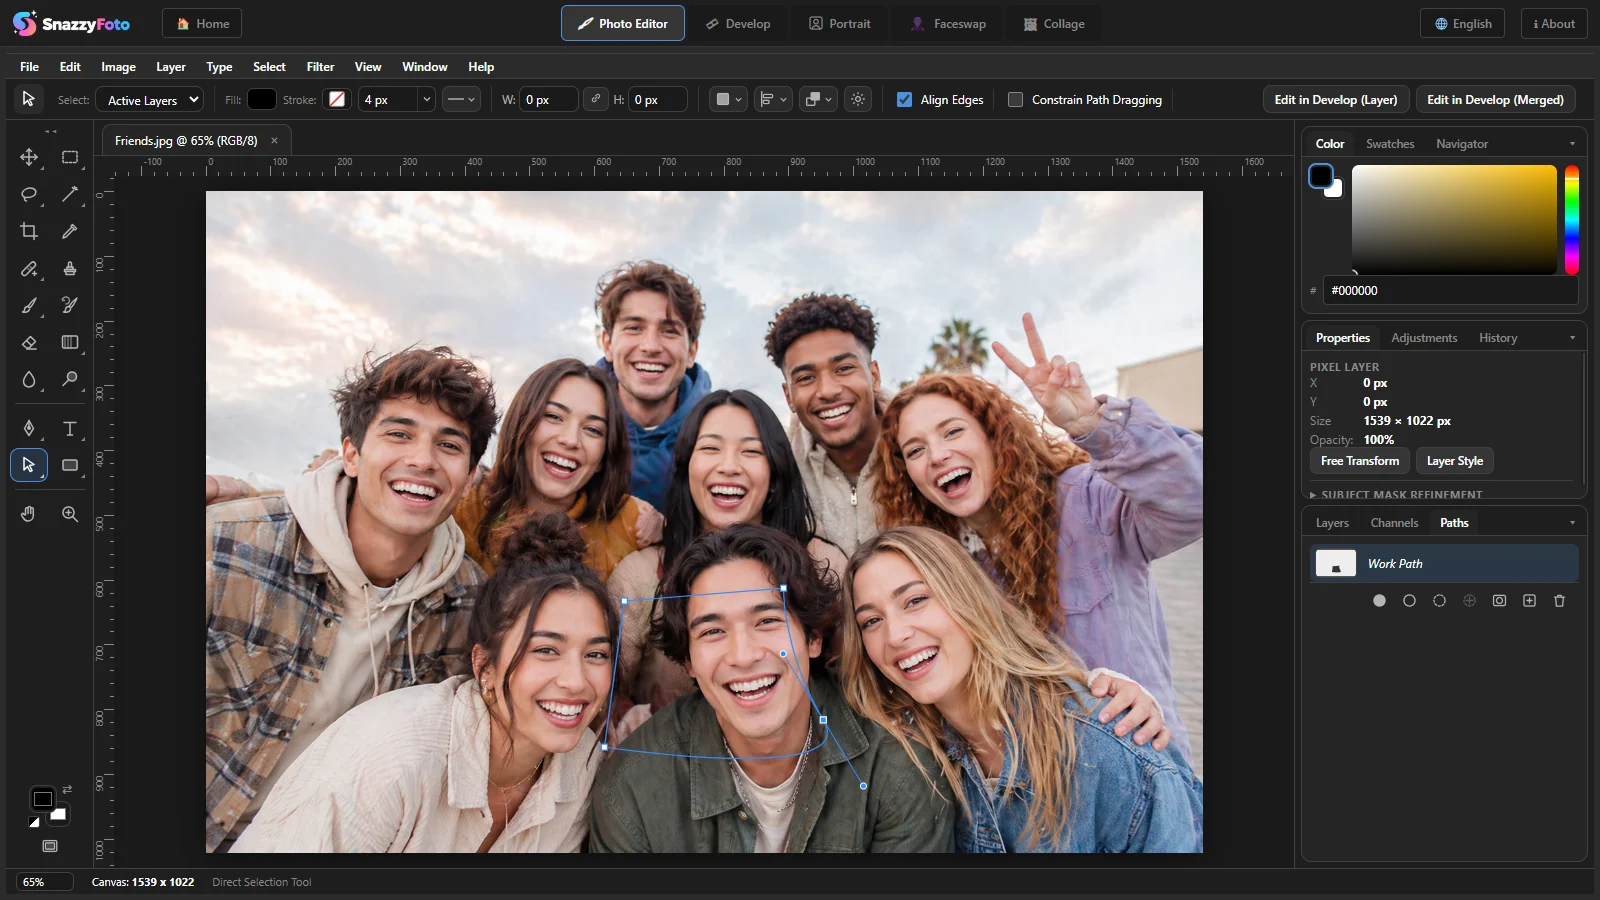
- With the tool mode on Path (the default) the path goes to the Paths panel as the Work Path. Use Make: in the options bar — Selection…, Mask or Shape — to turn it into what you need. With the mode on Shape, the Pen draws a shape layer directly.
 12
- 1 The path, with its points and a curve handle.
- 2 The Paths panel. Its buttons: Fill path with foreground color, Stroke path with brush, Load path as a selection, Make work path from selection, Add a vector mask from the path, Create new path and delete. Double-click the Work Path (or use Save Path… in its right-click menu) to keep it: drawing again would replace the Work Path.
- Auto Add/Delete — with the Pen, clicking on a path adds a point, clicking a point removes it. The Add Anchor Point Tool, Delete Anchor Point Tool and Convert Point Tool (sharp corner ↔ smooth curve) are in the Pen's flyout; they have no key of their own, and P always brings back the Pen.
- Path Selection Tool (A) — click a path or shape to select it whole and drag it; Alt + drag makes a copy. Select: Active Layers or All Layers.
- Direct Selection Tool (Shift + A) — drag single points and curve handles; Delete removes the selected point.