
Adjustments
Change colour and tone with Image › Adjustments or with adjustment layers: Levels, Curves, Hue/Saturation, Color Balance, Black & White, Color Lookup and more, and how to limit them to part of the picture.
Adjustments change the colours and tones of your picture: brighter, more contrast, warmer, black and white and much more. You can apply them straight to a layer, or as an adjustment layer that you can change or remove at any time.
Two ways to adjust
| Image › Adjustments | Adjustment layer | |
|---|---|---|
| What it changes | The pixels of the active layer (only inside the selection, if there is one) | Everything below it, without changing those pixels |
| Change it later | No — only with Undo | Yes, any time, in the Properties panel |
| Limit it to one area | Make a selection first | Paint on its mask, or make a selection first |
| Best for | Quick fixes you are sure about | Trying things out, and edits you may want to fine-tune |
Not sure? Use an adjustment layer. You can always switch it off with its eye, lower its opacity, or delete it.
Image › Adjustments
- Click the layer you want to change. It must be an unlocked pixel layer — otherwise SnazzyFoto says Choose an unlocked pixel layer first.
- To change only part of it, make a selection first.
- Choose Image › Adjustments and an adjustment, or press its shortcut (see the table below).
- Change the settings in the window. The picture updates while you do.
- Click OK (or press Enter) to apply, or Cancel (Esc) to leave the picture as it was.
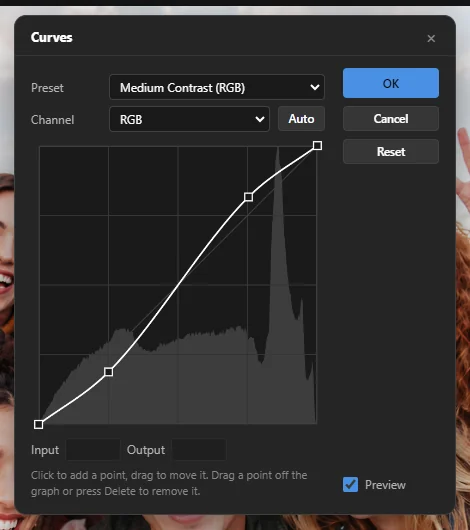 12345
- 1 Preset — ready-made settings to start from. Not every adjustment has presets.
- 2 Channel — change all colours together (RGB) or one colour channel. Auto next to it makes a sensible correction for you.
- 3 The settings — here, the curve. Each adjustment has its own (see the table below).
- 4 OK, Cancel and Reset (back to the settings you started with).
- 5 Preview — untick it to see the picture without the change, for comparison.
Drag the window by its title if it covers the part you want to see; SnazzyFoto remembers where you put it. Inside the window, Ctrl + Z undoes your last change to the settings (press again to redo it).
Some commands have no settings and apply at once: Invert, Desaturate, Equalize, Auto Tone, Auto Contrast and Auto Color. The three Auto commands are also directly in the Image menu.
Every adjustment
| Adjustment | What it does and its main settings |
|---|---|
| Brightness/Contrast | Make the picture lighter or darker (Brightness) and add or remove punch (Contrast). Use Legacy switches to a simpler, stronger formula. Auto picks values for you. |
| Levels Ctrl + L | Set the darkest point, the brightest point and the middle tones with three handles under a histogram (a graph of how many pixels have each brightness). Input Levels stretch the tones; Output Levels fade the blacks or whites. Per channel, with Auto and presets. |
| Curves Ctrl + M | The most flexible tone tool. Click the line to add a point and drag it: up makes those tones lighter, down darker. An S-shape adds contrast. Drag a point off the graph or press Delete to remove it. Per channel, with Auto and presets. |
| Exposure | Like changing the camera's exposure: Exposure (in stops), Offset (shadows) and Gamma Correction (midtones). |
| Vibrance | Vibrance strengthens dull colours more than strong ones, so skin stays natural. Saturation strengthens all colours equally. |
| Hue/Saturation Ctrl + U | Shift the colours (Hue), make them stronger or weaker (Saturation) and lighter or darker (Lightness) — for all colours (Master) or just Reds, Yellows, Greens, Cyans, Blues or Magentas. Colorize tints the whole picture with one colour, for example sepia. |
| Color Balance Ctrl + B | Push the colours towards Cyan or Red, Magenta or Green, Yellow or Blue, separately for the Shadows, Midtones and Highlights. Preserve Luminosity keeps the brightness the same. |
| Black & White Alt + Shift + Ctrl + B | Turn the picture black and white, and choose how light each original colour becomes (for example darker blue skies). Tint adds one colour on top. With Auto and presets such as red or infrared filters. |
| Photo Filter | Like a coloured filter in front of the lens: choose a Filter (warming, cooling and colours) or your own Color, and the Density. |
| Channel Mixer | Build each colour channel (Output Channel) from a mix of red, green and blue. With Monochrome it makes a black-and-white picture from your own mix. |
| Color Lookup | Apply a colour look from a 3D LUT file (.cube): click Load 3D LUT…. See Presets and LUTs. |
| Invert Ctrl + I | Makes a negative: black becomes white, and every colour its opposite. |
| Posterize | Reduces the number of tones (Levels) for a flat, poster-like look. |
| Threshold | Turns every pixel pure black or pure white. Threshold Level sets where the switch happens. |
| Gradient Map | Replaces dark-to-light with the colours of a gradient. Pick a preset or click below the bar to add colour stops. Reverse flips it. |
| Selective Color | Changes the amount of Cyan, Magenta, Yellow and Black in one group of Colors (for example only the reds, or only the neutrals). Method: Relative (gentler) or Absolute. |
| Desaturate Shift + Ctrl + U | Removes all colour at once. |
| Equalize | Spreads the brightness evenly from black to white. Can rescue a very flat picture. |
| Auto Tone Shift + Ctrl + L | Sets the darkest and brightest points of each colour channel automatically. |
| Auto Contrast Alt + Shift + Ctrl + L | Improves the contrast without changing the colours. |
| Auto Color Shift + Ctrl + B | Corrects contrast and removes a colour cast. |
Adjustment layers
An adjustment layer is a layer that holds a colour change instead of pixels. It changes everything below it in the Layers panel. Your photo itself stays untouched.
Add one
- Open the Adjustments tab (next to Properties) and click an adjustment.
- Or choose Layer › New Adjustment Layer.
- Or click the half-filled circle, New fill or adjustment layer, at the bottom of the Layers panel.
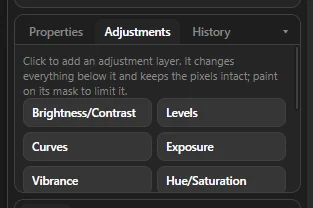
The new layer appears above the active layer, named after the adjustment, with a ◐ instead of a picture. Its settings are in the Properties tab; when you add it from the Adjustments panel, that tab opens by itself.
Change it later
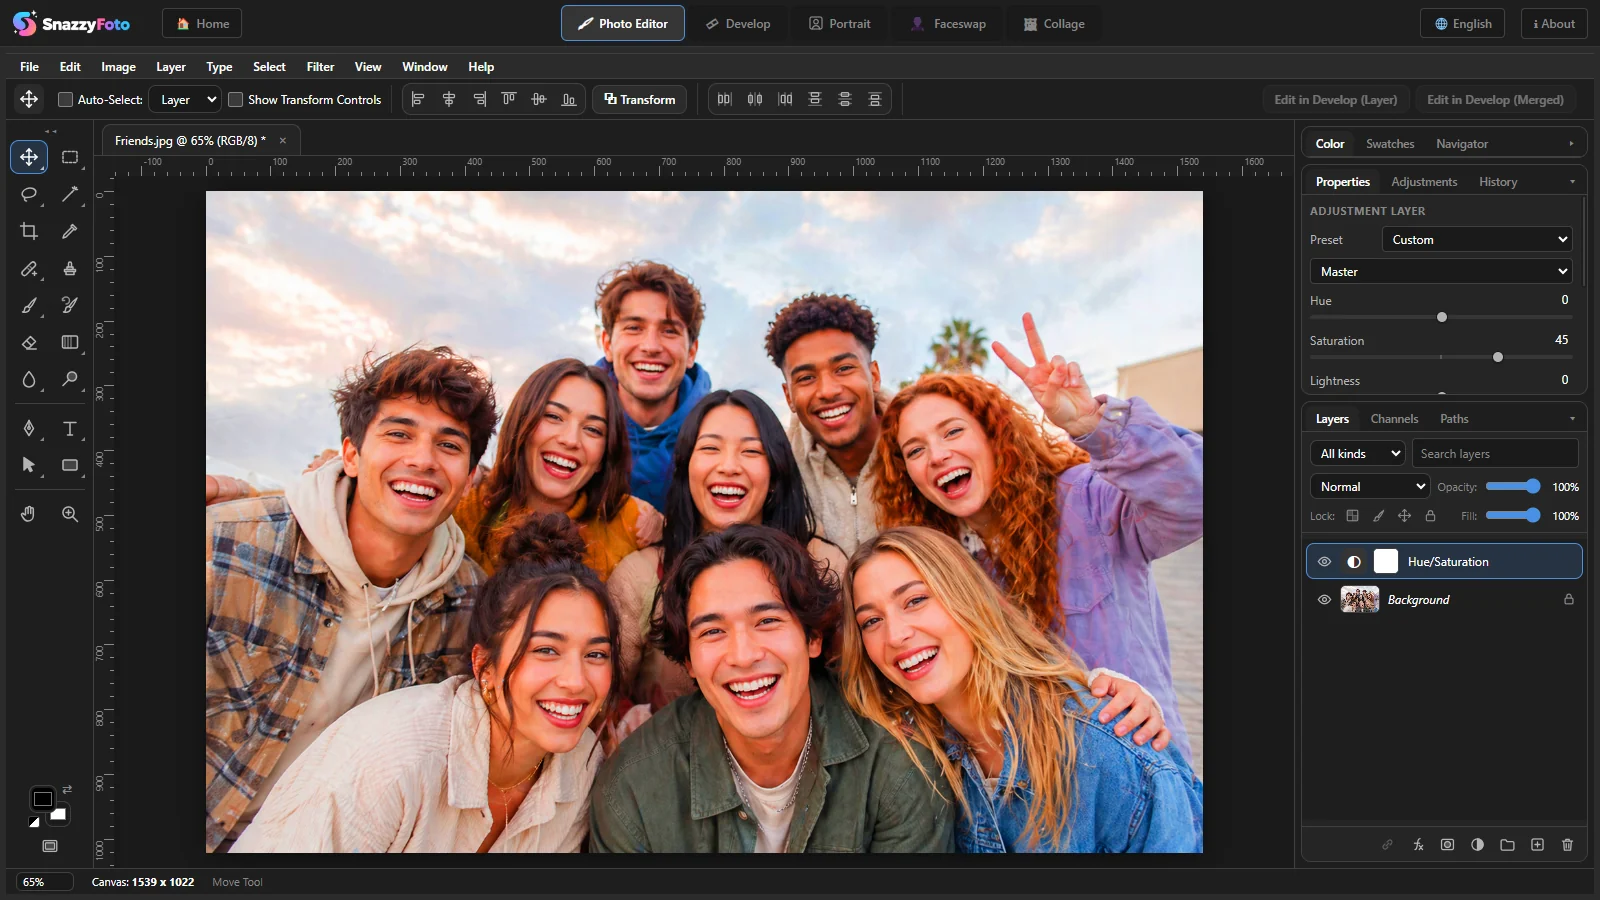 12
- 1 The adjustment layer — click it whenever you want to change it. Right-click › Edit Adjustment… shows its settings too.
- 2 Its settings in Properties — the same controls as in the Image › Adjustments window. The picture changes as you drag.
Like any layer, you can hide it with its eye, lower its Opacity: to weaken it, give it a blend mode, or delete it.
Limit it to part of the picture
- Before you add it, make a selection: the new adjustment layer gets a mask in that shape, so it only changes that area.
- Afterwards, paint on it: with the adjustment layer chosen, the Brush hides the effect and the Eraser brings it back (see Paint on a mask).
- Only one layer: to make the adjustment change only the layer directly below it, turn it into a clipping mask with Alt + Ctrl + G (see Clipping masks).
Desaturate, Equalize and the three Auto commands only exist in the Image menu, not as adjustment layers.
When to use Develop instead
For a whole photo — exposure, white balance, highlights and shadows, presets and local masks — Develop is often quicker. Send a layer there with Edit in Develop (Layer) and bring it back when you are done (see Edit in Develop and back).