
Develop basics
Open photos in Develop and find your way around: the layout, toolbar, zoom and Navigator, histogram, before/after, history, sending to the Photo Editor, and all keyboard shortcuts.
Develop is SnazzyFoto's room for light and colour. You move sliders, and the photo changes straight away. Your original file is never changed: SnazzyFoto remembers your settings and only applies them when you export or send the photo on.
Open photos in Develop
Click the Develop tab at the top of the window. The first time, the middle of the screen invites you to open something.
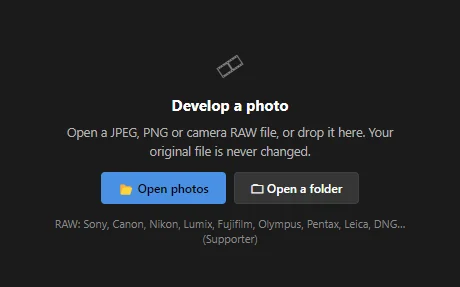 123
- 1 Open photos — pick one or more photos.
- 2 Open a folder — adds every photo inside one folder (not its subfolders), sorted by name.
- 3 Camera RAW files open too, if you are a Supporter. Supporter
Other ways in:
- Click Add or Folder at the top left of Develop, or press Ctrl + Shift + I (or Ctrl + O).
- Drag photos from File Explorer and drop them on Develop.
- On the Home screen, click Develop a photo, or a recent file you last opened in Develop.
- RAW and TIFF files always open in Develop, wherever you open them in SnazzyFoto.
Develop opens JPEG, PNG, WebP, BMP, GIF and TIFF files, and camera RAW files from Sony, Canon, Nikon, Lumix, Fujifilm, Olympus, Pentax, Leica and others (also DNG). See Camera RAW and AI Denoise.
Every photo you open joins the filmstrip at the bottom. Click a thumbnail to switch to that photo. The filmstrip is covered in Edit many photos at once.
Your edits are saved automatically, for each photo. Open the photo again later, even after restarting SnazzyFoto, and it comes back the way you left it. The History panel then starts with Opened with earlier edits.
The Develop screen
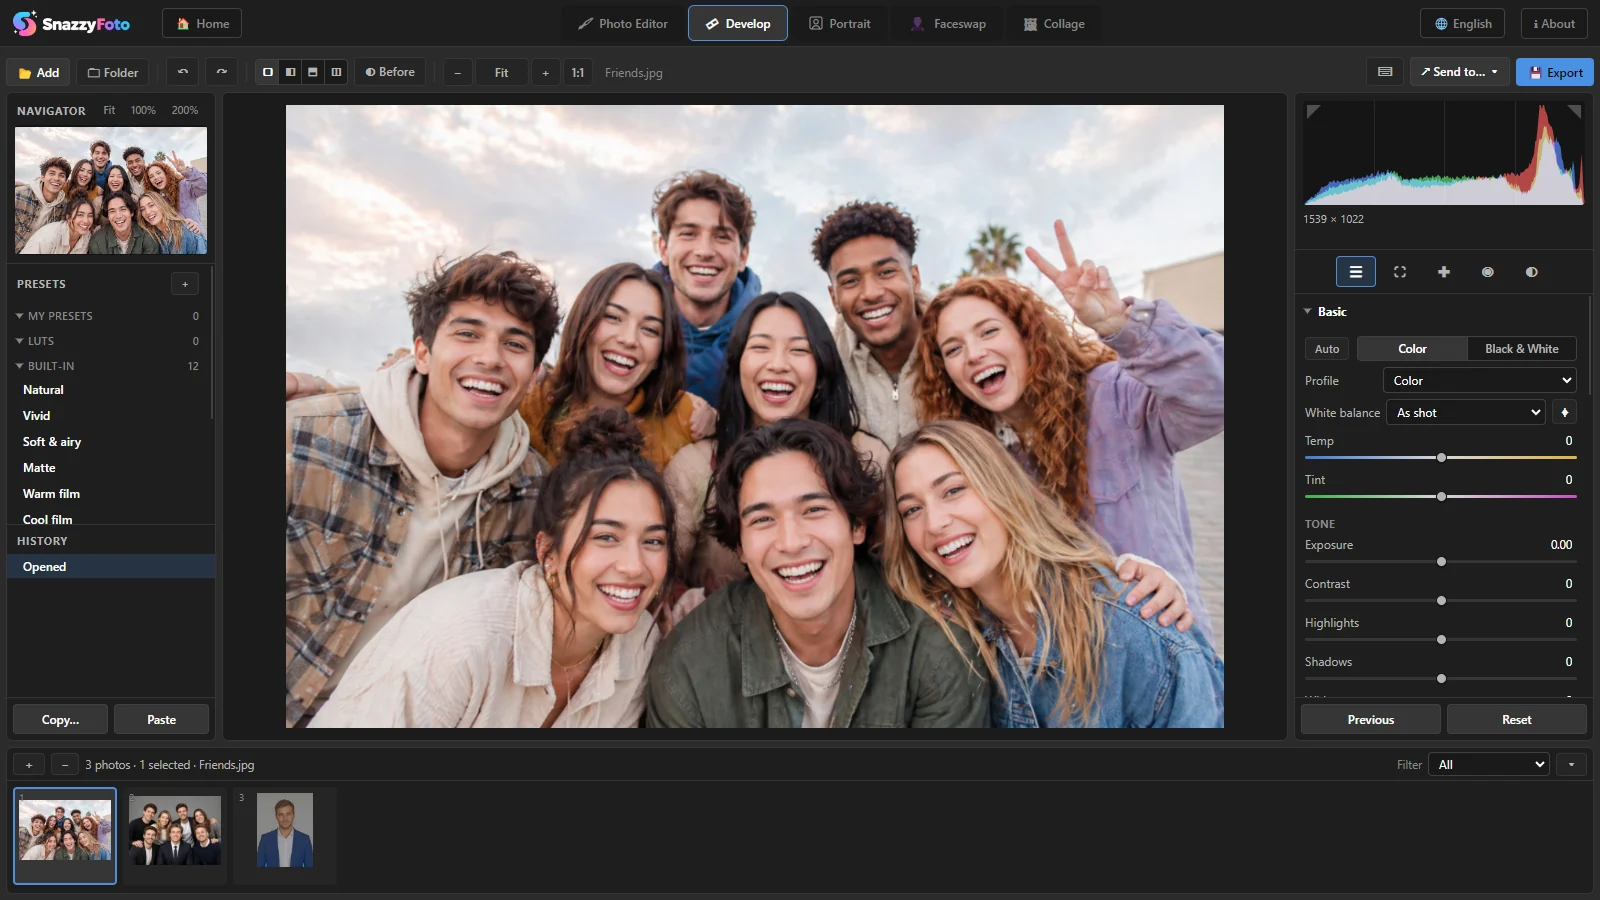 1234567
- 1 Toolbar — open photos, undo, compare before and after, zoom, export.
- 2 Left panel — the Navigator, Presets, History, and Copy… / Paste for settings.
- 3 The photo — always shows the result of your settings.
- 4 Histogram — a graph of the light in the photo, with camera details underneath.
- 5 Tools — Edit, Crop, Remove, Red eye and Masking (see Crop, Remove and Red eye and Masks).
- 6 Panels — the sliders, in groups you open and close: Basic, Sky, Lens Blur & Haze, Tone Curve, Color Mixer, Color Grading, Detail, Lens Corrections, Transform and Effects (and 360° Photo, for a 360° photo). They are explained in The Develop panels, Sky Replacement, Lens Blur and 360° photos.
- 7 Filmstrip — all the photos you are working on.
Press Tab to hide the side panels and give the photo more room, Shift + Tab to hide all panels, and F6 to hide the filmstrip. Press the same key again to bring them back.
The toolbar
 123456789
- 1 Add — adds photos to the filmstrip.
- 2 Folder — adds every photo in a folder.
- 3 ↶ / ↷ — undo (Ctrl + Z) and redo (Ctrl + Y).
- 4 View — a single photo, or before and after side by side, top and bottom, or split (see Before and after).
- 5 ◐ Before — shows the photo without your edits; click again to see them (\).
- 6 Zoom — smaller, Fit, bigger, and 1:1 (100 %, one screen pixel per photo pixel).
- 7 ⌨ — the list of keyboard shortcuts (Ctrl + /).
- 8 ↗ Send to… ▾ — takes the edited photo to another module: the Photo Editor (Ctrl + E), Portrait, Faceswap or Collage. See Send a picture to another module.
- 9 Export — saves the edited photo as a new file (Ctrl + Shift + E). See Export from Develop.
In the free version, Free version: export max. 2048 px appears next to the export buttons. Click it to read about becoming a Supporter.
Zoom and move around
- Click the photo to zoom to 100 % at that spot. Click again to fit the whole photo in. Z does the same.
- Scroll the mouse wheel over the photo to zoom in and out, or press Ctrl + = and Ctrl + −.
- Drag the zoomed photo to move around. While another tool is active, hold Space and drag.
- Navigator (top left) — a small copy of the whole photo. The box shows the part you see. Click or drag in it to jump there. Its buttons Fit, 100% and 200% set the zoom.
Judge sharpening and noise at 100 %. At "Fit" the photo is scaled down, so fine detail is hard to see.
The histogram
The histogram shows how much of the photo is dark (left), mid-tone (middle) and bright (right), for red, green and blue. A tall pile against the left edge means very dark areas; against the right edge, very bright areas.
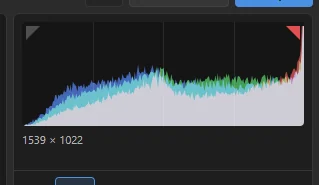 123
- 1 Shadow clipping — lights up when parts of the photo are pure black, with no detail left.
- 2 Highlight clipping — lights up when parts are pure white.
- 3 Photo details — the camera, ISO, focal length, aperture and shutter speed (when the file has them), the size in pixels, and whether it is a RAW, TIFF or HDR file.
Click either corner, or press J, to mark the clipped areas on the photo: blue where it is pure black, red where it is pure white. Move the mouse over the photo to read the red, green and blue values (in %) under the pointer.
Adjust the photo
Now change the photo with the sliders in the panels on the right. Start with the Basic panel; most photos need little else. Every panel and every tool in the tool strip is explained in The Develop panels.
In a hurry? Click Auto at the top of the Basic panel, or try a look from the Presets panel on the left.
Before and after
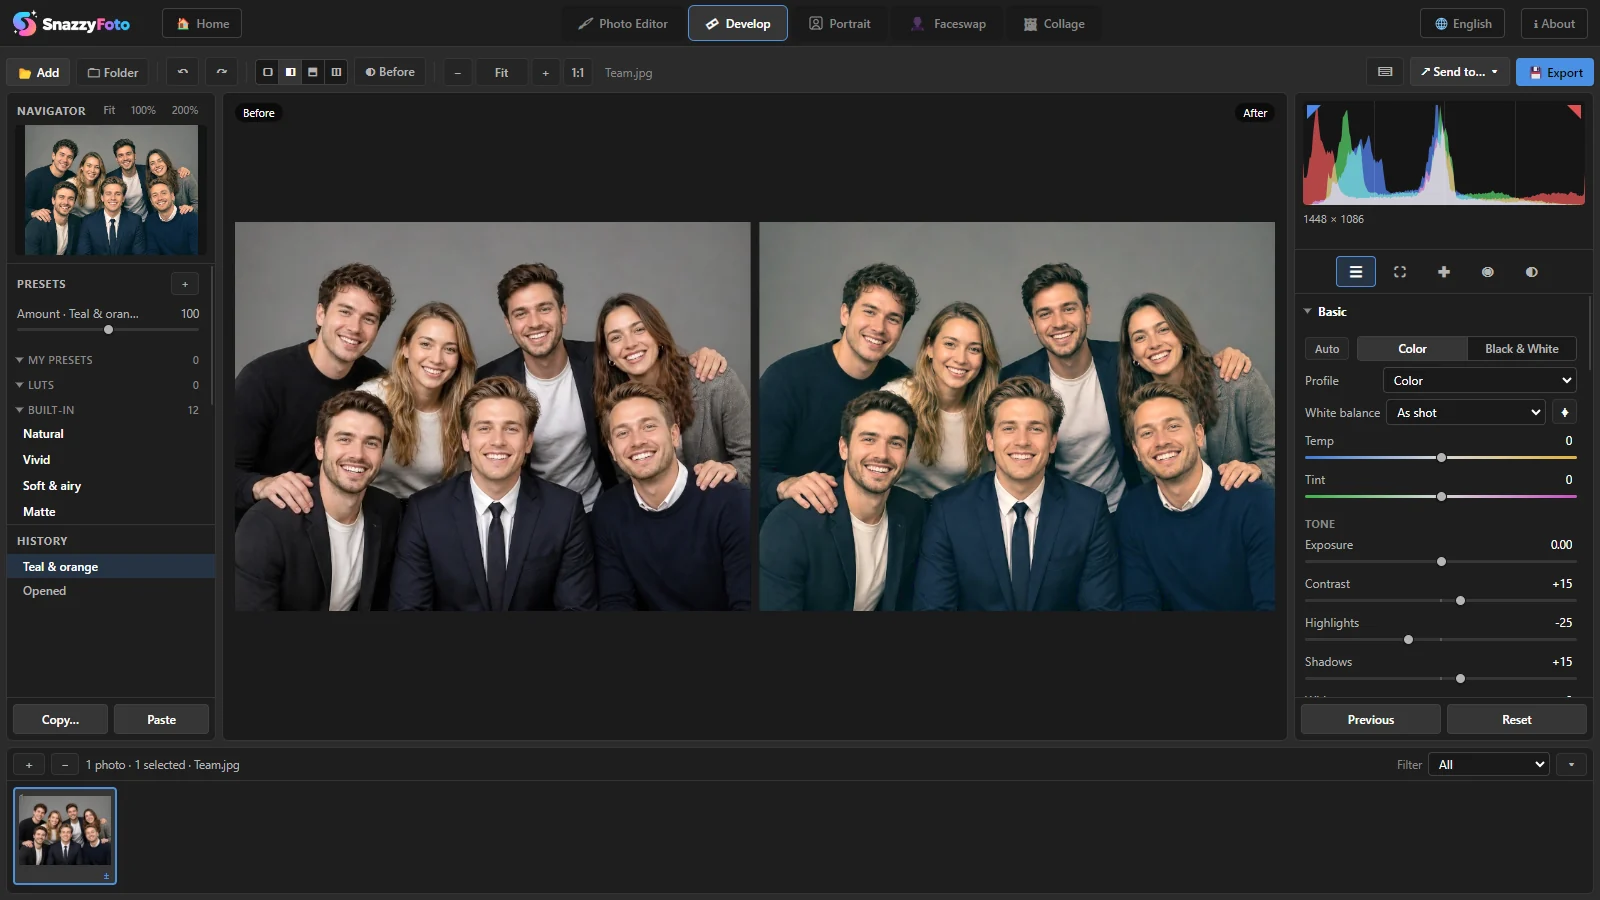 12
- 1 The view buttons in the toolbar: a single photo, before / after left and right (Y), top and bottom (Alt + Y), or split down the middle (Shift + Y). Click the same button again to go back to a single photo.
- 2 Labels show which side is Before and which After.
For a quick look, click ◐ Before or press \: the photo shows without your edits until you press it again. Your crop and straightening stay, so you compare like with like.
History, undo and reset
- The History panel on the left lists every change, newest at the top. Click a line to go back to that moment. Your next change starts a new branch from there.
- Ctrl + Z undoes, Ctrl + Y redoes.
- Reset (bottom right, Ctrl + Shift + R) puts every setting back to the start. You can undo it.
When several photos are selected in the filmstrip, Reset resets all of them. Ctrl + Z brings them all back.
Send to the Photo Editor and back
Develop is for light and colour. For layers, text, brushes or combining photos, move on to the Photo Editor:
- Press Ctrl + E, or click ↗ Send to… ▾ and choose Photo Editor. (Also in the right-click menu: Edit In › SnazzyFoto Photo Editor.)
- SnazzyFoto renders the photo at full size and switches to the Photo Editor.
- If no document is open there, the photo becomes a new document. If one is open, the photo is added as a new layer called From Develop.
The other way works too. In the Photo Editor, choose Image › Edit Layer in Develop… (Ctrl + Shift + A) or Image › Edit Merged Image in Develop…. The picture opens in Develop as Image from another module. Edit it, then press Ctrl + E: it comes back to the Photo Editor as a new layer, the same size as your document.
A picture that came from another module is not a file, so it is not added to the filmstrip and its edits are not remembered after you open another photo. Finish it before you switch.
Keyboard shortcuts
Develop has keyboard shortcuts for most of its work. Press Ctrl + / (or click ⌨) to see the list in the app.
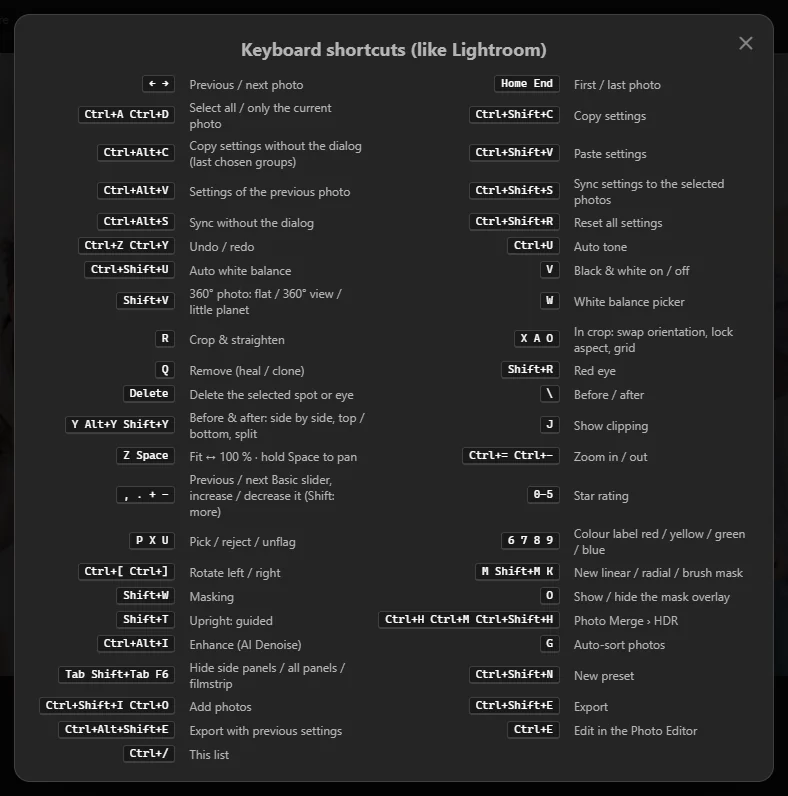
| Keys | What they do |
|---|---|
| Photos and the filmstrip | |
| ← → | Previous / next photo |
| Home End | First / last photo |
| Ctrl + A · Ctrl + D | Select all photos / only the current one |
| Ctrl + Shift + I · Ctrl + O | Add photos |
| 0–5 | Star rating (0 removes it) |
| P · X · U | Pick / reject / remove the flag |
| 6 7 8 9 | Colour label red / yellow / green / blue |
| G | Auto-sort photos |
| Settings | |
| Ctrl + Shift + C | Copy settings (with a choice of what) |
| Ctrl + Alt + C | Copy settings without the dialog |
| Ctrl + Shift + V | Paste settings |
| Ctrl + Alt + V | Settings of the previous photo |
| Ctrl + Shift + S | Sync settings to the selected photos |
| Ctrl + Alt + S | Sync without the dialog |
| Ctrl + Shift + R | Reset all settings |
| Ctrl + Z · Ctrl + Y | Undo / redo (also Ctrl + Shift + Z) |
| Ctrl + Shift + N | New preset |
| Adjusting | |
| Ctrl + U | Auto tone |
| Ctrl + Shift + U | Auto white balance |
| W | White balance picker |
| V | Black & white on / off |
| , . + − | Previous / next Basic slider, increase / decrease it (Shift: more) |
| Tools | |
| R | Crop & straighten |
| X · A · O | In the crop tool: swap portrait / landscape, lock the aspect, change the guide lines |
| Enter · Esc | In the crop tool: apply / cancel |
| Ctrl + [ · Ctrl + ] | Turn left / right |
| Q | Remove (heal / clone) |
| Shift + R | Red eye |
| Delete | Delete the selected spot, eye or mask |
| Shift + W | Masking |
| M · Shift + M · K | New linear / radial / brush mask |
| O | In Masking: show / hide the mask overlay |
| Shift + T | Upright: Guided |
| Ctrl + H · Ctrl + M · Ctrl + Shift + H | Photo Merge: HDR / Panorama / HDR Panorama |
| Ctrl + Alt + I | Enhance (AI Denoise) |
| Viewing | |
| \ | Before / after |
| Y · Alt + Y · Shift + Y | Before & after: side by side, top / bottom, split |
| J | Show clipping |
| Z · Space | Fit ↔ 100 % · hold Space and drag to move around |
| Ctrl + = · Ctrl + − | Zoom in / out |
| Tab · Shift + Tab · F6 | Hide side panels / all panels / the filmstrip |
| Shift + V | 360° photo: flat / 360° view / little planet |
| Finishing | |
| Ctrl + Shift + E | Export |
| Ctrl + Alt + Shift + E | Export with Previous (the last export settings, no dialog) |
| Ctrl + E | Edit in the Photo Editor |
| Ctrl + / | The shortcut list |
Questions
Develop says it needs WebGL 2 graphics.
Develop does its work on the graphics card. If the message Develop needs WebGL 2 graphics, which isn't available on this computer appears, update your graphics driver (from the website of Intel, AMD or NVIDIA, or through Windows Update) and restart SnazzyFoto. On a very old computer Develop may not work; the Photo Editor still does.
Where are my Develop edits saved?
Inside SnazzyFoto, linked to the photo's file name and folder. The photo file itself is never changed. If you move or rename the photo, SnazzyFoto no longer finds its edits; export it first. SnazzyFoto keeps the edits of your 1000 most recently edited photos.
How do I get my edited photo as a file?
Export it: click Export. See Export from Develop.