Filters

Every filter in the Photo Editor's Filter menu — blur, distort, noise, pixelate, render, sharpen, stylize and other — with a one-line description, plus the filter window and Last Filter.

⏱ 6 min readUpdated October 16, 2026

Filters change the pixels of a layer in one go: blur or sharpen it, add or remove noise, bend it, or turn it into a painting. The Filter menu has more than forty of them, sorted into groups.

Apply a filter

  1. Click the layer you want to change. It must be an unlocked pixel layer.
  2. To filter only part of it, make a selection first.
  3. Open the Filter menu, point at a group (for example Blur) and click a filter.
  4. A filter whose name ends with … opens a window with settings. Change them, watch the preview, and click OK. A filter without … is applied straight away.
The Filter menu with the Blur group open.
Tip

A filter changes the layer's pixels for good (only Undo brings them back). To keep the original, first copy the layer with Ctrl + J and filter the copy. Then you can hide the copy, lower its opacity or give it a mask.

Filters work on pixels. To filter a text layer, turn it into pixels first: right-click › Rasterize Type Layer (see Text and shapes).

The filter window

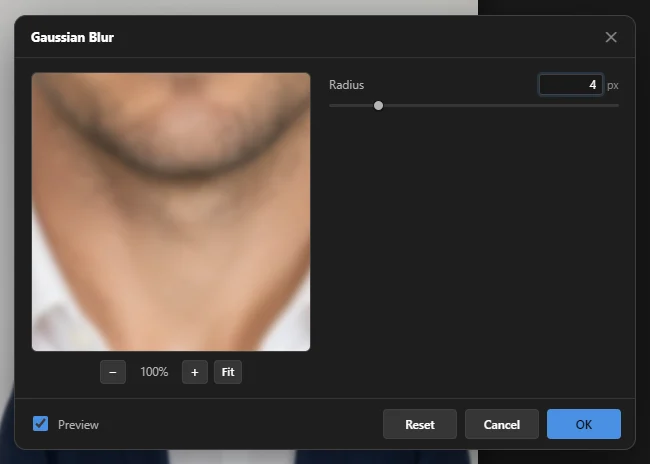
The Gaussian Blur window. The numbers match the list below.1234
The Gaussian Blur window. The numbers match the list below.
  1. 1 Preview — shows the result on part of your layer. Drag in it to look at another part. Hold the mouse button down to see the original for a moment.
  2. 2 Zoom — − and + zoom the preview (also Ctrl + - / +); Fit shows the whole layer.
  3. 3 Settings — sliders, lists and boxes. Filters with a random pattern also have Randomize for a new variation. For filters with a centre, such as Radial Blur and Lens Flare, click in the small picture to set it.
  4. 4 Reset (back to the default settings), Cancel and OK. Enter is OK, Esc is Cancel.

With Preview ticked (bottom left), the filter is also shown on the picture itself — only inside the selection, if there is one. Untick it to compare with the original. On a large photo the picture takes a moment to update after each change.

SnazzyFoto remembers the settings you used. Filter › Last Filter (Alt + Ctrl + F) applies the last filter again with the same settings, without opening the window.

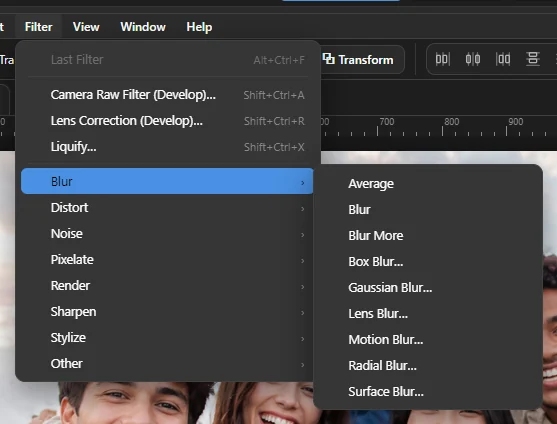
At the top of the Filter menu

CommandWhat it does
Last Filter Alt + Ctrl + FRepeats the last filter.
Develop Filter… Shift + Ctrl + AOpens the layer in Develop for colour and tone (see Edit in Develop and back).
Lens Correction (Develop)… Shift + Ctrl + RAlso opens the layer in Develop, where you can fix lens distortion and straighten lines (see Lens fixes and Upright).
Liquify… Shift + Ctrl + XChooses the Liquify tool: drag on the picture to push pixels and reshape things. The Size in the options bar sets how big an area you push.

Blur

FilterWhat it does
AverageFills the layer (or selection) with its average colour.
Blur, Blur MoreA quick light blur, or a little stronger.
Box Blur…An even blur (Radius).
Gaussian Blur…The smooth, natural blur you'll use most (Radius).
Lens Blur…Looks like a camera out of focus, with bright round spots (Radius, Specular highlights, Threshold).
Motion Blur…Streaks, as if things moved fast (Angle, Distance).
Radial Blur…Blurs around a centre: Spin (turning) or Zoom (rushing towards you).
Surface Blur…Smooths flat areas but keeps edges sharp — good for smoothing skin (Radius, Threshold).

Distort

FilterWhat it does
Pinch…Squeezes the middle inwards, or pushes it out with a negative amount.
Polar Coordinates…Bends the picture into a circle (Rectangular to polar) or unrolls a circle (Polar to rectangular).
Ripple…Small ripples, like water (Amount, Size).
Spherize…Bulges the picture like a ball.
Twirl…Swirls the picture around its centre (Angle).
Wave…Waves with full control over their length, height and shape (Sine, Triangle, Square).
ZigZag…Rings like a stone dropped in a pond (Amount, Ridges, Style).

Noise

FilterWhat it does
Add Noise…Adds grain, for a film look (Amount, Distribution, Monochromatic for grey grain).
DespeckleRemoves fine specks but keeps edges.
Dust & Scratches…Removes small spots and dust (Radius, Threshold).
Median…Smooths noise away; strong values look painted (Radius).
Reduce Noise…Cleans up noisy photos (Strength, Preserve details, Reduce color noise, Sharpen details). For stronger, AI-based cleaning see AI Denoise in Develop.

Pixelate

FilterWhat it does
Color Halftone…Big printed dots, like an old comic.
Crystallize…Breaks the picture into crystal-shaped cells (Cell size).
FacetFlattens areas into blocks of colour, like a hand-painted picture.
Mosaic…Big square pixels (Cell size). Handy for hiding a face or a number plate.
Pointillize…Coloured dots with the background colour between them (Cell size).

Render

FilterWhat it does
CloudsFills the layer with a cloud pattern made of the foreground and background colours.
Difference CloudsClouds mixed with the picture in Difference mode.
Fibers…A fibre or wood-grain texture from the foreground and background colours (Variance, Strength).
Lens Flare…A bright flare of light, like the sun shining into the lens (Flare center, Brightness, Lens type).
Vignette…Darkens or lightens the edges to draw the eye to the middle (Amount, Midpoint, Roundness, Feather).

Sharpen

FilterWhat it does
Sharpen, Sharpen MoreQuick sharpening, or a little stronger.
Sharpen EdgesSharpens only the edges and leaves smooth areas alone.
Smart Sharpen…Sharpening with control (Amount, Radius, Reduce noise).
Unsharp Mask…The classic way to sharpen photos (Amount, Radius, Threshold to protect smooth areas).

Stylize

FilterWhat it does
Diffuse…Scatters pixels for a frosted-glass look.
Emboss…Turns the picture into a grey relief, as if pressed into metal (Angle, Height, Amount).
Find EdgesDraws the outlines, like a pencil sketch.
Glowing Edges…Bright neon edges on black.
Oil Paint…Makes the photo look like an oil painting (Stylization, Cleanliness, Shine, Lighting angle).
SolarizeMixes the picture with its negative, like over-exposed film.
Trace Contour…Thin lines along one brightness level, like a contour map (Level, Edge).
Wind…Streaks, as if the picture is blown sideways (Wind, Blast or Stagger; From the left or From the right).

Other

FilterWhat it does
Custom…Your own filter from a grid of 5 × 5 numbers (Kernel, Scale, Offset). For experimenting.
High Pass…Keeps only the fine detail on grey. On a copy of the layer with the Overlay blend mode, it sharpens (Radius).
Maximum…, Minimum…Make light areas (Maximum) or dark areas (Minimum) spread out (Radius). Useful on masks to grow or shrink them.
Offset…Shifts the picture sideways and up or down. Wrap around moves what falls off one edge to the other — handy for seamless patterns.

Next steps

Still stuck? Email snazzysoft.app@gmail.com with a screenshot.
Filters — SnazzyFoto Help · SnazzySoft