
Edit many photos at once
Use the filmstrip: select several photos, rate, flag and colour-label them, filter, and copy, paste, sync or auto-sync settings; plus the right-click menu.
A day out, a party, a holiday: often you want the same look on many photos. Edit one, then copy its settings to the others in a few clicks. The filmstrip also lets you rate, flag and colour-label your photos, and show only the ones you want.
The filmstrip
Every photo you open in Develop joins the filmstrip at the bottom. It stays there, also after a restart, until you remove it.
 123456
- 1 + — adds photos (Ctrl + Shift + I). You can also drop photos on Develop, or add a whole folder with Folder in the toolbar.
- 2 − — takes the selected photos out of the filmstrip. The files stay where they are on your computer.
- 3 How many photos there are, how many are selected, and the name of the one you are looking at.
- 4 Filter — show only some photos (see Show only some photos).
- 5 ▾ — hides the filmstrip (F6).
- 6 The photo you are looking at has a bright frame.
Under each thumbnail: its star rating, a flag (⚑ picked, ✕ rejected), ± if it has been edited, and its number. A coloured stripe along the bottom is its colour label. Once you have opened a photo, its thumbnail shows your edits.
Click a thumbnail to open that photo, or use ← and →. Home and End jump to the first and the last.
Select several photos
- Ctrl-click thumbnails to add them to the selection, or to take them out again.
- Shift-click to select everything from the last photo you clicked up to this one.
- Ctrl + A selects all photos (that the filter shows); Ctrl + D selects only the current one again.
Selected photos have a highlighted frame. The photo shown in the middle stays the same while you select: it is the one whose settings you copy or sync.
Ratings, flags, labels, Paste, Reset, export and Photo Merge work on all selected photos at once.
Rate, flag and label
Mark your photos while you look through them, then show only the good ones with the filter.
| Keys | Mark |
|---|---|
| 1–5 · 0 | One to five stars · no stars |
| P | Flag as pick (a keeper) |
| X | Flag as rejected |
| U | Remove the flag |
| 6 7 8 9 | Colour label red, yellow, green, blue. On a single photo, the same key again removes it. |
The same is in the right-click menu (Set Flag, Set Rating, Set Color Label), which also has a purple label and No colour label. A short message on the photo confirms each mark.
Lots of photos? Let Auto-sort suggest which to keep. Supporter
Show only some photos
Choose in the Filter list at the right of the filmstrip:
| Filter | Shows |
|---|---|
| All | Every photo. |
| Picked · Unflagged · Rejected | Photos with that flag. |
| ★ 1+ … ★ 5 | Photos with at least that many stars. |
| Edited | Photos you have changed. |
| Any colour label · Red … Purple | Photos with any label, or with that one. |
The arrow keys, Ctrl + A and Shift-click only use the photos the filter shows.
Copy and paste settings
- Open the photo you edited and click Copy… at the bottom left (Ctrl + Shift + C).
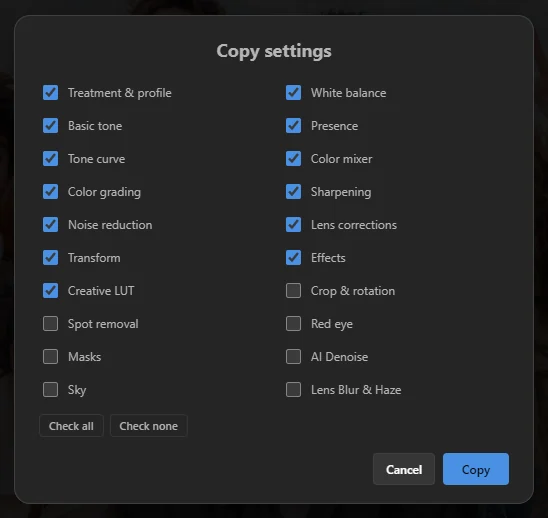
- In the Copy settings dialog, tick what to copy, then click Copy.
- Open another photo, or select several, and click Paste (Ctrl + Shift + V).
 123
- 1 One tick box per group of settings: Treatment & profile, White balance, Basic tone, Presence, Tone curve, Color mixer, Color grading, Sharpening, Noise reduction, Lens corrections, Transform, Effects, Creative LUT, Crop & rotation, Spot removal, Red eye, Masks, AI Denoise, Sky and Lens Blur & Haze.
- 2 Check all / Check none.
- 3 Copy (or Enter).
At first, crop, spot removal, red eye, masks, AI Denoise, Sky and Lens Blur & Haze are not ticked: they usually fit only the photo they were made for. (A copied sky is found again, and the depth for Lens Blur measured again, in each photo they are pasted to.) SnazzyFoto remembers your choice for next time. Ctrl + Alt + C copies with that choice without showing the dialog.
Settings of the previous photo
Working through a series one by one? With one photo selected, the button at the bottom right is Previous (Ctrl + Alt + V). It gives the current photo the settings of the nearest photo to its left in the filmstrip that you have edited. Crop, spot removal and red eye are not taken over.
Sync settings to many photos
 123
- Open the photo whose look you want to share, and edit it.
- Ctrl-click the other photos in the filmstrip (or press Ctrl + A). 1 The Previous button becomes Sync….
- Click Sync… (Ctrl + Shift + S). The Synchronize settings to the selected photos dialog has the same tick boxes as Copy.
- Click Synchronize. A message says how many photos got the settings.
Ctrl + Alt + S syncs with your last choice, without the dialog.
Auto Sync
2 While several photos are selected, an Auto button appears next to Sync…. Click it to switch Auto Sync on: from now on, every slider you move on the current photo moves on all selected photos too. Click it again to switch it off. Auto Sync never copies the crop, spot removal or red eye fixes.
3 Reset puts every setting of all selected photos back to the start.
Paste, Sync, Auto Sync and Reset on several photos are one step in the History of the photo you are looking at. Ctrl + Z (or a click on an earlier History line) undoes the change on all the photos it touched, and Ctrl + Y redoes it. Once you open another photo, that History starts afresh.
The right-click menu
Right-click a thumbnail or the photo for the menu below. If you right-click a photo outside the selection, the menu is for that photo only.
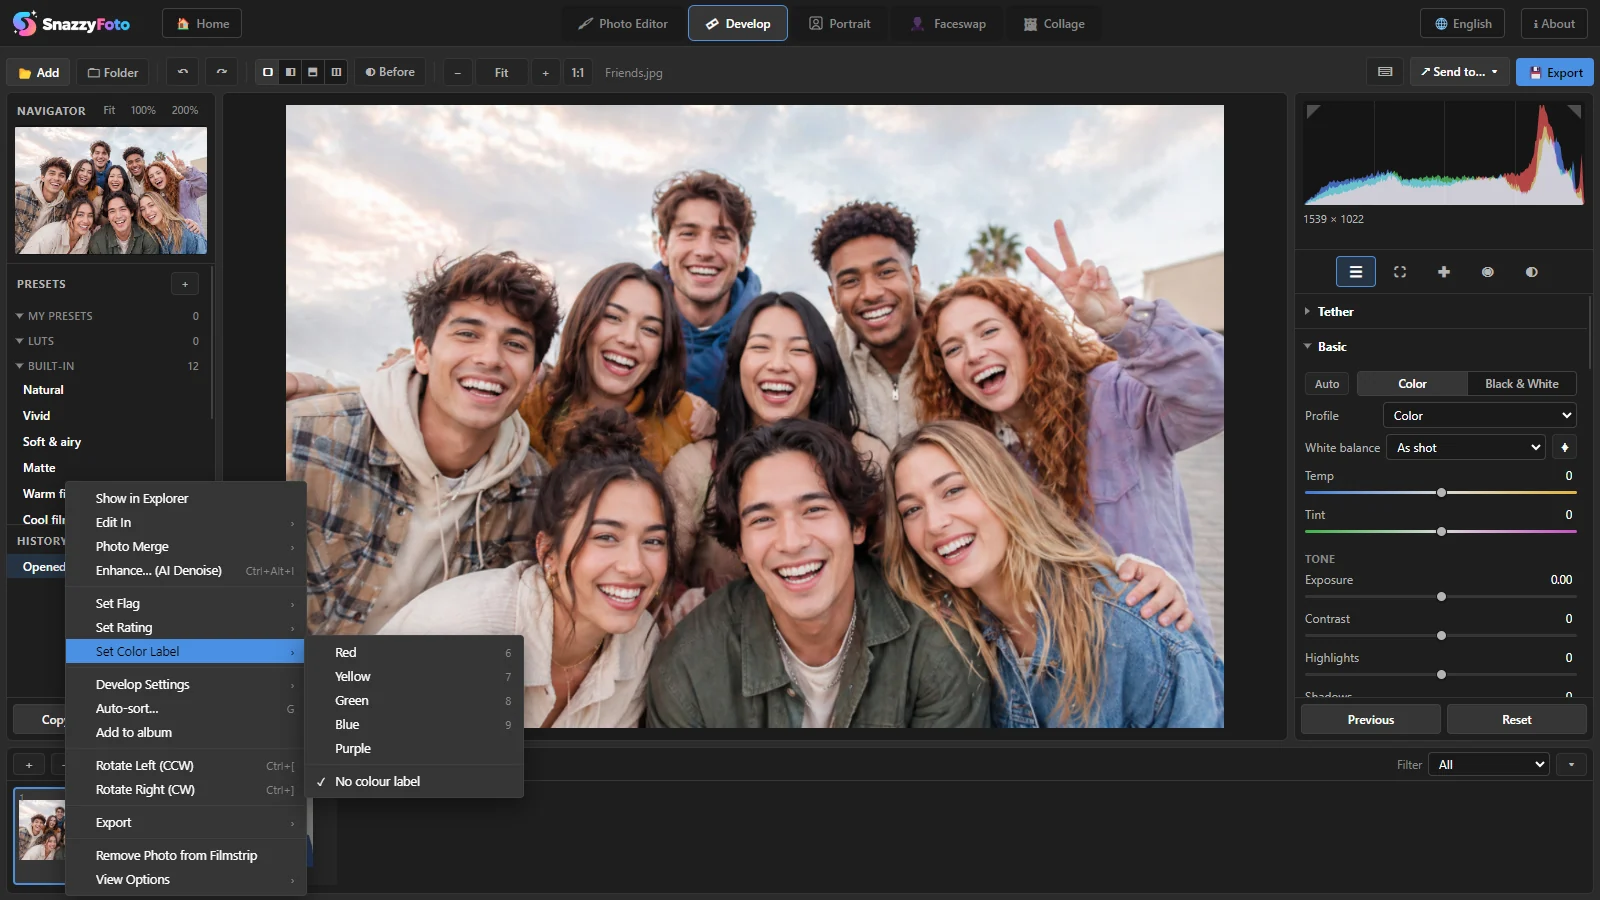 1
| Item | What it does |
|---|---|
| Show in Explorer | Opens the folder with the photo file. |
| Edit In › SnazzyFoto Photo Editor | Sends the edited photo to the Photo Editor (Ctrl + E). |
| Photo Merge › HDR… / Panorama… / HDR Panorama… | Merges the selected photos (HDR: Supporter). See Photo Merge. |
| Enhance… (AI Denoise) | See Camera RAW and AI Denoise. Supporter |
| Set Flag · Set Rating · Set Color Label | Mark the photos (see above). |
| Develop Settings | Copy Settings…, Paste Settings, Paste Settings from Previous, Sync Settings… and Reset. |
| Auto-sort… | See Auto-sort (G). |
| Add to album | Adds the selected photos, with their Develop settings, to the photo album. See Photo albums for print. |
| Rotate Left (CCW) · Rotate Right (CW) | Turns the photo a quarter turn. |
| Export › Export… / Export with Previous | See Export from Develop. |
| Remove Photo from Filmstrip | Same as −: the file stays on your computer. |
| View Options | Show or hide the Filmstrip and the Side panels; Show RAW + JPEG as separate photos (by default the two files of one shot show as one photo with a RAW+JPG badge); Keyboard shortcuts. |
A typical series, start to finish
- Click Folder and choose the folder of the shoot.
- Go through the photos with →, pressing P for keepers and X for the rest.
- Set the Filter to Picked.
- Edit the first photo, press Ctrl + A, then Sync… › Synchronize.
- Look through the photos and fine-tune the ones that need it (often only Exposure).
- Press Ctrl + A again and export them all at once with Export.