
Tethering: shoot straight into Develop
Watch a hot folder so every new photo opens in Develop, or connect a Canon, Nikon or Sony camera over USB for live view, Capture and camera settings (free). Fixes for connection problems and how to report one.
Tethering means shooting with the camera connected to your computer: every photo you take appears in Develop a moment later, big on the screen, so you and your client can check focus, light and pose while you shoot. The Tether panel in Develop offers two ways in: a hot folder (free) and camera control (also free).
Open the Tether panel
Go to Develop. The Tether panel is the first panel on the right; click its title to open it. At the top, choose how photos come in:
| Mode | What it does | Who |
|---|---|---|
| Hot folder | SnazzyFoto watches a folder. Another program puts the photos there. | Free, on Windows and Mac |
| Camera | SnazzyFoto talks to the camera over USB: live view, Capture and camera settings. | Free, on Windows for now |
Both modes end in the same place: the new photo is saved in the watched folder, added to the filmstrip and opened.
Hot folder
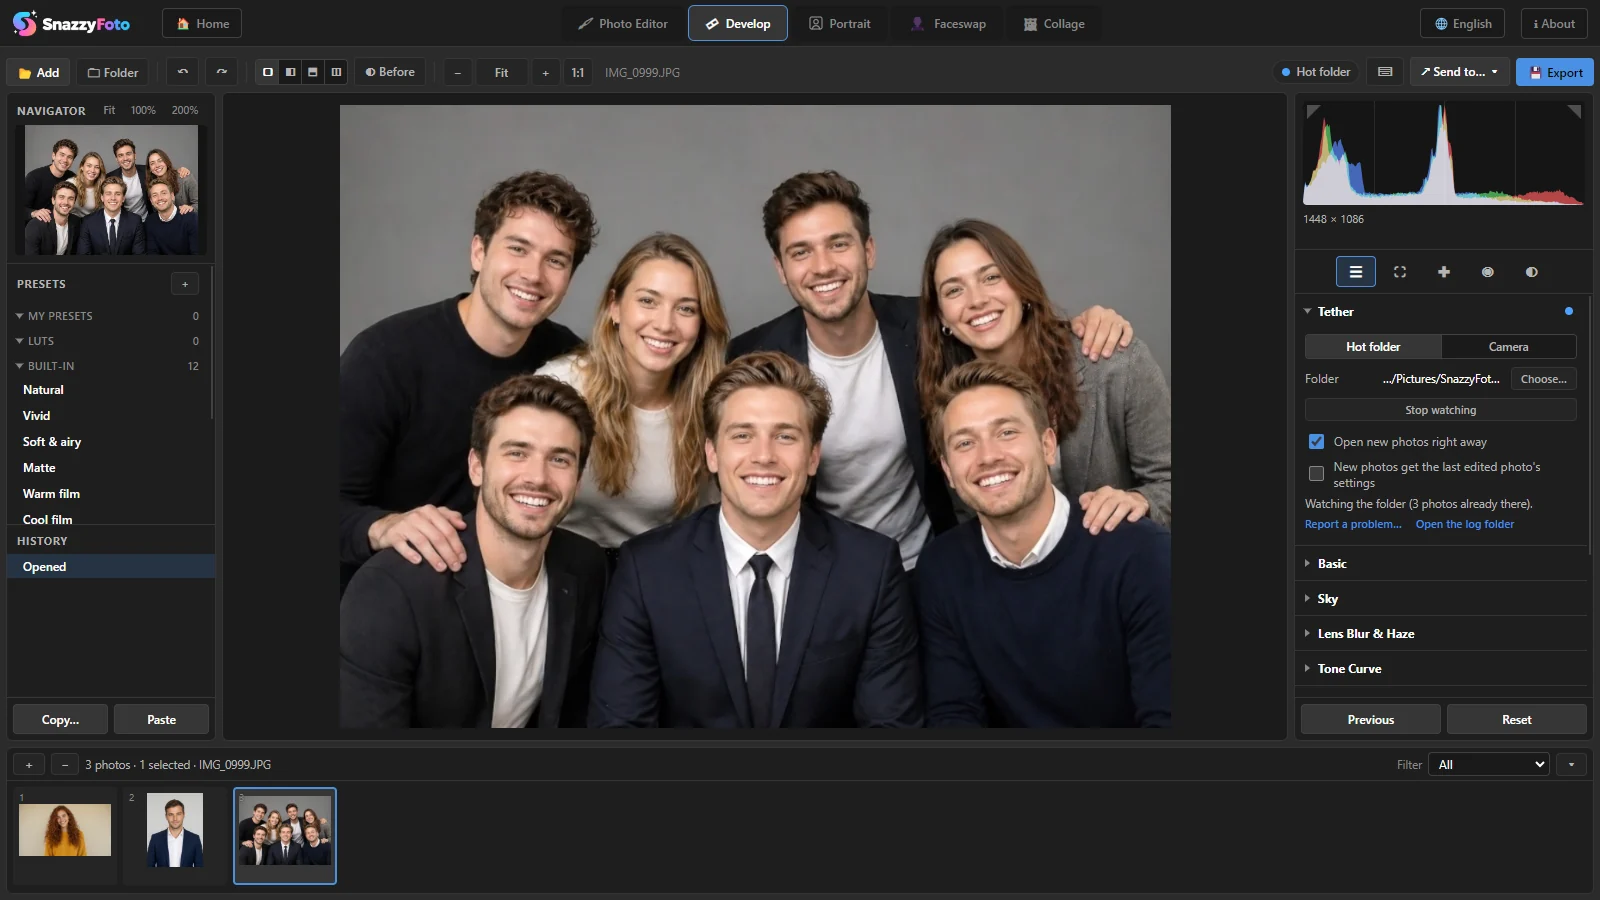 12345
- 1 Hot folder / Camera — the two ways in.
- 2 Folder — the folder that is watched. Click Choose… to pick another one. If you never chose one, it is Pictures › SnazzyFoto Tether › today (a new folder per day).
- 3 Start watching / Stop watching.
- 4 Open new photos right away and New photos get the last edited photo's settings (see below).
- 5 The filmstrip — photos already in the folder are added when you start; each new one is added at the end.
- Choose the folder with Choose… (or keep the default).
- Click Start watching. The panel says how many photos were already there.
- Let any program write photos into that folder: the camera maker's own tether software, a Wi-Fi or FTP transfer from the camera, or simply copying from a card reader.
- Each new photo lands in the filmstrip. With Open new photos right away on, it also opens straight away.
A few things SnazzyFoto takes care of for you:
- A photo that is still being written (a large RAW over Wi-Fi) is only picked up once it is complete. Temporary files are ignored.
- If the camera saves RAW + JPEG, the two files show as one photo in the filmstrip, with a RAW+JPG badge. Supporters get the RAW file; the free version opens the JPEG, because opening RAW files is a Supporter feature. To see both files, right-click the filmstrip and choose View Options › Show RAW + JPEG as separate photos.
- New photos never pull you out of another module: if you are in the Photo Editor, a short notice tells you a new photo arrived.
The hot folder works with any camera, including ones SnazzyFoto can't control yet: run the camera maker's tether app and point it at the same folder.
Give every new photo the same look Supporter
Turn on New photos get the last edited photo's settings. Edit one photo the way you like it, and every photo that arrives after it gets the same settings: exposure, colour, presets, masks and so on. Crop, rotation, spot removal and red-eye are not copied, because they belong to one particular photo.
The settings come from the photo you edited most recently. To change the look for the next shots, simply edit the newest photo.
Camera control
In Camera mode SnazzyFoto drives the camera itself. You can take pictures from the computer, see live view, and change the main camera settings. It works on Windows for now.
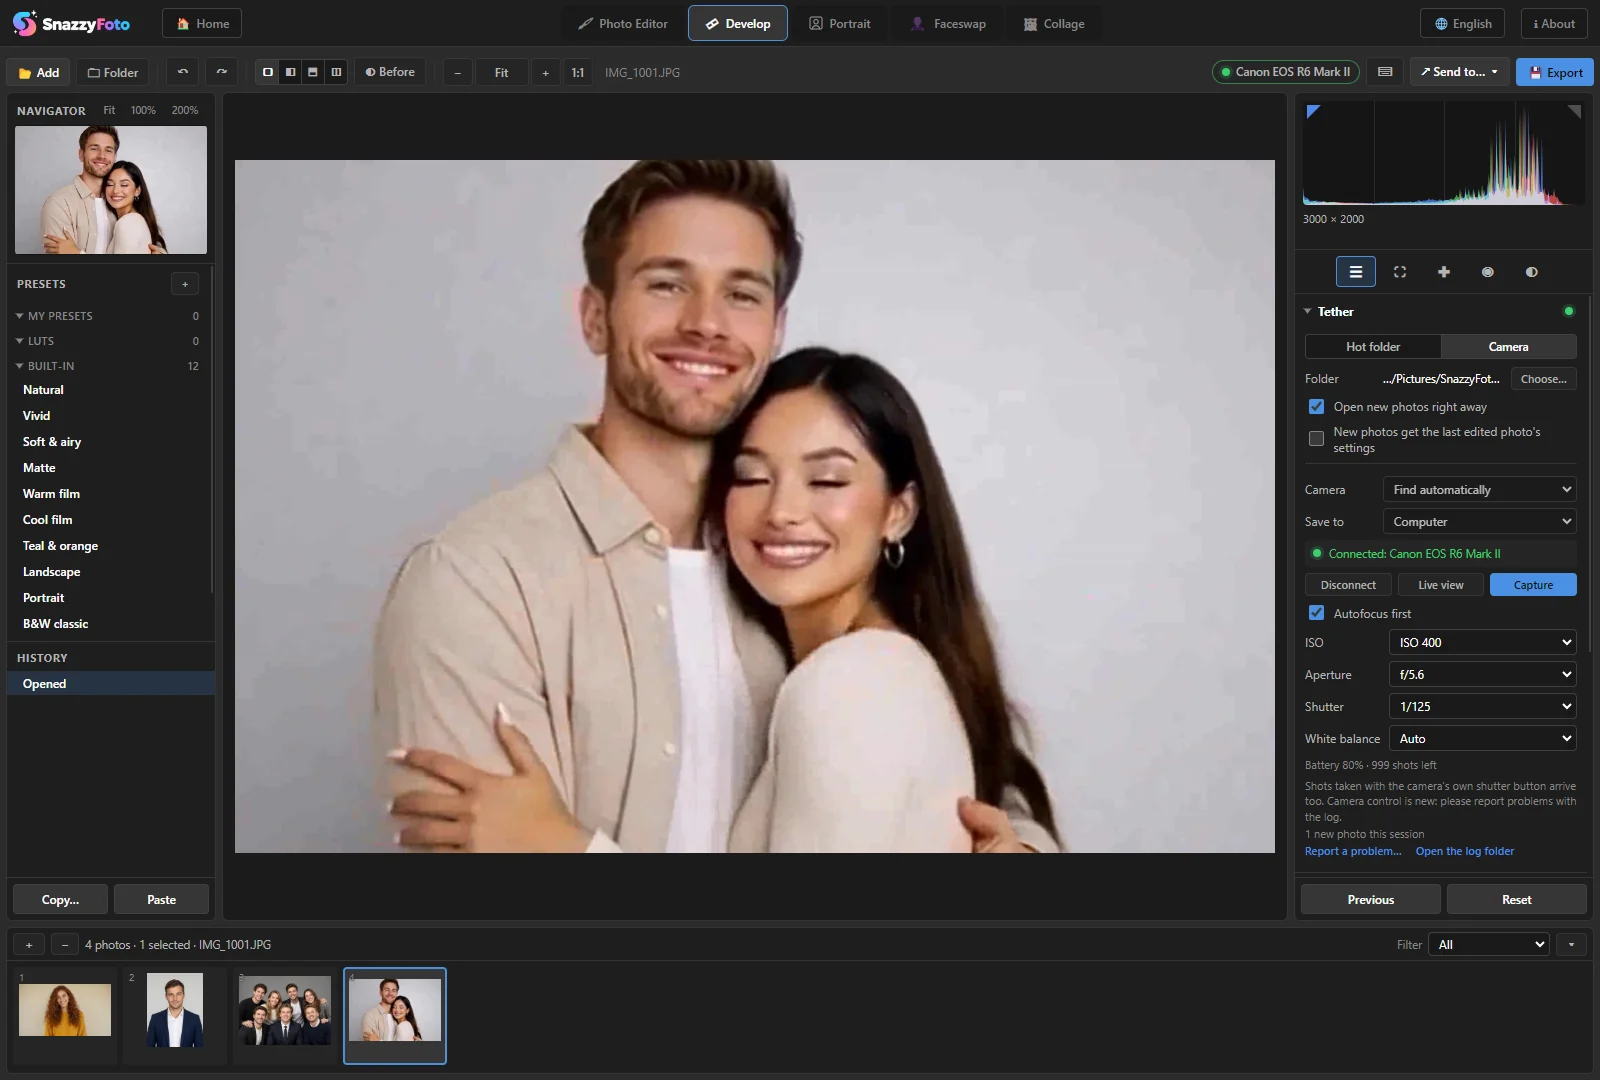 12345678
- 1 Camera — the camera make: Find automatically, Canon (EOS), Nikon Z, Nikon DSLR (D series), Sony Alpha (2019 and later) or Sony Alpha, older (PC Remote).
- 2 Save to — Computer (only into the watched folder) or Computer and card (a copy stays on the camera's memory card too). Some cameras decide this themselves: older Sony bodies in PC Remote, for example, save to the computer only. The panel then says so under Save to.
- 3 Connect / Disconnect.
- 4 Live view — opens the camera's live picture over the photo (see Live view).
- 5 Capture — takes a picture. With Autofocus first on, the camera focuses before it fires.
- 6 Camera settings — ISO, Aperture, Shutter, Exposure comp., White balance, Quality and, on Nikon, Image size (L, M or S; it sets the size of the JPEG, a RAW file is always full size), as far as your camera offers them, with the battery level and the shots left on the card.
- 7 Status — a green dot and Connected: … with the camera model; amber while SnazzyFoto waits for the camera to come back (see below); grey when no camera is connected.
- 8 The same state in Develop's toolbar, so you can see it with the Tether panel closed: the camera's name with a green dot, or Waiting for camera…. Click it to open the Tether panel. The Tether panel title shows the same dot.
- Connect the camera to the computer with a USB cable and switch it on.
- In the Tether panel, click Camera. Choose your camera make, or leave Find automatically.
- Click Connect. The status line shows Connected: … with the camera's name, and the dot turns green.
- Click Capture. The photo is saved in the watched folder, appears in the filmstrip and opens.
Photos taken with the camera's own shutter button arrive too, so you can shoot as usual and just look at the screen.
The watched folder is the same as in hot-folder mode: change it with Choose…. If SnazzyFoto was not watching a folder yet, Connect starts watching it.
Camera control, live view and Capture are free. Free exports are limited to 2048 px, and giving new photos the last edited photo's settings is a Supporter feature. See Free and Supporter.
Live view
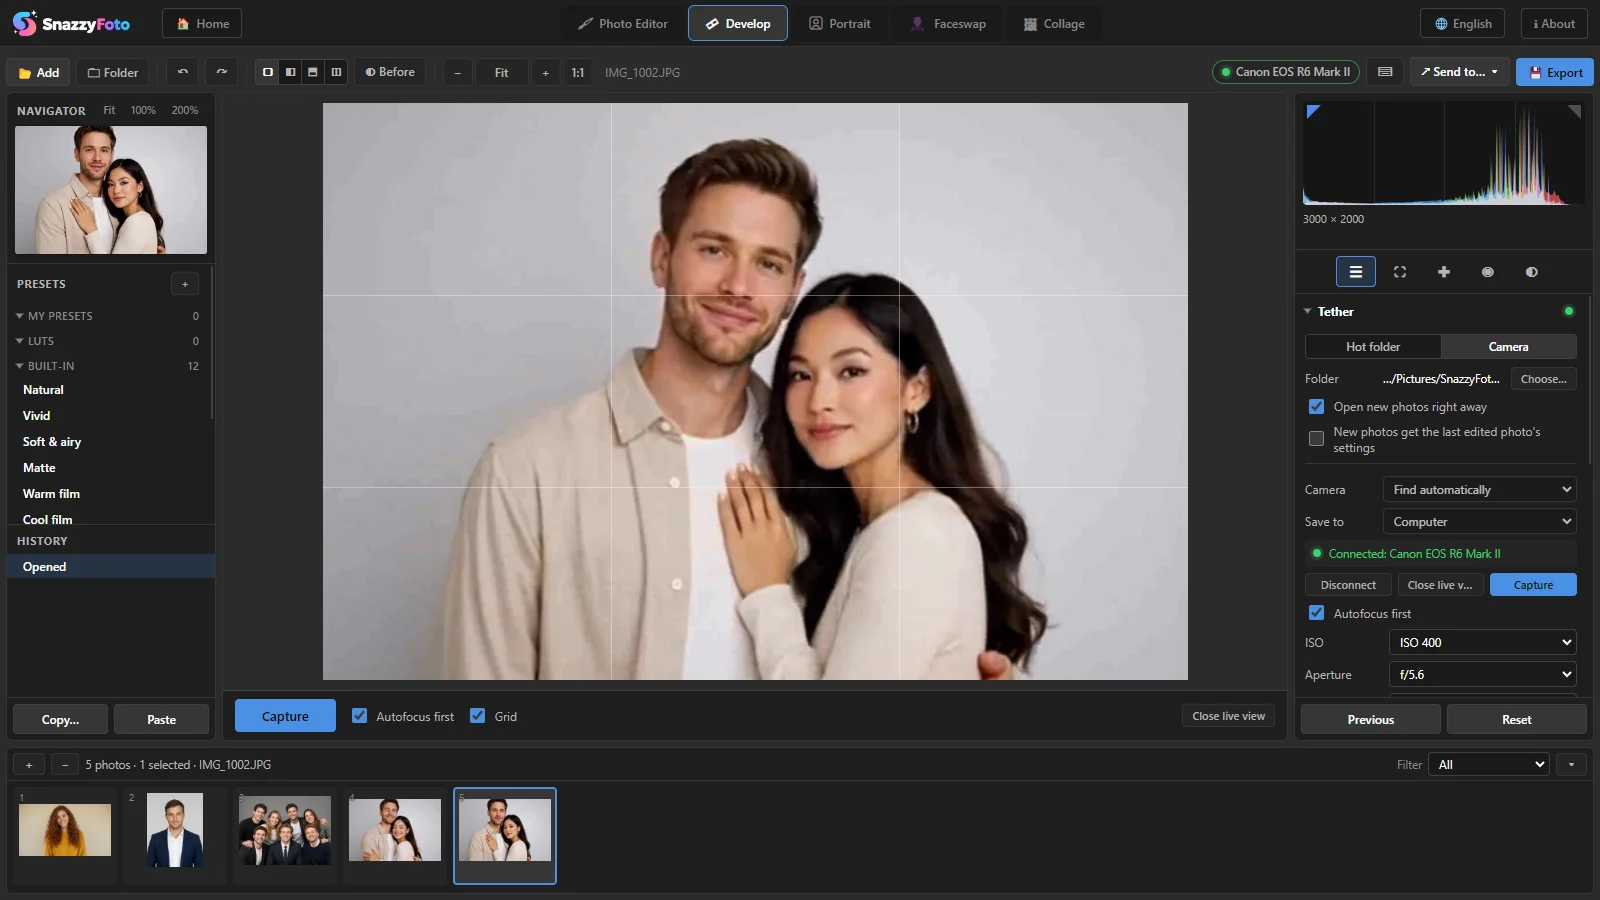 123
- 1 Capture — takes the picture; the frame flashes briefly. Pressing Space does the same.
- 2 Autofocus first and Grid — focus before each shot, and a rule-of-thirds grid to help with composition.
- 3 Close live view — or press Esc. The photo you were looking at is shown again.
Live view keeps the camera's picture shape and fills the photo area. Each new shot opens behind it, so after you close live view you see the latest photo.
Which cameras work
| Choose | Cameras | Good to know |
|---|---|---|
| Canon (EOS) | Canon EOS DSLRs and EOS mirrorless cameras | Close EOS Utility first. |
| Nikon Z | Nikon Z mirrorless cameras | Close NX Tether first. |
| Nikon DSLR (D series) | Nikon D-series DSLRs | Close Camera Control Pro first. |
| Sony Alpha (2019 and later) | Newer Sony Alpha, ZV and FX cameras | Needs the Sony camera driver on Windows (see below). |
| Sony Alpha, older (PC Remote) | Older Sony Alpha cameras such as the A7 II, A7 III or A6400 | In the camera's menu, set the USB connection to PC Remote. |
Camera control works on Windows for now; the hot folder works everywhere. Camera control is new: it has not been tried on every camera body yet. If your camera misbehaves, please report it: that is how support for it gets better.
The Sony camera driver
Sony cameras from 2019 on need Sony's camera driver on Windows. When SnazzyFoto finds a Sony camera without it, the panel says so and shows Install the Sony camera driver. Click it; Windows asks for permission. When it says Driver installed. Unplug the camera and plug it in again., do exactly that and click Connect again.
When the camera won't connect
Most connection problems have simple causes. Check these first:
- Close the camera maker's software. Only one program can talk to the camera at a time. Close EOS Utility, NX Tether, Camera Control Pro or Imaging Edge (also from the taskbar's notification area), then click Connect again.
- Use a good USB cable, plugged straight into the computer. Charging-only cables and long hubs are the most common cause of cameras that disappear.
- Switch the camera on and wake it up (half-press the shutter button). Some cameras turn USB off when they go to sleep: set auto power off to a longer time while tethering.
- Older Sony cameras: set the USB connection to PC Remote in the camera's menu.
- Pick the camera make instead of Find automatically if it is not found.
What the messages mean:
| Message | What to do |
|---|---|
| No camera found… | Check the cable, switch the camera on and close the camera maker's tether app (see the list above). |
| Another program is using the camera… | Close EOS Utility, NX Tether, Imaging Edge or similar, then connect again. |
| The camera is busy. Try again in a moment. | The camera is still saving the last shot or showing a menu. Wait a second and try again. |
| Autofocus failed, nothing was taken. | The camera could not focus (too dark, no contrast). Aim at something with detail, or turn off Autofocus first and focus manually. |
| Check the memory card in the camera… | With Computer and card, the card must be in the camera, not full and not locked. Or switch Save to to Computer. |
| The photo could not be saved on this computer… | The disk is full or the folder can't be written to. Choose another folder. |
| Sony cameras need the Sony camera driver… | Install it with the button in the panel (see above). |
| The camera was switched off or unplugged. | Switch it on or plug it in again. SnazzyFoto waits for it (Waiting for camera…) and reconnects by itself within a few seconds. If you plug in a different camera instead (with Find automatically), SnazzyFoto connects that one. Stop waiting ends the session. |
| The camera didn't answer in time. / The camera connection stopped. Connect again. | Click Connect again. If it keeps happening, switch the camera off and on, try another cable, and report the problem. |
Report a problem
If tethering doesn't work with your camera, you can send us the camera log of your last session straight from the app. It shows us what the camera answered, so we can find the cause.
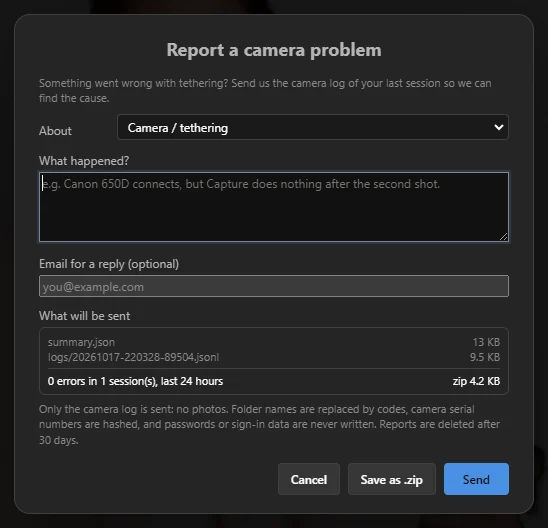 12345
- In the Tether panel, click Report a problem… (at the bottom of the panel).
- 1 Under What happened?, describe the problem: your camera model, what you clicked and what happened (or didn't).
- 2 Add an email address under Email for a reply (optional) if you'd like an answer.
- 3 What will be sent lists the files: a summary.json (app and camera details, the errors) and the latest session log, from the last 24 hours at most, together at most 2 MB.
- 4 Click Send. The window then shows a report code; quote it if you write to us about the problem.
5 No internet on that computer, or the sending failed? Click Save as .zip, keep the file and email it to us from another device.
What is in the report: only the camera log, never photos. Folder names are replaced by codes, camera serial numbers are hashed, and passwords or sign-in data are never written to the log. Reports are deleted after 30 days. On your computer, camera logs are kept for 7 days.
To look at the logs yourself, click Open the log folder in the Tether panel.