
Photo Editor basics
Open photos and projects, start a blank canvas, zoom and move around, use rulers and guides, undo with History, save .snazzy projects, export PNG, JPEG or WebP (free: up to 2048 px), copy and paste, resize and crop, and edit a layer in Develop and back.
The Photo Editor is where you work with layers: open a photo or start a blank canvas, edit it, save your work as a project and export a finished picture. This page covers the everyday basics — opening, viewing, undoing, saving and exporting.
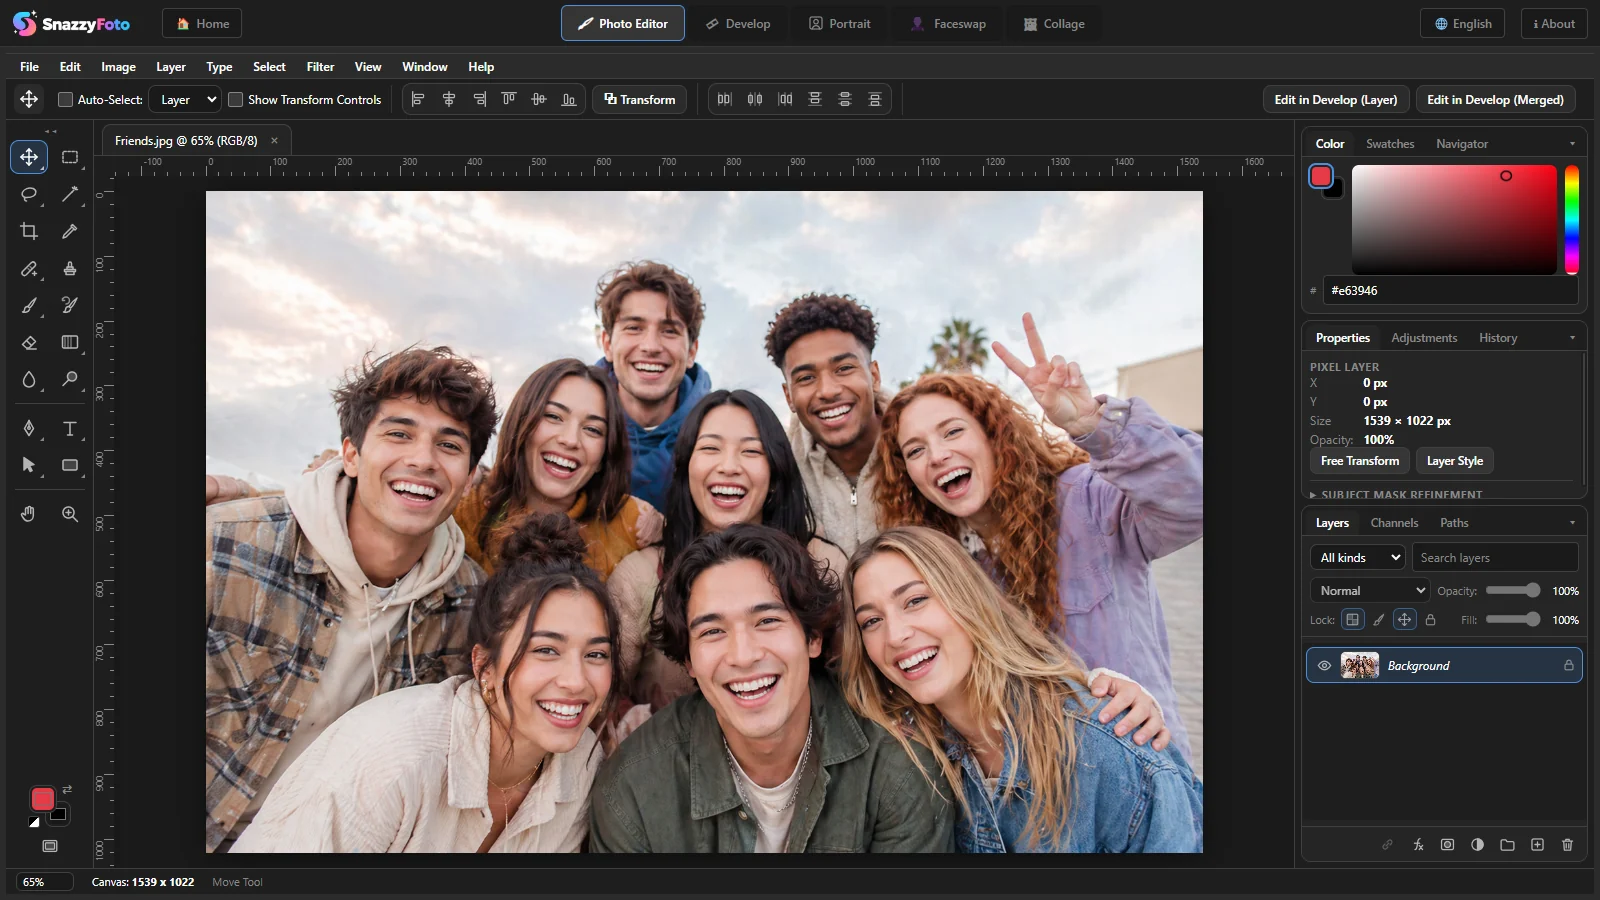
The Photo Editor uses the menus, tools and shortcuts that are common in layer-based photo editors, so if you have used one before, most things are where you expect them. If not, this Help Center explains each part. For a tour of the whole SnazzyFoto window, see the interface tour. Help › Help Center (online) opens this Help Center in your browser.
Open a photo
- Choose File › Open… or press Ctrl + O, then pick a photo. JPG, PNG, WebP, BMP and GIF files open in the Editor.
- Drag a photo from File Explorer onto the SnazzyFoto window. If a photo is already open, the dropped photos are added to it as new layers, scaled down to fit and centred.
- File › Open Recent lists the last photos and projects you opened.
- File › Place Embedded… adds another photo to the open one as a new layer.
- The Home screen can open several photos at once: the first one opens, the others become layers.
Camera RAW files and TIFF files open in Develop first. Make your colour changes there, then send the result to the Editor (see Edit in Develop and back). Opening camera RAW files needs Supporter — see Camera RAW and AI Denoise.
The Editor holds one document at a time. If the open document has unsaved changes, SnazzyFoto asks before it opens another one. Click Discard changes to continue, or cancel and save first with Ctrl + S.
Start with a blank canvas
Choose File › New… or press Ctrl + N.
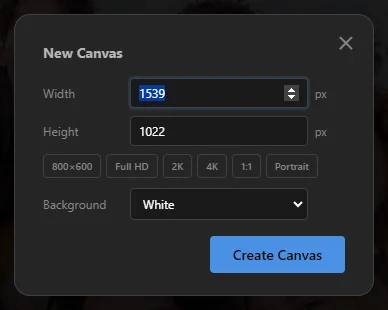 1234
- 1 Width and Height in pixels, from 1 to 16000.
- 2 Presets — one click fills in a common size: 800×600, Full HD, 2K, 4K, 1:1 (square) or Portrait (1080×1920, for Stories).
- 3 Background — White, Transparent (see-through) or Black.
- 4 Create Canvas — makes the new document.
The Home screen also has ready-made sizes named after their use, such as an Instagram post or a YouTube thumbnail.
The document, rulers and status bar
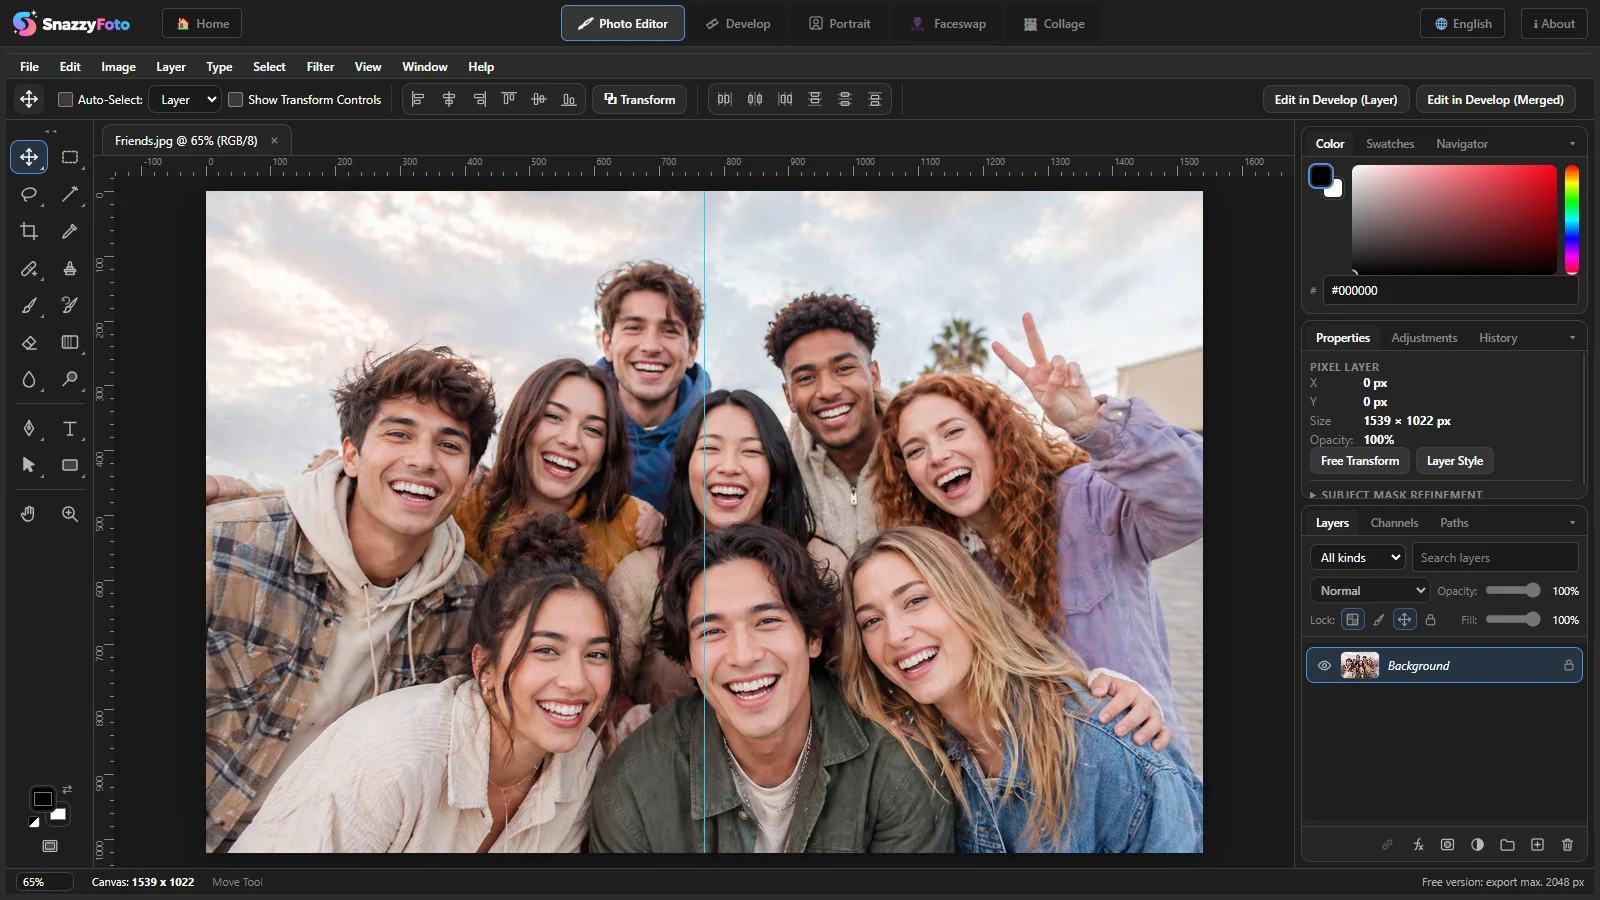 1234567
- 1 Document tab — the file name, the zoom and (RGB/8). A * means there are unsaved changes. The × closes the document (Ctrl + W).
- 2 Rulers — show pixel positions along the top and the left.
- 3 A guide — a thin line that helps you line things up (see Rulers, guides and grid).
- 4 Zoom — type a percentage and press Enter.
- 5 Canvas: the size of the document in pixels. Next to it, the name of the tool you are using.
- 6 Free version: export max. 2048 px — shown only in the free version. Click it to read about Supporter.
- 7 Edit in Develop (Layer) and Edit in Develop (Merged) — see below.
Zoom and move around
| To do this | Do this |
|---|---|
| Zoom in or out | Turn the mouse wheel over the picture, or press Ctrl + + / Ctrl + - |
| Fit the whole picture on screen | Ctrl + 0 or View › Fit on Screen |
| Show the real pixels (100%) | Ctrl + 1; View › 200% doubles that |
| Zoom into one spot | Zoom tool (Z): click to zoom in, Alt + click to zoom out |
| Move the view | Hold Space and drag, or use the Hand tool (H), or the scroll bars |
| Jump to another part | Click or drag in the Navigator panel |
Zooming only changes your view. It never changes the picture itself.
Screen modes. Press F to switch between Standard Screen Mode, Full Screen Mode with Menu Bar (no document tab and status bar) and Full Screen Mode (only the picture). Press F again to come back. Tab hides or shows the tools, options bar and panels.
Rulers, guides and grid
- Rulers — turn them on or off with View › Rulers (Ctrl + R).
- Guides — drag from the top ruler to make a horizontal guide, or from the left ruler for a vertical one. Drag a guide to move it. To remove one, drag it back onto the ruler. View › Clear Guides removes them all.
- Grid — View › Show › Grid (Ctrl + ') draws a square every 100 pixels.
- Show or hide guides — View › Show › Guides (Ctrl + ;).
- Extras — View › Extras (Ctrl + H) hides guides, grid and the selection outline at once, so you can look at the clean picture.
Guides move along when you crop, resize or rotate the picture. Guides and the grid are only on your screen: they are never exported and not stored in project files.
The panels
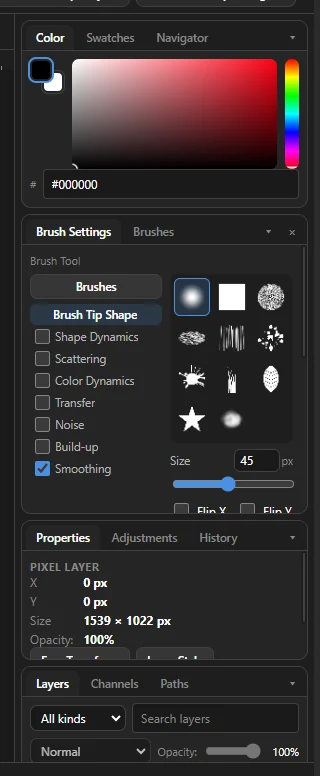 12345
- 1 Color, Swatches and Navigator — choose colours (see Colours) and see where you are in a zoomed picture.
- 2 Brush Settings and Brushes — only while you want them: F5 shows and hides them, × closes them (see Brushes and painting).
- 3 Properties, Adjustments and History — the settings of the selected layer, adjustment layers (see Adjustments) and your list of steps.
- 4 Layers, Channels and Paths — see Layers and masks and The Pen and paths.
- 5 ▾ folds a group away to give the others more room. Click a tab to unfold it.
The Window menu opens any panel by name: F5 shows Brush Settings, F6 Color and F7 Layers. SnazzyFoto remembers which tabs you had open.
The Channels panel can also show a single colour channel: click Red, Green or Blue (or press Ctrl + 3, 4, 5) to see it in grey, and RGB (Ctrl + 2) to go back. This only changes the view.
Undo and History
- Undo — Ctrl + Z, or Edit › Undo. Press it again to go further back.
- Redo — Shift + Ctrl + Z or Ctrl + Y.
- History panel — every step is listed by name, with Current State marking where you are. Click an earlier step to go back to it. Click a later step to go forward again.
SnazzyFoto keeps up to 50 steps. For large pictures, older steps are kept in a temporary folder on your disk, so undo stays quick without filling your computer's memory. The ✕ at the top of the History panel clears the list; after that you can't undo the earlier steps. The history is not stored in project files.
Save your work as a project
A project (.snazzy file) keeps everything so you can carry on later: all layers, masks, text you can still edit, shapes, adjustment layers, layer styles, blend modes and opacity. Projects are always stored at full size, also in the free version.
- Choose File › Save (Ctrl + S) or Save As… (Shift + Ctrl + S).
- The first time, pick a folder and type a name, then click Save. The * on the document tab disappears.
- After that, Ctrl + S saves into the same file straight away. Use Save As… to save a copy under another name.
To open a project again, choose File › Open Project… (Shift + Ctrl + O), use Open Recent, or drag the .snazzy file onto the window.
A project is not a picture other programs can open. When you are done, also export a PNG or JPEG to share. Keep the .snazzy file if you might want to change something later.
If you close SnazzyFoto with unsaved changes in the Editor, it asks first: Save, Don't Save or Cancel.
Export a picture
Exporting makes a normal picture file of everything you can see: all visible layers together.
| Command | What you get |
|---|---|
| File › Export › Quick Export Shift + Ctrl + ' | A PNG. Transparent areas stay transparent. |
| File › Export › Export As… Alt + Shift + Ctrl + ' | PNG, JPEG or WebP: choose the type in the save window (or type the extension, such as .jpg). |
- Choose one of the two commands.
- Pick a folder and type a name. SnazzyFoto suggests the name of your document.
- Click Save.
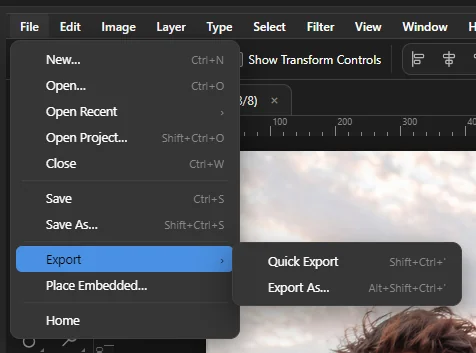 12
- 1 Save and Save As… — store a project (.snazzy) you can keep editing.
- 2 Export — make a PNG, JPEG or WebP picture to share.
JPEG can't be see-through: transparent areas become white in a JPEG. Use PNG (or WebP) to keep them transparent, for example for a cut-out person or a logo.
What the free version exports
In the free version, an exported picture is at most 2048 pixels on its longest side. A larger picture is scaled down to that size, keeping its shape; a smaller one is exported as it is. There is no watermark. The same limit applies to pictures you copy to the Windows clipboard. As a Supporter you export at full size. See Supporter.
Copy and paste
- Copy (Ctrl + C) — copies the selected part of the active layer. With nothing selected, it copies the whole visible picture.
- Cut (Ctrl + X) — copies the selection and removes it from the layer.
- Copy Merged (Shift + Ctrl + C) — copies the visible picture, all layers together.
- Paste (Ctrl + V) — pastes as a new layer called Pasted.
Copy, Cut and Copy Merged also put the picture on the Windows clipboard, so you can paste it into other programs. Pictures copied in other programs can be pasted too: Ctrl + V always pastes what you copied last, in SnazzyFoto or elsewhere. If no document is open, pasting a picture from the Windows clipboard first opens the New Canvas dialog at the size of that picture.
To copy a selection straight onto a new layer, use Layer › New › Layer via Copy (Ctrl + J) — see Layers and masks.
Resize, crop and rotate
| Command | What it does |
|---|---|
| Image › Image Size… Alt + Ctrl + I | Makes the whole picture bigger or smaller. Type a Width or Height; with Lock aspect ratio ticked, the other one follows. Resample: Bilinear (smooth) for photos, Nearest (pixelated) for pixel art. |
| Image › Canvas Size… Alt + Ctrl + C | Adds or cuts away space around the picture without scaling it. The Anchor arrows choose which side stays in place. New space is transparent. |
| Crop Tool C | Crop and straighten by hand (see below). |
| Image › Crop | Crops to the box around the current selection. |
| Image › Trim | Cuts away transparent edges around the picture. |
| Image › Image Rotation | Turns the whole picture: Rotate 180°, Rotate 90° Clockwise or Rotate 90° Counter Clockwise. |
| Edit › Transform | Rotates or flips only the active layer: the same three rotations, plus Flip Horizontal (mirror) and Flip Vertical. |
| Edit › Free Transform Ctrl + T | Move, resize and rotate the active layer by hand (see below). |
The Crop tool
Press C. A box with handles appears around the whole picture; the part outside it is shaded.
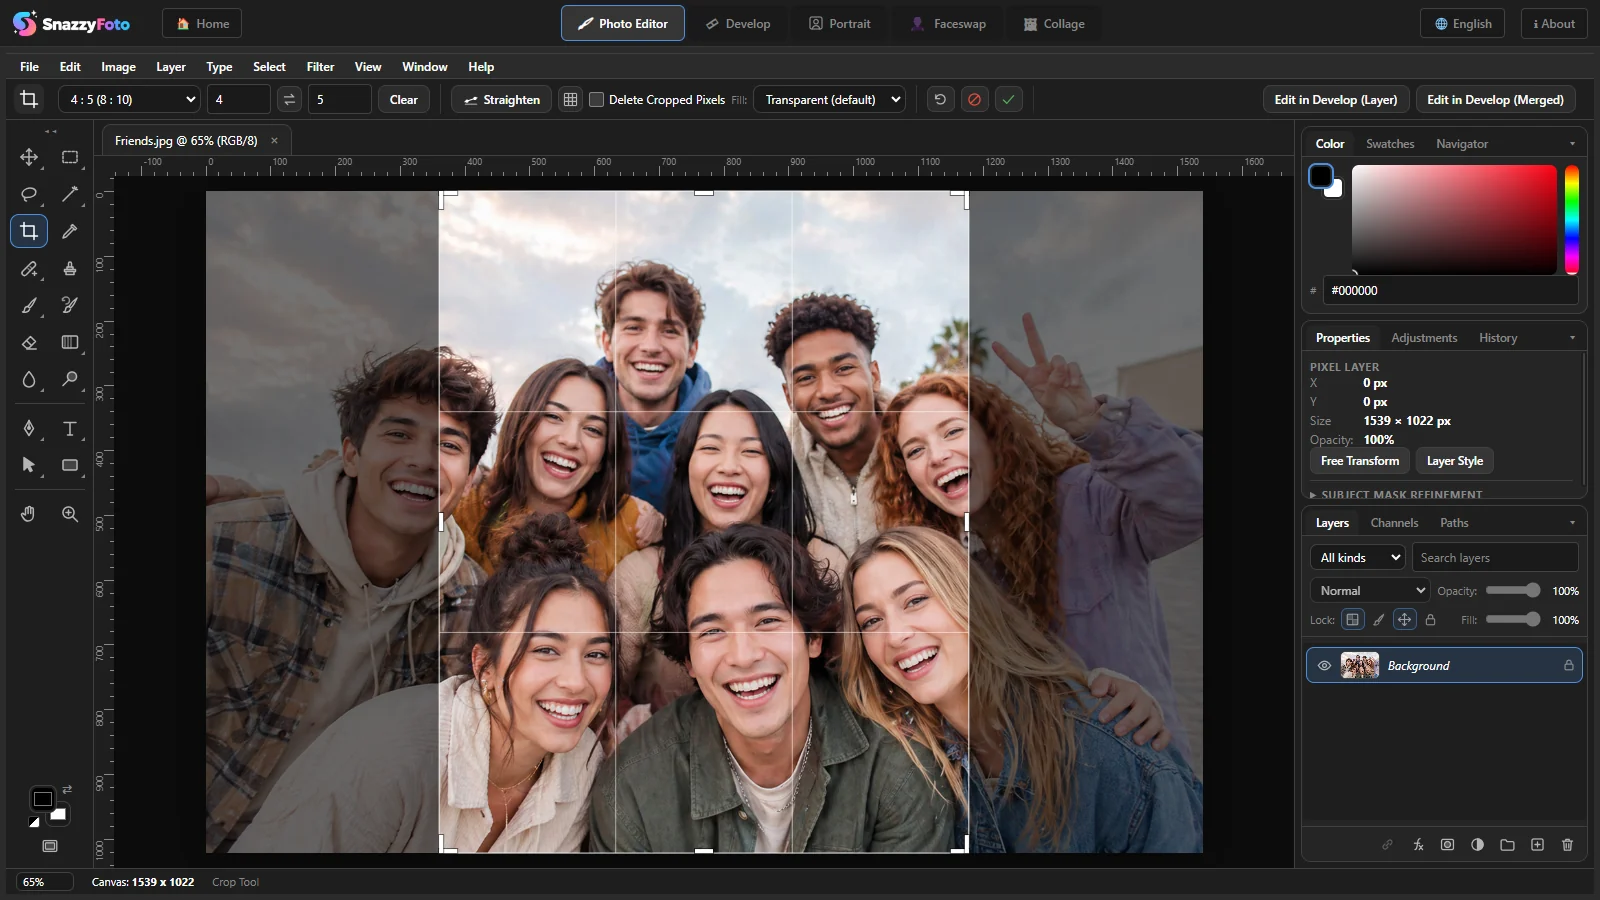 1234567
- 1 Shape or size — Ratio (type your own ratio in the two boxes, or leave them empty to drag freely), W x H x Resolution (an exact size in pixels: the crop is resized to it), Original Ratio, or ready ratios such as 1 : 1 (Square), 4 : 5, 2 : 3 and 16 : 9. The ⇄ button swaps portrait and landscape; Clear empties the boxes.
- 2 Straighten — then draw a line along something that should be level, such as the horizon. The picture turns so the line becomes straight. You can also hold Ctrl and draw the line without the button.
- 3 Overlay — the guide lines over the box: Rule of Thirds, Grid, Diagonal, Triangle, Golden Ratio or Golden Spiral, and when to show them. O goes through the overlays, Shift + O turns the triangle and spiral around.
- 4 Delete Cropped Pixels — off by default: the parts outside the box are only hidden, not thrown away. You can bring them back later by moving the layer with the Move tool, or by cropping again larger. Tick it to really cut them off (smaller files). A crop with it off turns a locked Background into a normal layer, Layer 0, so its hidden parts can be kept.
- 5 Fill: — what fills empty corners when you rotate the crop or make the box bigger than the picture: Transparent (default) or the Background Color.
- 6 Reset, cancel (Esc) and commit (Enter).
- 7 The box — at first, drag on the picture to draw the box you want. Then drag inside it to move it, drag the handles to change its size, and drag just outside it to rotate. A double-click inside applies the crop.
Switching to another tool while a crop box is changed applies the crop. Ctrl + Z undoes it.
Free Transform
Choose Edit › Free Transform (Ctrl + T), click Transform in the Move tool's options bar, or tick Show Transform Controls and drag a handle. A box with handles appears around the active layer.
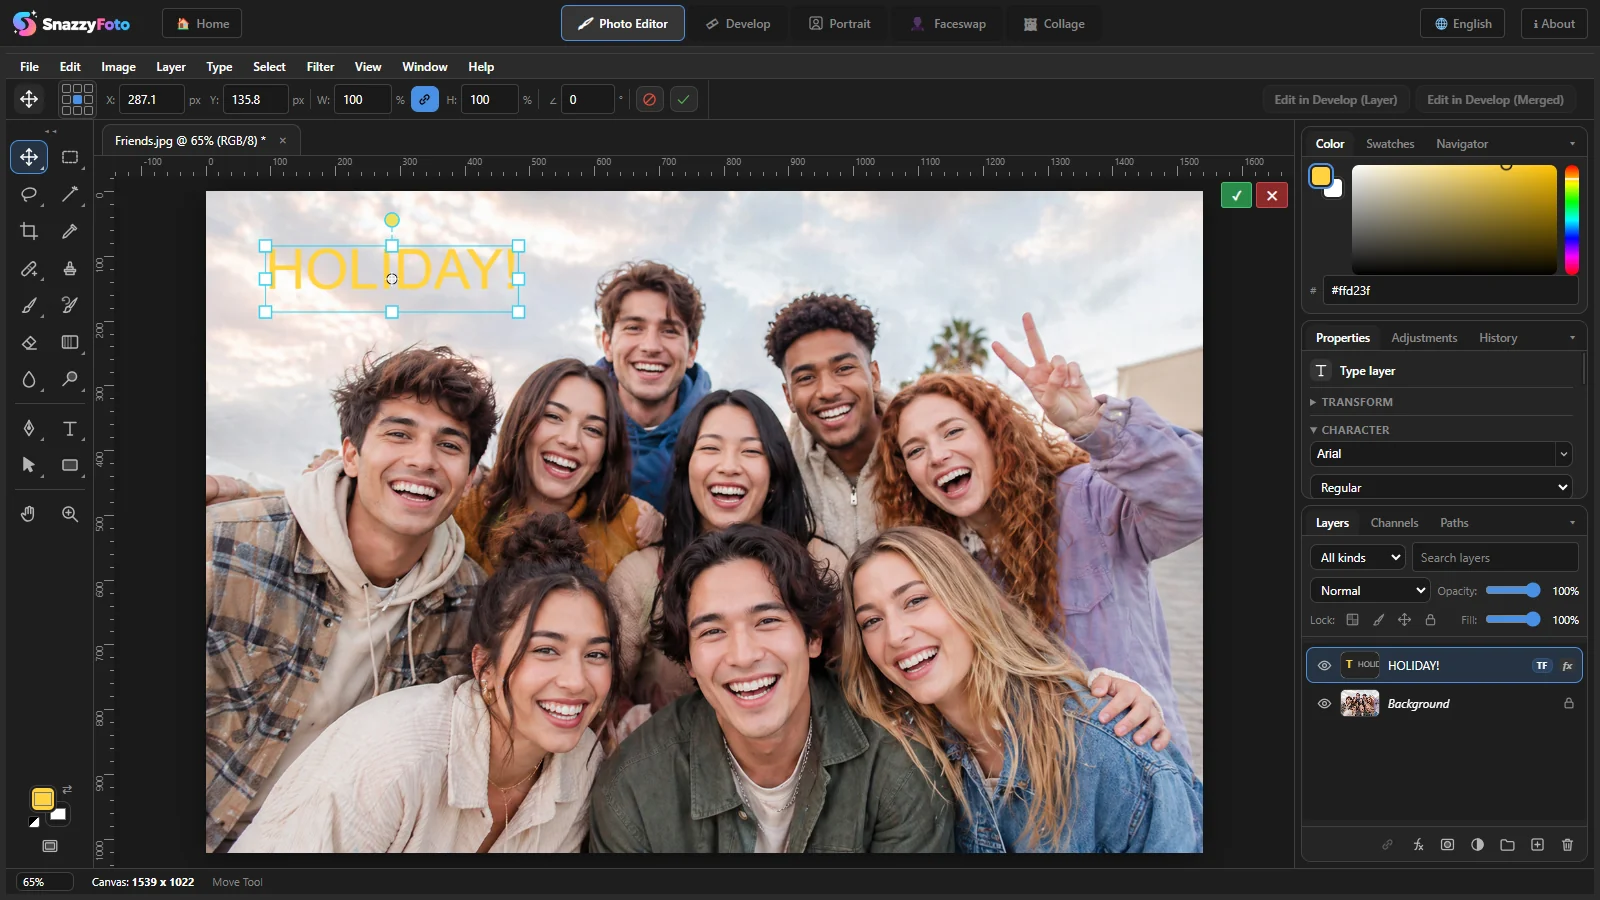 12
- 1 The options bar — the reference point (the centre of rotation; click another dot of the little grid), X: and Y: (its position), W: and H: in percent with the link that keeps the proportions, the angle, and cancel / commit.
- 2 ✓ applies, ✕ cancels.
- Drag inside the box to move, a corner to resize (proportions kept while the link is on; Shift changes that), a side to stretch. Alt resizes around the reference point.
- Drag just outside the box to rotate; Shift turns in 15° steps.
- The arrow keys move the layer 1 pixel (Shift: 10).
- Enter or a double-click inside the box applies; Esc cancels.
Text and shapes stay sharp and editable when you transform them: scaling text changes its font size.
The Background layer is locked. When you try to move it with the Move tool or transform it, SnazzyFoto says so:
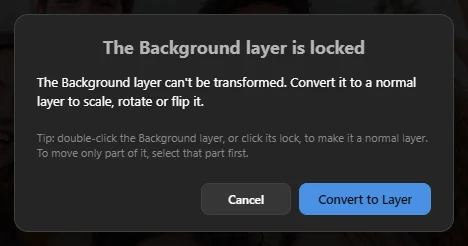 1
Click Convert to Layer 1 to turn it into a normal layer (Layer 0); if you were starting Free Transform, it then starts right away. Cancel leaves it as it is. To move or transform only part of the picture, select that part first.
Edit in Develop and back
Develop has the colour and tone tools for whole photos. You can send a layer there, edit it and bring it back.
- Click a photo layer in the Layers panel.
- Click Edit in Develop (Layer) at the right of the options bar to send just that layer, or Edit in Develop (Merged) to send the whole visible picture. The same commands are in the Image menu: Edit Layer in Develop… (Shift + Ctrl + A) and Edit Merged Image in Develop….
- SnazzyFoto switches to Develop. Make your changes.
- Press Ctrl + E (or ↗ Send to… ▾ › Photo Editor). You are back in the Editor, and the result is a new layer called From Develop above the layer you started from.
Your original layer is not changed. Hide or delete it if you only want the new version. The buttons are greyed out when the active layer is not a normal photo (pixel) layer — for example a text or adjustment layer.
Filter › Develop Filter… and Lens Correction (Develop)… do the same as Edit in Develop (Layer).