
Brushes and painting
Painting in the Photo Editor: brush presets, the Brush Settings and Brushes panels (F5), Opacity vs Flow, smoothing, pen pressure, Pencil, Eraser, Clone Stamp, History Brush, the Gradient tool and Gradient Editor, Blur/Sharpen/Smudge and Dodge/Burn/Sponge.
The Photo Editor has a full set of painting tools: brushes with presets and a Brush Settings panel, Opacity and Flow, smoothing, pen pressure, the Clone Stamp, the History Brush, the Gradient tool with its editor, and tools that blur, sharpen, smudge, lighten or darken where you paint.
The painting tools
| Key | Tools | What they do |
|---|---|---|
| B | Brush Tool, Pencil Tool | Paint with the foreground colour. The Pencil draws hard-edged lines, pixel by pixel. |
| Y | History Brush Tool | Paints back the picture as it was when you opened it. |
| E | Eraser Tool | Erases to transparency (on the Background layer: paints the background colour). |
| S | Clone Stamp Tool | Copies one part of the picture onto another. |
| G | Gradient Tool, Paint Bucket Tool | Fill with a blend of colours, or fill an area of similar colour. |
| R | Blur Tool, Sharpen Tool, Smudge Tool, Liquify | Soften, sharpen or push the pixels you paint over. |
| O | Dodge Tool, Burn Tool, Sponge Tool | Lighten, darken, or take colour out / add colour where you paint. |
| J | The healing tools | Remove spots and flaws. See Healing tools. |
Tools that share a button are switched with Shift + the letter, or by right-clicking the button (see The toolbox).
The options bar
 12345678
- 1 The current tool.
- 2 The brush preset picker — the brush tip, with its size. Click it (or right-click the picture) to change the size, hardness or preset (see below).
- 3 Shows or hides the Brush Settings panel (F5).
- 4 Mode: — how the paint mixes with the picture: Normal, Behind (only where the layer is transparent), Clear (erases), Multiply, Screen, Overlay and more.
- 5 Opacity — the most a stroke can cover. The button next to it makes pen pressure control the opacity.
- 6 Flow: — how much paint each touch of the brush adds. The airbrush button next to it keeps adding paint while you hold the brush still.
- 7 Smoothing: — evens out shaky strokes.
- 8 The angle of the brush tip, and a button that makes pen pressure control the size.
Opacity and Flow
Think of Opacity as the ceiling and Flow as the speed. At Opacity 50 % a stroke never covers more than half, however often you go over the same spot. At Flow 20 % each pass adds a little paint, so the colour builds up gently towards the Opacity as you keep painting. For soft shading, use a soft brush, full Opacity and a low Flow.
- 1 … 9, 0 set the opacity to 10 % … 90 %, 100 %; type two digits quickly for an exact value (4 5 = 45 %).
- Shift + the digits set the Flow.
Smoothing
With Smoothing above 0 the brush follows the mouse as if on a string, so hand-drawn lines and lettering come out smooth. The stroke catches up when you let go. Use 10–30 % for everyday painting, more for calligraphy.
Pen pressure
With a drawing tablet, the pressure of the pen can change the size or the opacity of the stroke: switch on the pressure buttons in the options bar, or set Control: to Pen Pressure in the Brush Settings panel. A mouse always paints at full pressure.
The brush preset picker
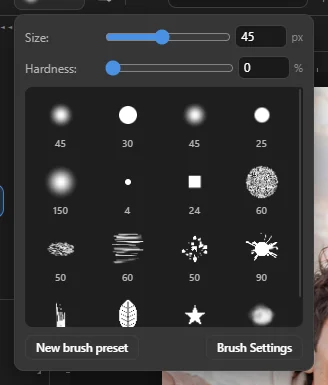
- Size: and Hardness: — the size in pixels (up to 5000) and how sharp the edge is (0 % = very soft, 100 % = crisp).
- Presets — Soft Round, Hard Round, Soft Airbrush, Hard Pencil, textured brushes such as Chalk, Charcoal, Dry Brush, Spatter, and stamps such as Grass, Scattered Leaves, Stars and Clouds. Click one to use it.
- New brush preset saves the current brush, with all its settings, as a preset of your own.
- Brush Settings opens the panel below.
Quicker: [ and ] make the brush smaller and bigger, Shift + [ and Shift + ] softer and harder. Press Caps Lock to see a crosshair instead of the brush outline.
The Brush Settings and Brushes panels
Press F5, click the button next to the preset picker, or choose it in the Window menu. The panel opens in the dock on the right, with a second tab, Brushes, that lists all presets. Its × closes it again.
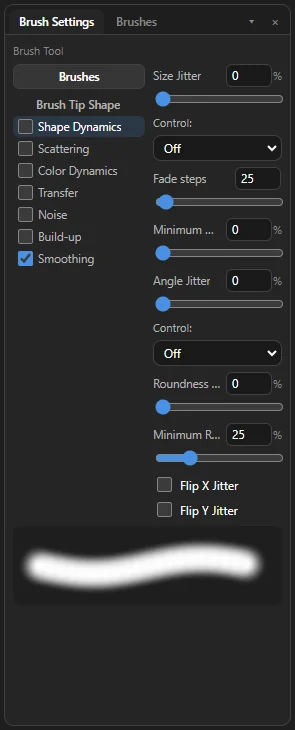
| Section | What it changes |
|---|---|
| Brush Tip Shape | The tip (round, square, chalk, leaf, star…), Size, Flip X / Flip Y, Angle:, Roundness:, Hardness and Spacing (the distance between the dabs that make a stroke). |
| Shape Dynamics | Size, angle and roundness that vary along the stroke: Size Jitter with a Control: (Fade, Pen Pressure, Direction…), Minimum Diameter, Angle Jitter, Roundness Jitter, flips. |
| Scattering | Dabs spread around the stroke (Both Axes, Count, Count Jitter) — for grass, leaves, stars. |
| Color Dynamics | Colour that changes per dab: Foreground/Background Jitter, Hue Jitter, Saturation Jitter, Brightness Jitter, Purity. |
| Transfer | Opacity Jitter and Flow Jitter, also by pen pressure. |
| Noise, Build-up, Smoothing | Grain on soft edges; airbrush build-up; smoothing (the same as in the options bar). |
Each tool keeps its own brush: the Eraser can stay big and soft while the Brush is small and hard.
Pencil and Eraser
- The Pencil Tool paints without soft edges, for pixel art and crisp lines.
- The Eraser Tool has the Mode: Brush, Pencil or Block (a square). Erase to History (or holding Alt) brings back the picture as it was when you opened it, instead of erasing. On a layer with Lock transparent pixels it paints the background colour; on a layer mask it paints grey (see Paint on a mask).
Painting tips that work everywhere: click, then Shift + click elsewhere to paint a straight line between the two points. Hold Shift while dragging to keep the stroke horizontal or vertical. Hold Alt with the Brush or Pencil to pick a colour from the picture.
Clone Stamp
- Press S. Hold Alt and click a clean area: that is the source (a cross marks it).
- Paint over what should disappear. The source travels with the brush; while you hover, a preview of what will be painted shows under the brush (Show Overlay).
- Aligned keeps the distance between source and brush the same for every stroke. Untick it to start from the same source each time.
- Sample: — Current Layer, Current & Below or All Layers. With All Layers you can clone onto an empty layer above the photo and keep the photo untouched.
- The source is shared with the Healing Brush Tool, which blends the copied texture into its new place (see Healing tools).
History Brush
The History Brush Tool (Y) paints back each layer as it was when you opened the picture — for example to undo a filter in just one place. A layer added later has nothing to paint back; SnazzyFoto says This layer has no history state to paint from.
The Gradient tool and the Gradient Editor
Press G and drag across the layer (or the selection): the gradient runs from where you start to where you let go. Hold Shift for a straight or 45° line.
- Kind — Linear Gradient, Radial Gradient, Angle Gradient, Reflected Gradient or Diamond Gradient.
- Reverse swaps the ends, Dither prevents banding, and Method: sets how colours mix: Perceptual (even to the eye, the default), Linear, Classic or Smooth.
- Click the gradient strip in the options bar to open the Gradient Editor; the small arrow next to it shows the presets (Foreground to Background, Foreground to Transparent, Spectrum, Sunset…).
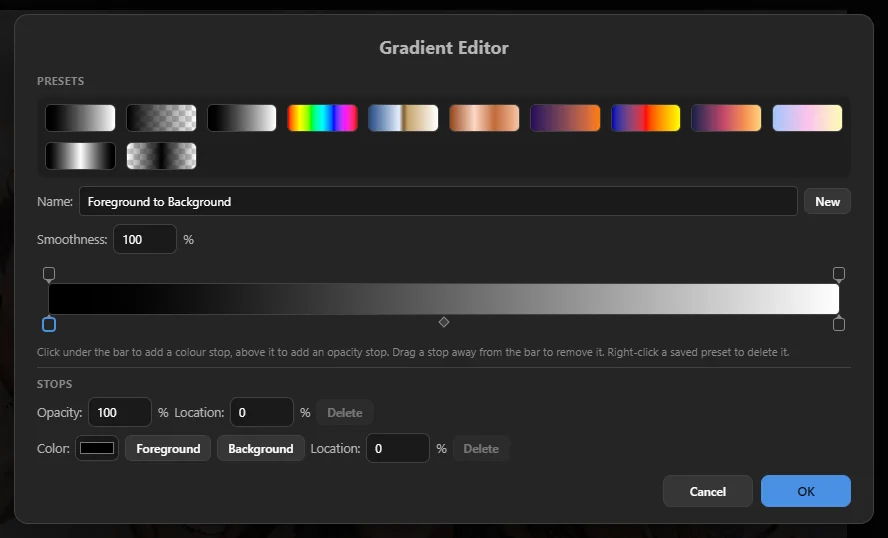
In the editor, pick a preset to start from, then change the colours: click under the bar to add a colour stop, above it to add an opacity stop, drag stops to move them, and drag a stop away from the bar to remove it. Below, set the selected stop's Color: (or make it follow the Foreground / Background colour), its Opacity: and Location:. The diamond between two stops is the midpoint. Give your gradient a Name: and click New to keep it as a preset; right-click a saved preset to delete it.
Blur, Sharpen, Smudge
- Blur Tool softens what you paint over; Sharpen Tool brings out detail (Protect Detail keeps it from getting grainy). Hold Alt to switch between the two.
- Smudge Tool pushes colour along like a finger in wet paint. Finger Painting (or Alt) starts each stroke with the foreground colour.
- Strength: sets how strong they are (the digit keys change it). Sample All Layers lets them work on an empty layer using what is below.
- Liquify pushes pixels to reshape things gently; its Size is the area you push.
Dodge, Burn, Sponge
- Dodge Tool lightens, Burn Tool darkens — like a photographer in the darkroom. Range: chooses whether Shadows, Midtones or Highlights change most; Exposure: is the strength; Protect Tones keeps colours from shifting. Hold Alt to switch between them.
- Sponge Tool takes colour out (Desaturate) or makes it stronger (Saturate). Vibrance changes dull colours more than colours that are already strong.
Retouch on a copy: press Ctrl + J first, so you can lower the copy's opacity or delete it if you went too far.