
Motion tracking, corner pin and stabilisation
Make a title follow something that moves, pin a picture onto a surface, and steady shaky footage.
Motion tracking follows something that moves in a video — a face, a car, a sign — so a title or a picture can travel with it. Corner pin bends a picture onto a flat surface, like a phone screen or a poster. Stabilisation steadies a shaky handheld shot. All three are in Properties › Clip; scroll down past Transform.
Make a title follow something
You need two clips: the video with the moving thing in it, and the title or picture that should follow it, on a track above.
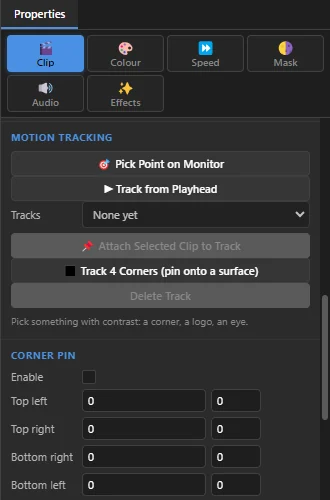 123456
- Put the title on a track above the video, where it should appear. Place it where you want it on the monitor, next to the thing it should follow.
- Select the video clip and move the playhead to the frame where the tracking should start.
- Click 1 Pick Point on Monitor, then click the thing to follow on the monitor. Pick something with contrast: a corner, a logo, an eye. A flat, even area cannot be tracked.
- Click 2 Track from Playhead. SnazzyCut follows the point frame by frame to the end of the clip; a bar shows how far it is and how well each frame matches. Cancel stops it and keeps what is done.
- The result is listed under 3 Tracks (Track 1, with how many frames). The status bar says if the point was lost on the way, and when.
- Click 4 Attach Selected Clip to Track. In the window that opens, choose the title or picture under Attach and click Attach.
The title keeps the place you gave it and moves with the tracked point from there. The movement is written as position keyframes on the title, so you can fine-tune it in the Keyframes tab, or delete those keyframes to detach it again. Delete Track removes a track you no longer need from the video clip.
If tracking loses the point (it went out of the frame, or something passed in front), move the playhead a little after that moment, pick the point again and track from there. Then attach the title again from the new track.
Corner pin: put a picture on a surface
Corner pin moves the four corners of a clip one by one, so a rectangle can be bent into any four-sided shape: a picture that looks like it is on a screen, a sign or a wall seen at an angle. It works on any picture: a video, photo, title or colour clip.
By hand, for a still shot
- Select the clip to bend, for example the picture to put on a screen, on a track above the shot of the screen.
- Tick Enable under 6 Corner Pin. Four handles appear on the corners of the clip on the monitor.
- Drag each handle onto a corner of the surface. You can also type the numbers for Top left, Top right, Bottom right and Bottom left: how far each corner moves, in pixels, sideways and up or down.
Reset Corners puts the corners back; untick Enable to switch the effect off without losing them.
Tracked, for a moving shot
- Select the video with the surface in it and move the playhead to where the tracking should start.
- Click 5 Track 4 Corners (pin onto a surface).
- Click the four corners of the surface on the monitor, in this order: top left, top right, bottom right, bottom left. The status bar tells you which one is next; Esc cancels.
- SnazzyCut tracks each corner to the end of the clip. Then choose the clip to pin under Pin and click Pin It.
The pinned clip's corners follow the surface as it moves and turns. To undo it, untick Enable under Corner Pin, or delete the corner keyframes.
Steady a shaky shot
Stabilisation smooths out the small shakes of a handheld camera. To hide the moving edges, it zooms in a little.
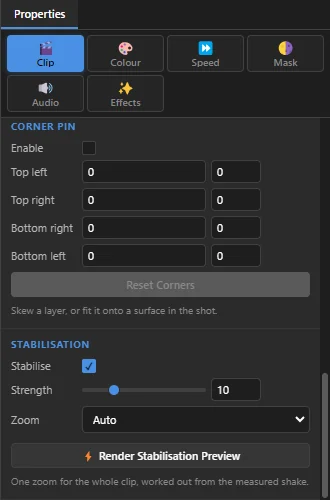 12345
- 1 Stabilise — tick it to switch stabilisation on for the selected video clip.
- 2 Strength — how much movement is smoothed out, from 1 to 40. Higher is steadier, but a deliberate pan may start to feel slow and floaty. 10 is a good start.
- 3 Zoom — how it hides the edges:
- Auto — one zoom for the whole clip, worked out from how much it shakes.
- Auto (per frame) — the zoom changes from frame to frame, so the edges never show; the framing breathes a little.
- Manual — you set the zoom with Amount. Too little and the moving edges show.
- 4 Render Stabilisation Preview — renders this clip so you can watch the steadied result.
- 5 A note on what the chosen setting does.
Stabilisation needs two passes over the clip, so the monitor does not show it while you play. A badge on the monitor reminds you. Click Render Stabilisation Preview (or press Enter for Render Preview) to see it. It is always applied when you export.