
Keyframes and animation
Make position, size, colour, volume and effects change over time, with a slow zoom on a photo as a worked example.
Keyframes make things move and change during a clip: a photo that slowly zooms in, a title that slides across, a colour that fades to black and white. You set a value at a few moments, and SnazzyCut animates everything in between.
What is a keyframe?
A keyframe is a value at a moment. For example: "at 0 seconds the size is 100%" and "at 5 seconds the size is 120%". With those two keyframes, SnazzyCut grows the picture a little in every frame between them, so it zooms in smoothly over five seconds.
You can animate the position, size (Scale), Rotation and Opacity of a clip, most colour settings, the volume, and the settings of every effect.
The ◆ buttons in Properties
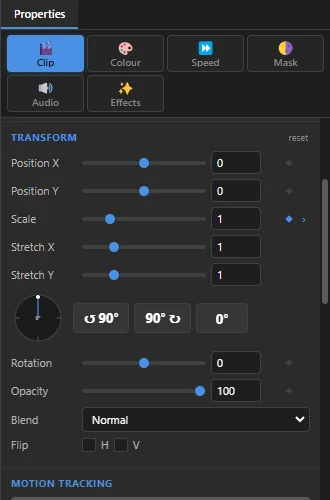
In Properties, every setting that can be animated has three small buttons on the right.
 1234
- 1 The setting — here Scale, the size of the picture (1 is 100%).
- 2 ◆ — adds a keyframe at the playhead, or removes the one that is there.
- 3 ‹ — jumps the playhead to the previous keyframe of this setting.
- 4 › — jumps to the next keyframe.
| The ◆ looks… | It means | Clicking it |
|---|---|---|
| Grey ◆ | Not animated | Starts the animation with a keyframe at the playhead. |
| Blue ◆ | There is a keyframe right at the playhead | Removes that keyframe. |
| Blue ◇ | Animated, but no keyframe here | Adds one here with the current value. |
Once a setting has a keyframe, changing it anywhere else adds a new keyframe at the playhead automatically. This also works when you drag the picture on the monitor. To change the value of the whole clip again, remove its keyframes first.
Worked example: a slow zoom on a photo
A slow zoom (often called the "Ken Burns effect") brings a still photo to life. It takes about a minute.
- Click the photo on the timeline to select it. In Properties, open the Clip tab.
- Drag the playhead to the first frame of the photo.
- Click ◆ next to Scale. It turns blue: the photo now has a keyframe at size 1 (100%).
- Drag the playhead to the last frame of the photo.
- Type
1.2in the Scale box and press Enter. SnazzyCut adds a second keyframe by itself. - Move the playhead back and press Space: the photo zooms in slowly.
- Make it gentler at both ends: open the Keyframes tab, right-click the first keyframe and choose Interpolation › Ease In-Out (see Easing).
For a drift as well as a zoom, do the same with Position X: a keyframe at the start, then a slightly different number at the end. Keep the changes small; a slow zoom should hardly be noticed.
The Keyframes tab
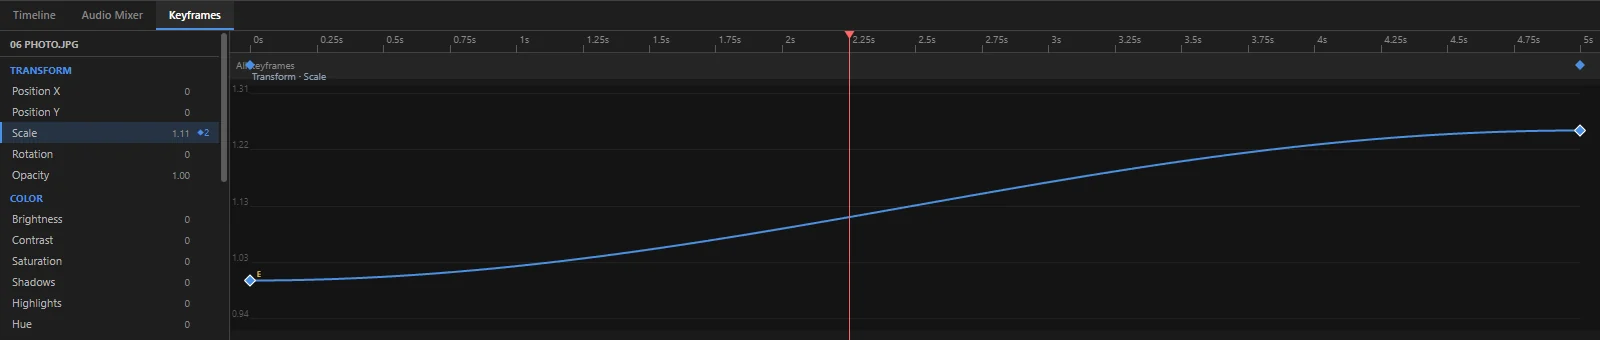
The Keyframes tab (next to Timeline at the bottom) shows the keyframes of the selected clip as a graph, so you can see and change the whole animation.
 123
- 1 Properties — everything you can animate on this clip, grouped (Transform, Color, Audio, Time, and one group per effect). The number is the value at the playhead.
- 2 The chosen property — ◆2 means it has two keyframes. Click a property to show its curve.
- 3 The graph — time runs left to right across the clip; higher means a bigger value. The top row (All keyframes) shows the keyframes of every property.
- Move a keyframe: drag it left or right to change when it happens, up or down to change its value.
- Add a keyframe: double-click an empty spot on the graph, or double-click a property in the list to add one at the playhead.
- Remove a keyframe: double-click it, or right-click it › Delete Keyframe.
- Type an exact value: right-click a keyframe › Set Value….
- Move the playhead: click the time ruler at the top of the graph.
- Start over: right-click an empty spot › Clear This Property or Clear All Keyframes.
Easing: how the change speeds up and slows down
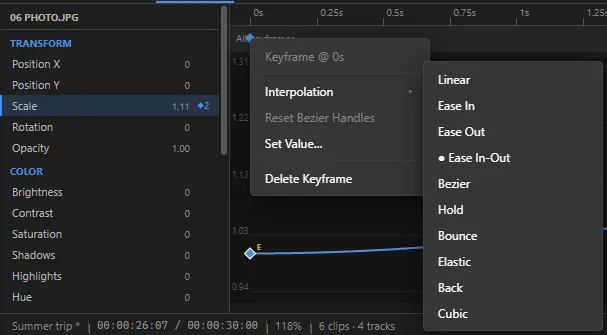
By default a value changes at a steady speed (Linear). Real movement usually starts and stops gently. Right-click a keyframe in the graph and choose Interpolation to change that.
 123
- 1 The menu of the keyframe you right-clicked.
- 2 Interpolation — how the value travels from this keyframe to the next one.
- 3 The choices. The dot shows the current one.
| Choice | The movement |
|---|---|
| Linear | Steady speed from start to end. |
| Ease In | Starts slowly, then speeds up. |
| Ease Out | Starts fast, then slows down to a stop. |
| Ease In-Out | Slow at both ends. The most natural choice for zooms and slides. |
| Hold | No movement: keeps the value, then jumps at the next keyframe. |
| Bounce, Elastic, Back | Playful overshoots, good for titles and stickers. |
| Bezier | Shows two handles on the curve that you drag to shape the change yourself. Reset Bezier Handles undoes your shaping. |
A keyframe with a curve other than Linear has a small letter next to it in the graph.
A keyframe keeps its easing when you change its value later (with a slider, or by typing), so you can set easing and values in any order.
Fades on the timeline
For quick fades you do not need the panels. Hover a clip on the timeline and a dashed line appears: opacity on video, photo and title clips, volume on audio clips. Hold Alt and click the line to add a point, then drag points up or down. These points are ordinary keyframes and show up in the Keyframes tab too.