
A tour of the editor
What each part of the SnazzyCut window is for, how workspaces change the layout, and how to resize, float and save panels.
The editor is one window divided into panels. Once you know the name and job of each one, the rest of this Help Center is easy to follow. Nothing here can break your video: moving panels around only changes how the window looks.
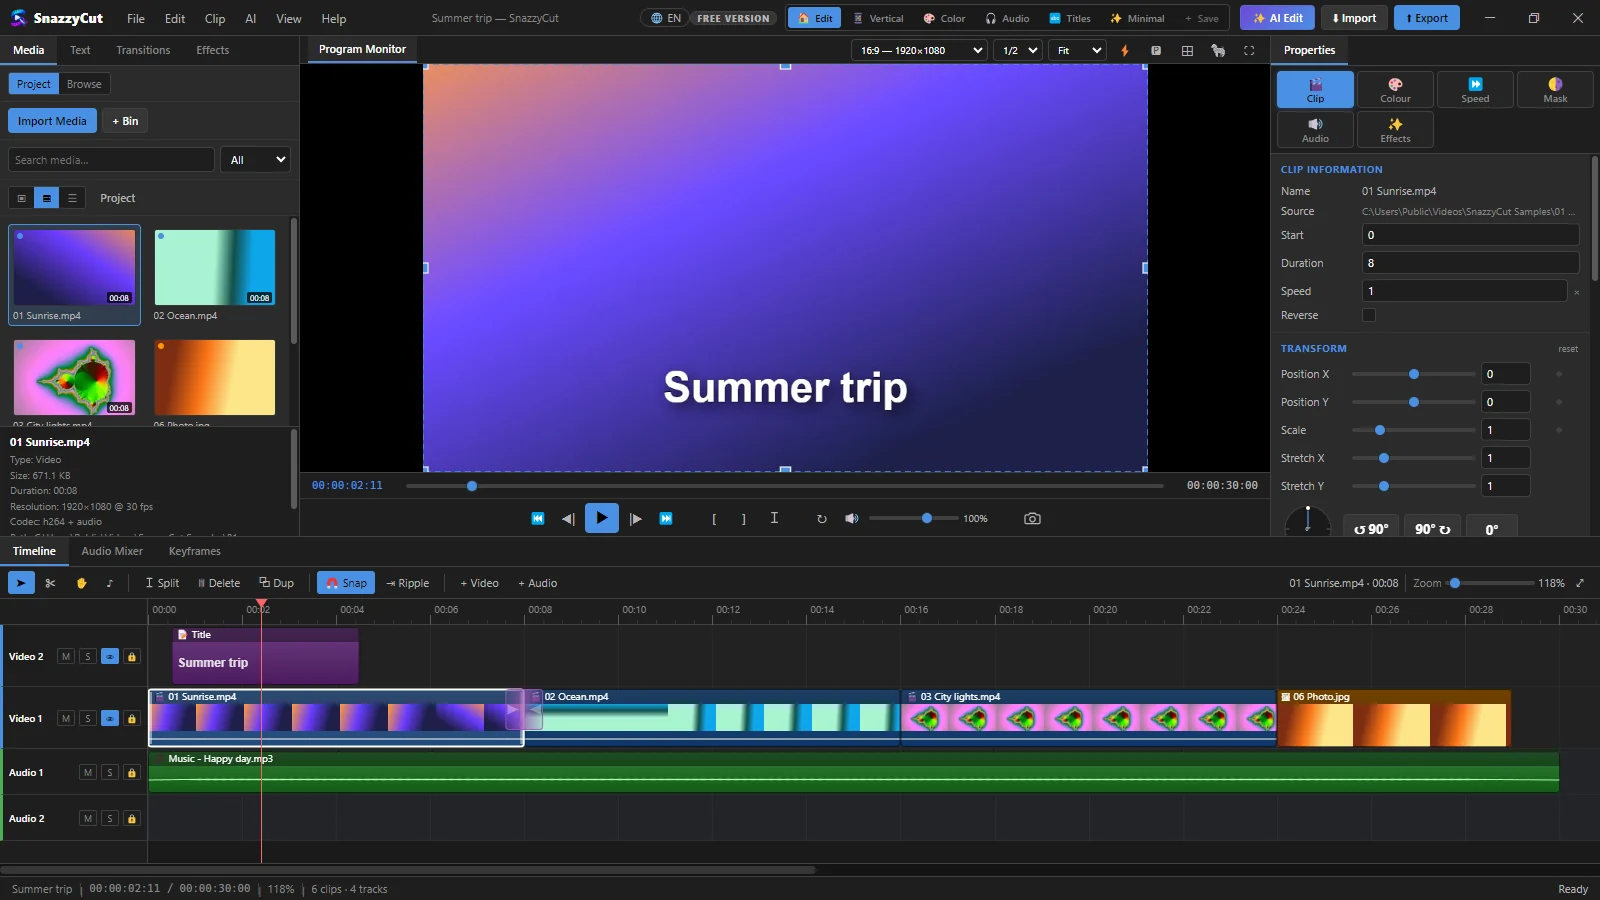 1234567
- 1 Menus — every command, with its keyboard shortcut next to it.
- 2 Workspaces — ready-made arrangements of the panels for different jobs.
- 3 Left dock — your media, text, transitions and effects.
- 4 Program Monitor — the picture of your video at the playhead, and the play buttons.
- 5 Properties — the settings of the clip you selected.
- 6 Timeline — where you put clips in order, cut and arrange them.
- 7 Export — turns your edit into a video file.
The title bar
On the left are the menus: File, Edit, Clip, AI, View and Help. In the middle is your project's name. A * after it means there are changes you haven't saved. The right-hand side has these buttons:
 1234567
- 1 🌐 Language — switches the language at once. No restart needed.
- 2 Free version — shown until you are a Supporter. Click it to donate, or to sign in if you already have.
- 3 Workspaces — see Workspaces below.
- 4 + Save — saves the way your panels are arranged now as a workspace of your own.
- 5 AI Edit — builds an edit for you from your folders and a description. Supporter
- 6 Import — adds videos, photos and music to the Media panel (Ctrl + I).
- 7 Export — opens the Export Video dialog (Ctrl + E).
Click the SnazzyCut logo at the top left to go back to the Home screen.
The left dock: Media, Text, Transitions, Effects
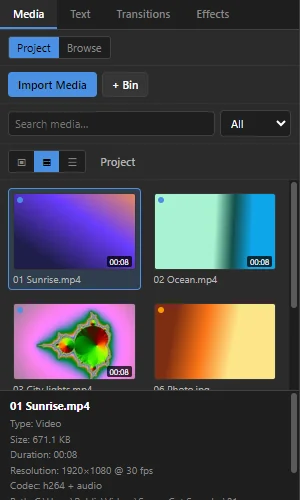 1234
- 1 Tabs — click one to switch panel:
- Media — the videos, photos and music in your project.
- Text — titles and captions, ready-made Looks, and Narration (text read out loud).
- Transitions — effects between two clips, like a dissolve or a wipe.
- Effects — filters, colour looks and LUTs for a clip.
- 2 Project shows the files already in your project. Browse lets you look through the folders on your computer without importing anything.
- 3 Import Media — pick files to add. You can also drag files from File Explorer onto this panel.
- 4 Your files. Drag one down onto the timeline to use it. Click one to see its details underneath.
The Program Monitor
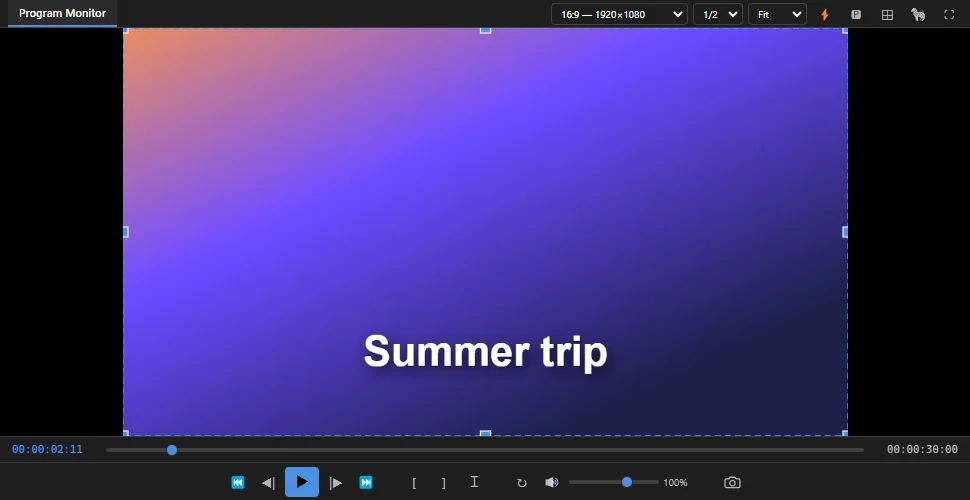 12345
- 1 Frame size — the shape of your video, for example 16:9 or 9:16. Change it here at any time.
- 2 Playback resolution — Full, 1/2 or 1/4. A smaller one plays more smoothly on a slow computer. It does not change the exported video.
- 3 The picture — exactly what your exported video will show at the playhead.
- 4 Time — where the playhead is (left), how long the video is (right), and a slider to move through it.
- 5 Buttons — go to the start, one frame back, play, one frame forward, go to the end; set in and out marks; split; loop; volume; and a camera button that saves the current frame as a picture.
| Key | What it does |
|---|---|
| Space | Play and pause |
| ← / → | One frame back / forward |
| Home / End | Go to the start / end |
| F11 | Watch full screen |
The buttons above the monitor
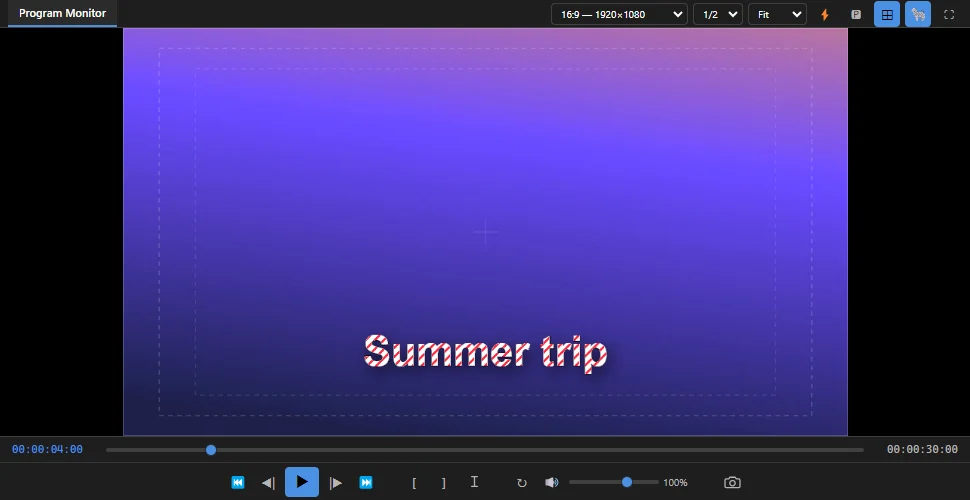 12345678
- 1 Frame size — the shape of the project (see above).
- 2 Playback resolution — Full, 1/2 or 1/4.
- 3 Zoom — Fit shows the whole frame; 50%, 100% and 200% show it smaller or closer, for checking detail.
- 4 ⚡ Render Preview (Enter) — see below.
- 5 🅿 Proxy editing — plays small copies of big files (see Smoother playback with proxies).
- 6 ⊞ Safe margins — two dashed frames at 90% and 80% of the picture. Keep titles inside them so phones and TVs do not cut them off.
- 7 🦓 Zebra — diagonal stripes on the parts of the picture that are almost pure white, so you can see where a sky or a face is too bright. Right-click it to choose the level, from 75% to 100% (90% to start with).
- 8 ⛶ Fullscreen (F11) — the monitor on the whole screen.
Safe margins and zebra stripes are only guides on the monitor: they never appear in the exported video or in Export Frame pictures.
Render Preview
A part with many layers, effects or 4K clips may be too heavy to play smoothly. Press Enter (or click ⚡, or View › Render Preview) and SnazzyCut renders that part into ready-made pieces that play smoothly. It renders the in/out range if you set one (see Markers and the in/out range), otherwise the whole timeline, at the playback resolution.
- A badge on the monitor shows the progress, then Preview ready. After you change something, it says the preview is stale: press Enter again. Only the pieces you changed are rendered again.
- The rendered preview is only for watching while you edit. Your export is always made from the original files.
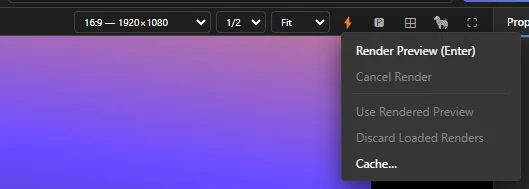 12
Right-click 1 ⚡ for the 2 options: Render Preview (Enter), Cancel Render, Use Rendered Preview or Show Live Composite (switch between the rendered pieces and the normal live picture), Discard Loaded Renders, and Cache…. The cache window (also View › Preview Render Cache…) shows how much disk space the rendered pieces use, with Open Folder and Clear Cache. Clearing is always safe: the pieces are rendered again when needed.
Properties
Click a clip on the timeline and its settings appear on the right. With nothing selected, the panel says No clip selected.
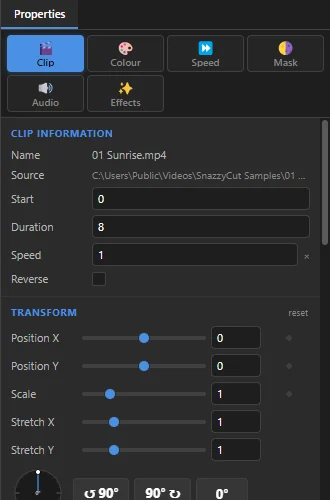 12
- 1 Tabs — Clip (position, size, rotation), Colour, Speed, Mask, Audio (volume, fades) and Effects. A text clip also gets a Text tab.
- 2 Settings of the chosen tab. Type a number, or drag a slider and watch the monitor.
Click a transition on the timeline and the panel shows that transition's settings instead.
Further down the Clip tab are the settings for a nested clip, motion tracking, corner pin and stabilisation.
The timeline and the bottom dock
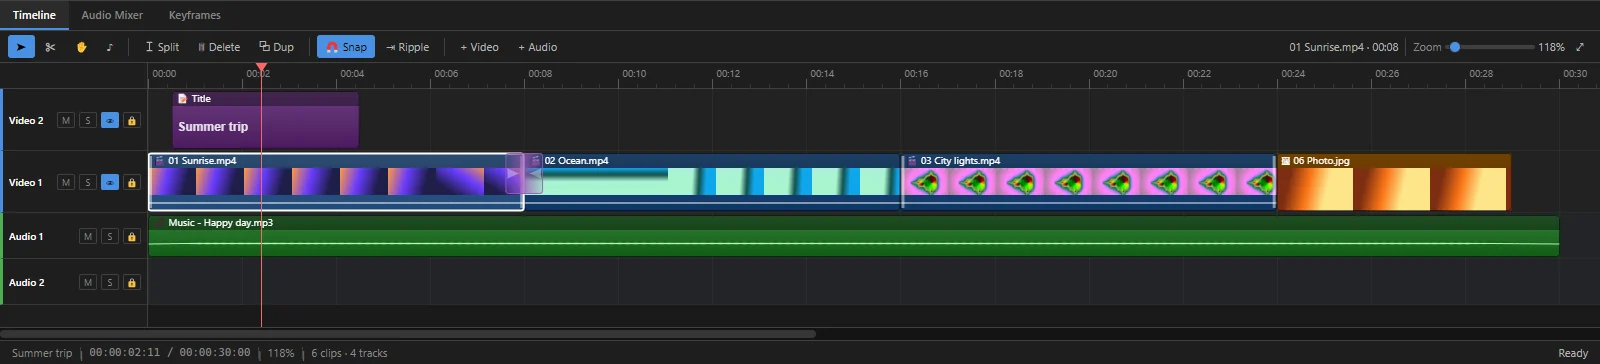 1234567
- 1 Tabs — Timeline, Audio Mixer (the volume of each track) and Keyframes (animation over time).
- 2 Tools — selection (V) to pick and move clips, razor (C) to cut where you click, hand (H) to scroll, and remix (R) to make music longer or shorter.
- 3 Split, Delete and Dup (duplicate) for the selected clips.
- 4 Snap makes clips stick to each other's edges (N). Ripple makes dropped media and pasted clips push the following clips along to make room (see Place and move clips).
- 5 Tracks — video tracks on top (Video 2 is in front of Video 1), audio tracks below. Each has buttons to mute (M), solo (S), hide (👁) and lock (🔒) it. + Video and + Audio in the toolbar add more tracks.
- 6 Zoom — drag the slider to see more detail or more of the video. The button at the end fits the whole video in (Ctrl + 0).
- 7 Status bar — the project name, the playhead time and the total length, the zoom, how many clips and tracks there are, and on the right short messages about what just happened.
The red line is the playhead: the moment shown in the monitor. Click in the row of times at the top of the timeline to move it there. To learn the timeline properly, see Timeline basics.
Workspaces
A workspace is a ready-made arrangement of the panels. Click one in the title bar; your edit itself does not change.
| Workspace | What it shows |
|---|---|
| Edit | Everything, balanced. The one to start with. |
| Vertical | A tall monitor on the right, for 9:16 videos (Reels, TikTok, Shorts). |
| Color | The Effects panel and Properties, for colour grading. |
| Audio | The Audio Mixer at the bottom (the timeline is the tab next to it). |
| Titles | The Text panel beside a large monitor. |
| Minimal | Just the monitor, Properties and the timeline. |
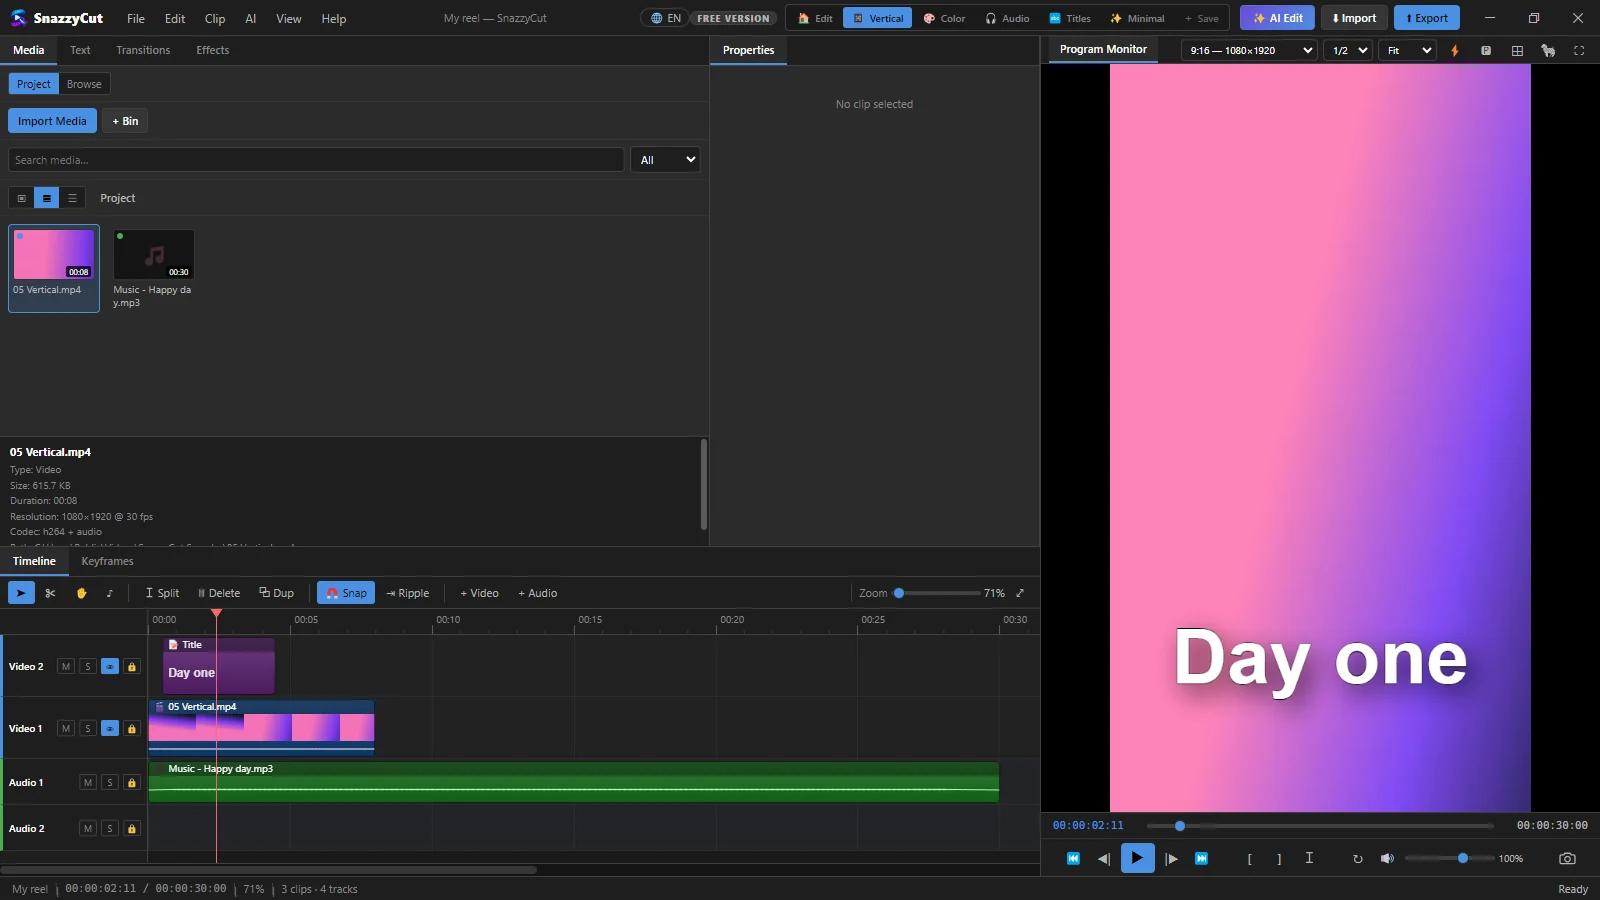 12
The same workspaces are in View › Layout, along with Reset Layout, which puts every panel back where the Edit workspace has it.
Resize, float and hide panels
- Resize — drag the border between two panels. The mouse pointer changes to a double arrow when you are on it.
- Float — right-click a panel's tab and choose Undock Panel, or use View › Floating Panels. The panel becomes a small window of its own that you can drag anywhere over the editor.
- Hide — right-click a tab and choose Hide Panel. To get it back, tick it again in the View menu.
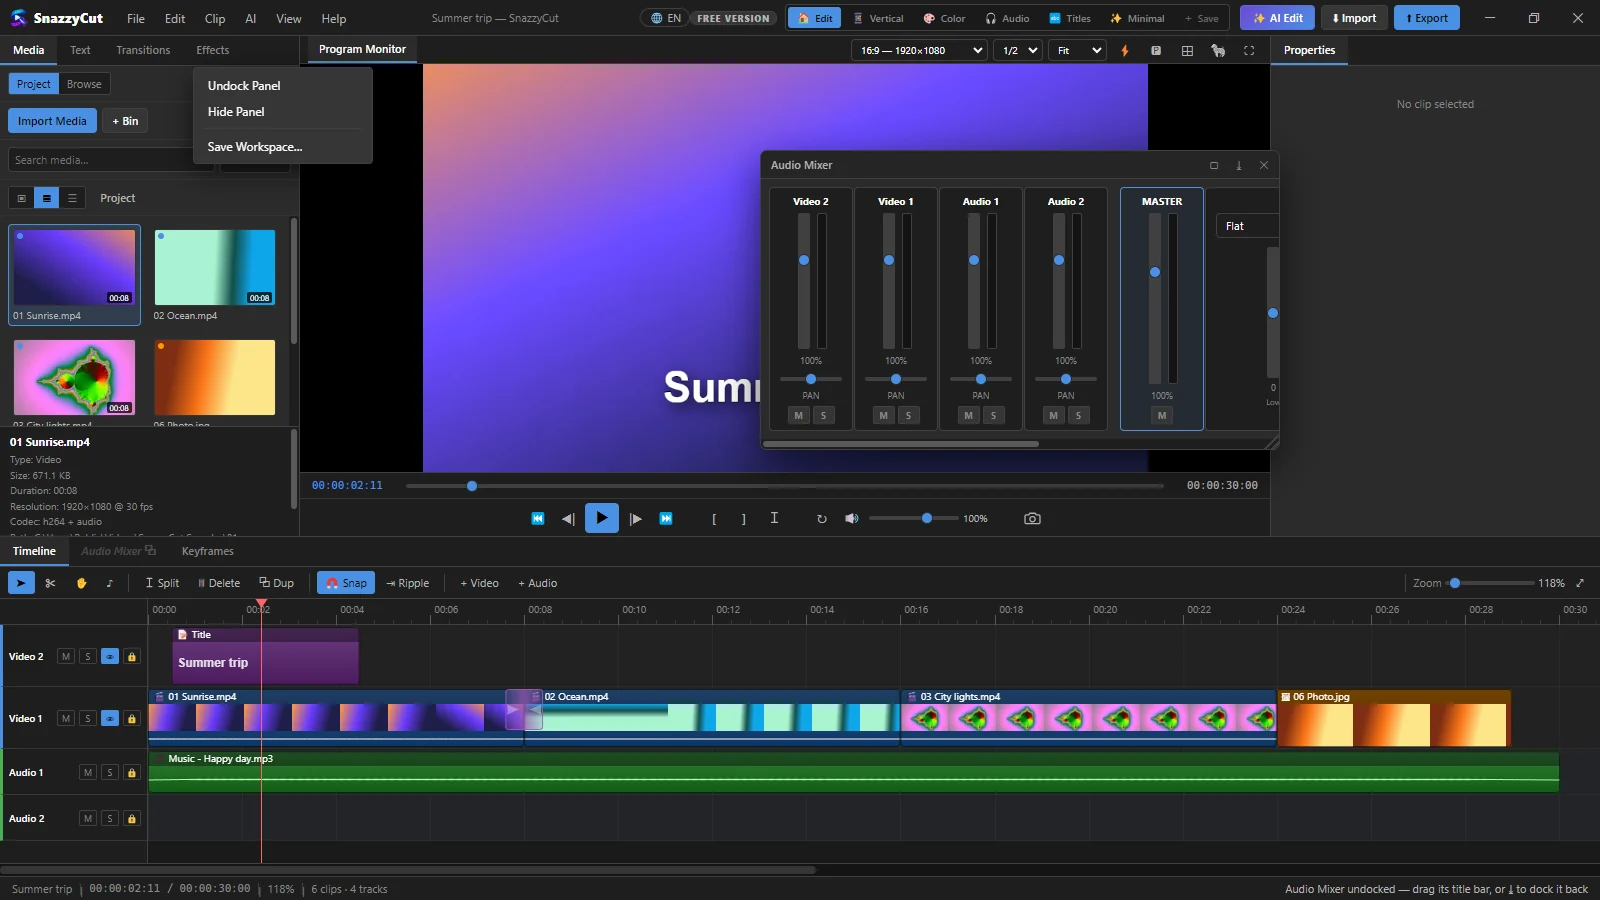 123
- 1 A floating panel. Drag its title bar to move it, and its bottom-right corner to resize it.
- 2 ⤓ puts it back where it came from. View › Floating Panels › Dock All Panels brings every floating panel home at once.
- 3 The menu on a panel tab: Undock Panel, Hide Panel and Save Workspace….
Save your own layout
- Arrange the panels the way you like them.
- Click + Save at the end of the workspace buttons (or View › Save Workspace…).
- Type a name and confirm. Your workspace appears as a new button with a ★.
Right-click your own workspace button to Apply it, Update to Current Layout after you change something, or Delete it.
A project remembers how its panels were arranged, how far the timeline was zoomed and where the playhead was. When you open it again, it looks the way you left it.