
Nested clips
Pack several clips into one, edit inside it, reuse it, and break it apart again.
A nested clip packs several clips into one. On the timeline it looks and behaves like a single clip, but inside it has its own little timeline that you can open and edit. Use it to keep a busy edit tidy, to treat a group of clips as one, or to reuse the same piece several times.
When a nested clip helps
- One effect for a group — put a colour look, a fade, Camera Shake or a speed change on several clips at once, as if they were one shot.
- Move a group in one go — a title with its background box and a logo stay together when you move or trim them.
- A tidy timeline — an intro made of ten layers takes up one clip on one track.
- Reuse — copy the nested clip, and a change inside it shows in every copy.
Multi-row text looks (see Ready-made looks) and AI Auto-Edit's One nested clip here, at the playhead also give you nested clips. Everything on this page works for them too.
Nest clips
- Select the clips you want to pack together: Ctrl+click each one, or drag a box around them. They can be on different tracks, sound included.
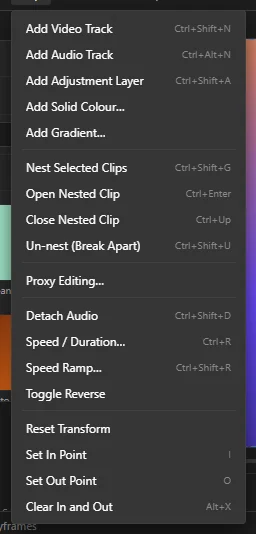
- Choose Clip › Nest Selected Clips or press Ctrl + Shift + G. You can also right-click one of them › Nest Clip.
- The clips are replaced by one purple clip named Nest 1 (the next one is Nest 2, and so on). It starts where the first clip started and ends where the last one ended. It goes on the highest video track the clips used; if another clip is in the way there, it goes on another track the clips used, else on the nearest free track, else on a new track just above. It never covers a clip you did not select.
 12
- 1 The nesting commands: Nest Selected Clips, Open Nested Clip, Close Nested Clip and Un-nest (Break Apart), each with its key.
- 2 Layers you can add at the playhead: an adjustment layer (see Adjustment layers), a solid colour and a gradient (see Colour and gradient clips).
Transitions between the nested clips go inside the nest with them. Undo (Ctrl + Z) puts everything back as it was.
A nested clip on the timeline
 12345
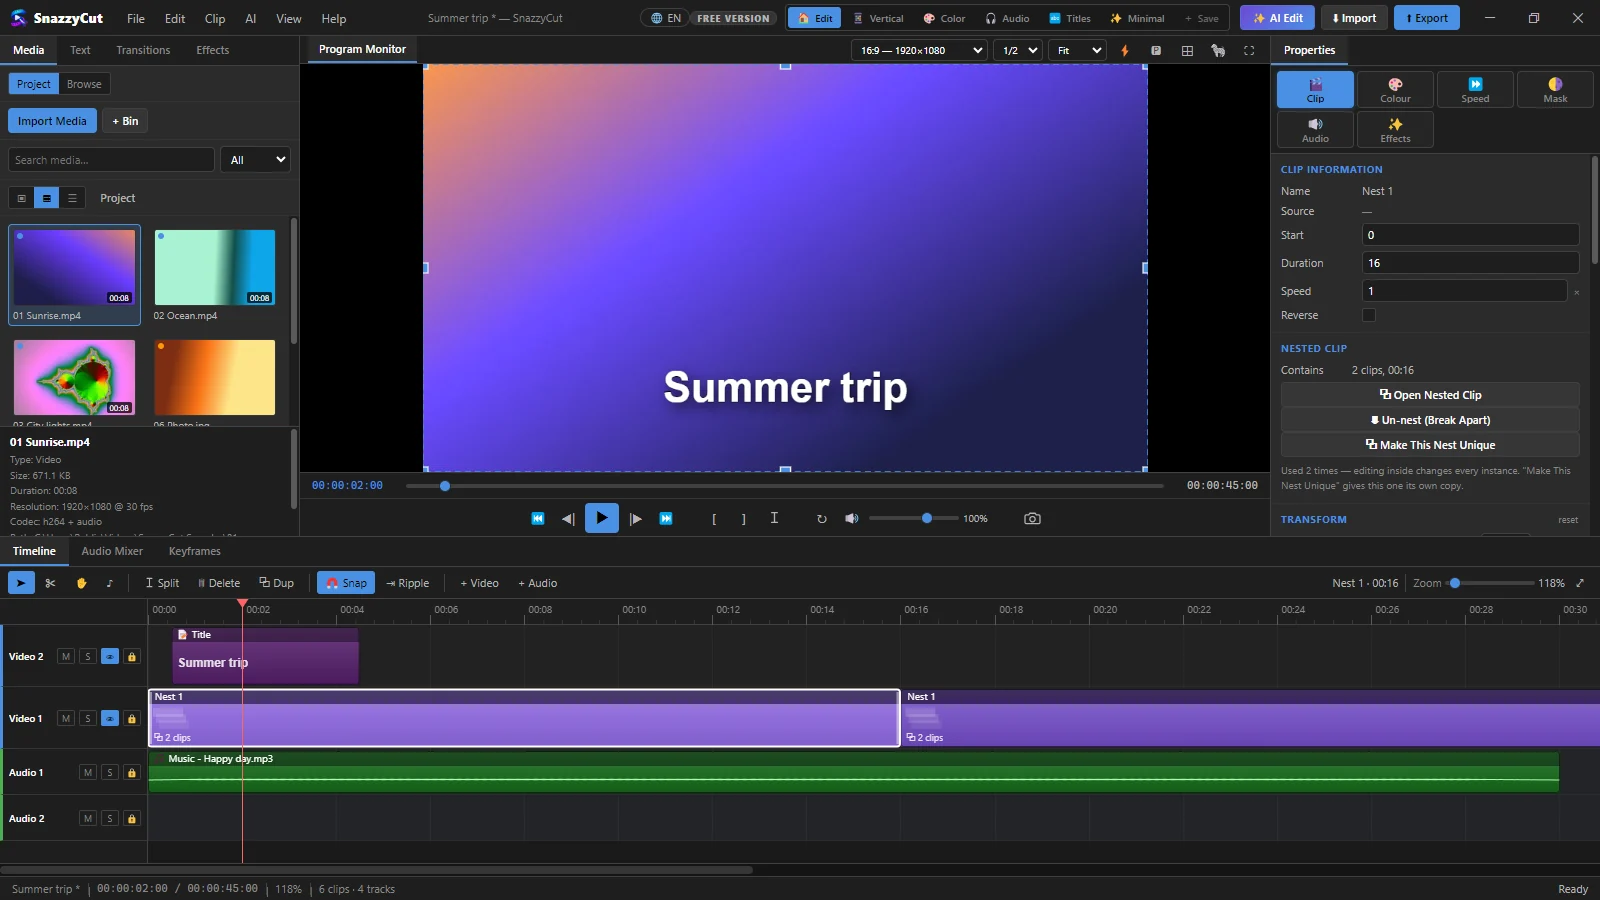
- 1 The nested clip — move it, trim it, split it, and add effects, colour, keyframes or a transition, like any clip. The changes apply to everything inside it together.
- 2 Nested Clip in Properties › Clip — Contains says how many clips are inside and how long it is.
- 3 Open Nested Clip — opens its timeline (see below).
- 4 Un-nest (Break Apart) — puts the clips back on the main timeline.
- 5 Make This Nest Unique — gives this copy its own contents (see Reuse a nested clip).
Edit inside a nested clip
Double-click the nested clip, or select it and press Ctrl + Enter (Clip › Open Nested Clip). The timeline now shows what is inside: the same tracks and clips, starting at 0. Edit them as usual: trim, move, add titles, effects or more tracks.
 123
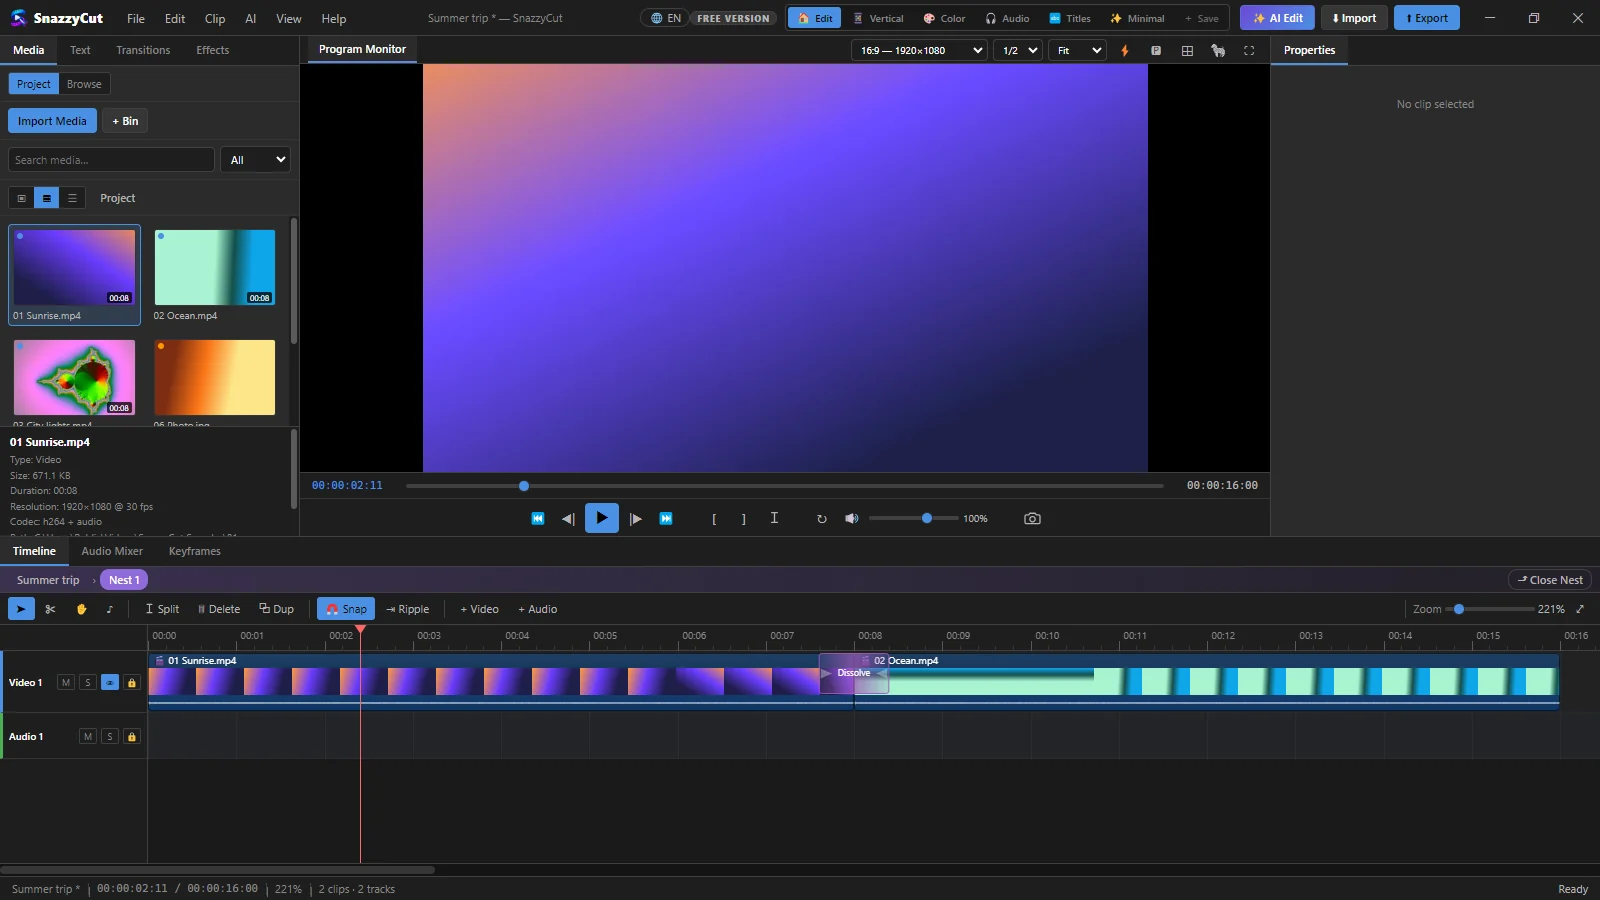
- 1 The bar above the timeline shows where you are: the project's name, then › and the nested clip's name. Click the project's name to go straight back to the main timeline.
- 2 ⤴ Close Nest — goes back out one level. Ctrl + ↑ and Clip › Close Nested Clip do the same.
- 3 The nested clip's own timeline. The monitor plays it on its own while you are inside.
When you close the nest, the playhead goes back to the moment you opened it from. A nested clip can hold other nested clips, up to 8 levels deep.
Changes inside a nested clip are ordinary steps: Ctrl + Z undoes them, whether you are inside or not. If the nest's contents get longer, the nested clip on the main timeline does not grow by itself: drag its end edge to show the rest. If they get shorter, the nested clip gets shorter too.
Reuse a nested clip
Copy a nested clip (Ctrl + D, or copy and paste) and both copies share the same contents. Edit inside one, and the other changes too. Handy for a logo sting or a lower third you use several times. The Nested Clip group then says how many times it is used.
To change one copy on its own, select it and click Make This Nest Unique (or right-click › Make Nest Unique). It gets its own contents, named "… copy", and editing it no longer touches the others.
Break a nested clip apart
Select the nested clip and choose Clip › Un-nest (Break Apart) (Ctrl + Shift + U), click Un-nest (Break Apart) in Properties, or right-click it › Un-nest (Break Apart).
- The clips inside go back onto the main timeline, in its place. Each layer of the nest keeps its clips together on one track: its original track when that is free; else the track with the same name, if no other picture would end up between the layers; else the nearest free track; else a new track. The layers stay stacked in the same order, locked tracks are skipped, and nothing lands on top of another clip.
- Only the part you could see comes back: if you had trimmed the nested clip, the trimmed-off clips are left out.
- The nested clip's own position, size, rotation and opacity are passed on to each clip, so the picture stays the same. Effects, colour and keyframes on the nested clip itself are not passed on.