
Effects and colour
Add effects and LUT looks, correct and grade colour, and use masks and green screen.
Effects change how a clip looks: a soft blur, a vignette, an old-film look. Colour tools fix a picture that is too dark or too blue, and give your video a mood. This page also covers masks (show only part of a clip) and green screen.
The Effects panel
Open the Effects tab at the top left. It has three tabs: Library (every effect), Applied (what is on the selected clip) and LUTs (ready-made colour looks).
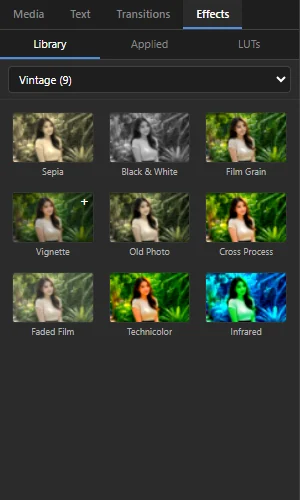 1234
- 1 Library / Applied / LUTs — the three tabs of the panel.
- 2 Category — show all effects, or one group such as Blur, Light or Vintage.
- 3 An effect — the picture shows what it does. Hover it to see its settings.
- 4 + — appears when you hover; click it to add the effect to the selected clip.
Try an effect before you add it
Put the playhead over a clip, then click an effect once. The monitor shows the clip with that effect, but nothing is changed yet. Click it again (or click anywhere else) and the picture goes back to normal. This way you can browse the list without having to undo anything.
Add an effect to a clip
- Click the clip on the timeline to select it. You can select several clips to add the effect to all of them.
- Double-click the effect, or click its +. You can also drag the effect onto a clip on the timeline.
- The effect is now on the clip. Change its settings in Properties › Effects (below).
Right-click a clip on the timeline and choose Add Effect › a category. The Effects panel opens on that category.
Change, switch off or remove an effect
Select the clip and open the Effects tab in Properties (on the right). Every effect on the clip has a card. The top one is applied first.
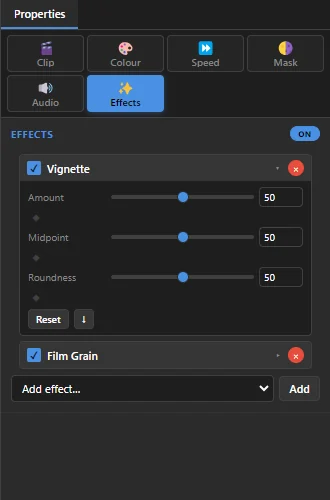 123456
- 1 Effects — the tab with the clip's effects.
- 2 ON / OFF — switches all of the clip's effects off at once, so you can compare before and after. The settings are kept.
- 3 Tick box — switches just this one effect off or on.
- 4 × — removes the effect from the clip.
- 5 Settings — click the effect's name to open or close them. Drag a slider or type a number. Reset puts the effect back to its starting values, and ↑ / ↓ change the order.
- 6 Add effect… — pick an effect from the list and click Add, without opening the Effects panel.
The small ◆ next to each setting lets the value change over time, for example a blur that fades away. See Keyframes.
See everything on a clip
The Applied tab of the Effects panel lists everything that changes the selected clip's picture: a LUT, colour correction, levels and wheels, stabilisation and each effect.
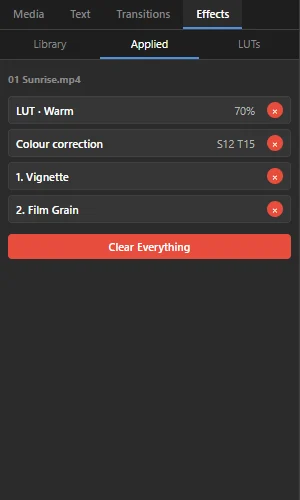 123
- 1 Everything on the clip, in one list.
- 2 × — removes that one item.
- 3 Clear Everything — removes all of them and gives you the clip as it was filmed.
One look for many clips: adjustment layers
An adjustment layer is an empty clip that carries effects. Everything on the tracks below it gets those effects, for as long as the layer lasts. Use it to give a whole scene the same look, then change it in one place.
- Drag an effect (or a LUT) onto empty space on a video track. It becomes an adjustment layer at that spot.
- Or choose Clip › Add Adjustment Layer (Ctrl + Shift + A) to add an empty one at the playhead, then add effects to it like any clip. It goes on the track whose name you clicked if that track is free there; otherwise on a free track above the footage at the playhead, or on a new track just above it, so it always sits above the clips it changes.
- Trim or move the layer on the timeline to choose which part of the video it covers.
LUTs: ready-made colour looks
A LUT (look-up table) is a colour recipe: it turns your colours into another set of colours in one step, for a cinematic, warm or faded look. SnazzyCut has 11 built-in looks, and you can import your own .cube files.
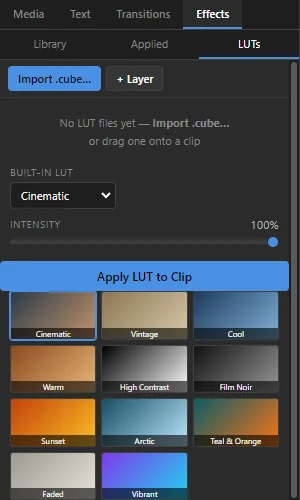 123456
- 1 Import .cube… — add LUT files from your computer. They appear as tiles above the built-in looks.
- 2 + Layer — adds the chosen look as an adjustment layer at the playhead.
- 3 Built-in LUT — the 11 looks by name, or None.
- 4 Intensity — how strong the look is, from 0% to 100%.
- 5 Apply LUT to Clip — puts the look on every selected clip at once.
- 6 The looks — click one to put it on the selected clip.
- Select a clip, then click a look (or an imported LUT tile). The clip changes straight away.
- Lower Intensity if the look is too strong.
- Not right? Click another look, or press Ctrl + Z: all your tries on that clip undo as one step.
To give several clips the same look, select them all and click Apply LUT to Clip. You can also drag an imported LUT tile onto a clip. To take a LUT off, remove it in the Applied tab, or choose None and click Apply LUT to Clip. Right-click an imported LUT for Remove from Project.
A .cube file stays where it is on your computer. If you move or delete it, the look disappears from clips that use it.
Correct the colour
Select a clip and open Properties › Colour. The first group, Color Correction, has simple sliders. Every slider starts at 0, which means "unchanged".
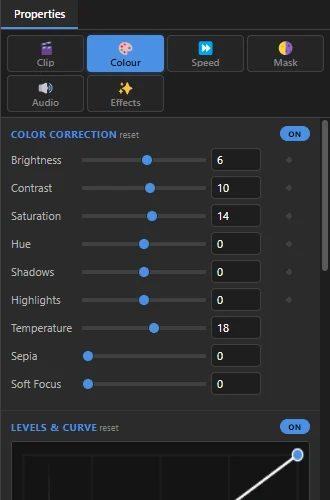 123456
- 1 Colour — the tab with all the colour tools.
- 2 ON / OFF — switch the group off to compare with the original. Your settings are kept.
- 3 reset — puts every slider in the group back to 0.
- 4 Brightness, Contrast, Saturation, Hue — the main controls (see the table).
- 5 Temperature — warmer (more orange) to the right, cooler (more blue) to the left.
- 6 ◆ — animates the value over time, see Keyframes.
| Slider | What it does |
|---|---|
| Brightness | The whole picture lighter or darker. |
| Contrast | More or less difference between dark and light parts. |
| Saturation | Stronger or paler colours. All the way left gives black and white. |
| Hue | Shifts every colour around the colour wheel. Small amounts only. |
| Shadows | Lightens or deepens only the dark parts. The bright parts are left alone. |
| Highlights | Recovers or brightens only the bright parts, such as a white sky. |
| Temperature | Fixes a picture that is too blue or too orange. |
| Sepia | A brown old-photo tint. |
| Soft Focus | A gentle softening of the whole picture. For a blur with more control, use the Blur effects. |
Fix one thing at a time: first brightness and contrast, then temperature, then saturation. If a clip looks right, copy the look to others with a LUT or an adjustment layer.
Levels and curve
The next group, Levels & Curve, is for finer control. Behind the curve is a histogram: a graph of how many pixels in the frame on the monitor are dark (left) or bright (right). It follows the playhead.
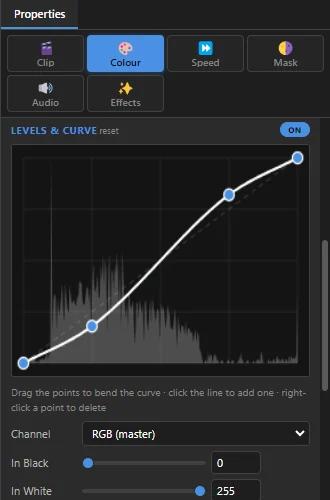 123
- 1 The curve — drag a point to bend it. Click the line to add a point; right-click a point to delete it. Raising the curve brightens, lowering it darkens. Right-click the curve for ready-made shapes: S-Curve (contrast) and Faded Film.
- 2 Channel — work on the whole picture (RGB (master)) or only on Red, Green or Blue.
- 3 Levels — In Black and In White set what counts as black and white; Gamma lightens or darkens the middle tones.
Colour wheels
The Colour Wheels tint the dark parts (Shadows), the middle tones (Midtones) and the bright parts (Highlights) separately. A popular look is slightly blue shadows with warm highlights.
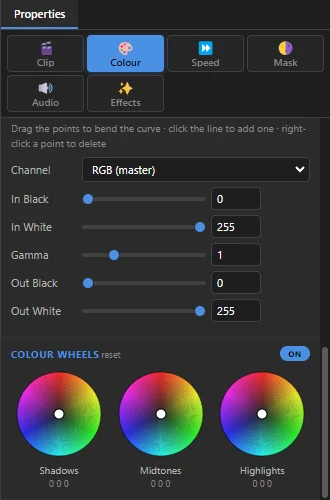 123
- 1 Drag the dot in a wheel towards a colour to add that colour. A little goes a long way. Double-click a wheel to reset it.
- 2 reset puts all three wheels back to the middle.
- 3 ON / OFF switches the wheels off without losing them.
For colour work, click Color in the workspace bar at the top. It gives you a bigger monitor with the effects and keyframes close by.
Masks: show only part of a clip
A mask is a shape that decides which part of a clip you can see. Outside the shape the clip is see-through, so the track below shows (or black, if there is nothing below). Use it for a picture in a circle, to hide something at the edge, or to blend two shots.
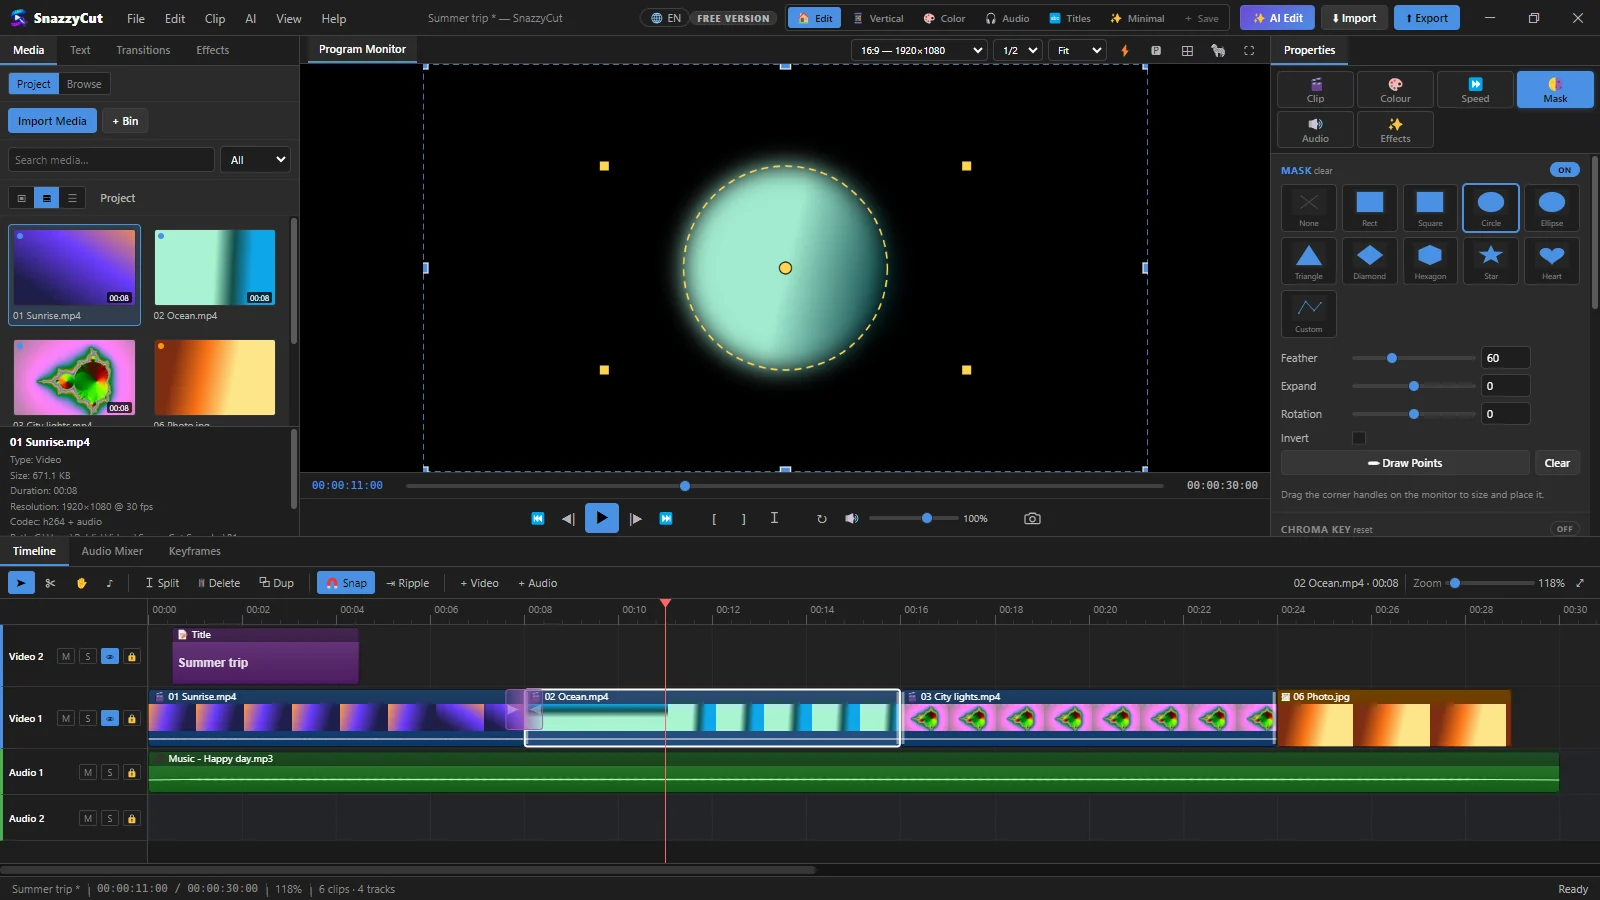 123456
- 1 Mask — the tab in Properties.
- 2 Shapes — Rect, Square, Circle, Ellipse, Triangle, Diamond, Hexagon, Star, Heart, or Custom to draw your own. None turns the mask off.
- 3 Feather — softens the edge. Expand makes the shape bigger or smaller, Rotation turns it.
- 4 Invert — swaps inside and outside, so the shape becomes a hole.
- 5 Draw Points — draw a custom shape on the monitor. Clear removes the mask.
- 6 The monitor — drag the yellow handles to size and place the shape.
With Custom: drag the points on the monitor, click the outline to add a point, and right-click a point to remove it.
Further down the Mask tab, Auto Mask cuts a moving subject out for you: click Click Subject and then the subject on the monitor, fix the edges with Brush (hold Alt to rub out), then click Track Forward to follow it through the clip. It works best when the subject looks clearly different from the background.
Background, next to Track Forward, works the other way round: no click needed, it separates whatever moves from a background that stays still. The camera must not move. Raise Threshold if the background shows through. Tolerance, Feather, Invert and Show Matte fine-tune the result.
Green screen (chroma key)
Chroma key removes one colour, usually the green or blue of a backdrop, so you can put someone in front of another picture.
- Put the background (a video or photo) on a lower video track, and the green-screen clip on the track above it.
- Select the green-screen clip and open Properties › Mask. Scroll down to Chroma Key.
- Click Pick, then click the green backdrop on the monitor. The green disappears and the background shows through.
- Adjust the sliders until the edges look clean.
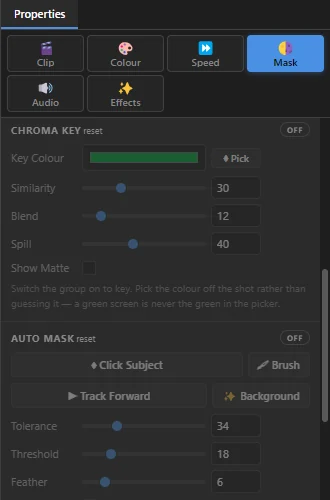 123456
- 1 ON / OFF — chroma key starts off. Clicking Pick or moving a slider switches it on.
- 2 Pick — take the colour from the picture. This works much better than choosing a green yourself.
- 3 Similarity — how close to the picked colour a pixel must be to disappear. Raise it if green patches remain; lower it if parts of the person vanish.
- 4 Blend — how soft the edge is. Raise it for hair and fast movement.
- 5 Spill — removes the green glow that the backdrop leaves on skin and clothes.
- 6 Show Matte — shows what is kept in white and what is removed in black, so you can spot holes. Untick it when you are done.
Chroma key works best with an evenly lit backdrop and no green clothes. You can combine it with a mask to cut away the edges of the backdrop.