
Captions from speech
Turn what is said in a clip into timed captions with Whisper, on your computer — then edit and style them.
SnazzyCut can listen to a clip and write down what is said as captions (subtitles): short text clips, timed to the speech, on their own track. It uses the Whisper speech model on your computer — nothing is uploaded, and it is free.
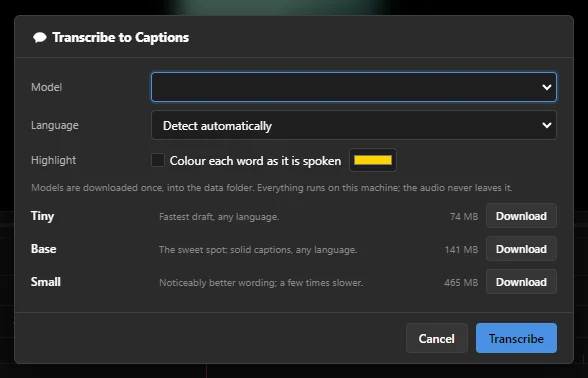 12345
- 1 Model — which Whisper model writes the captions. Only downloaded models can be picked.
- 2 Language — the language spoken in the clip, or Detect automatically.
- 3 Highlight — colour each word as it is spoken, in the colour beside it.
- 4 The models, with their download size and a Download button.
- 5 Transcribe — starts writing the captions.
Make captions from a clip
- Put a clip with someone speaking on the timeline, and click it to select it.
- Choose AI › Transcribe Selected Clip to Captions…. You can also right-click the clip and choose Transcribe to Captions….
- The first time, download a model (see below).
- Pick the Model and the Language, then click Transcribe.
- The status bar says Transcribing — the picture keeps working, results appear when done…. You can keep editing while it works. When it is done it says how many captions were added.
Only the part of the clip that is on the timeline is transcribed. Trim the clip first if you only want captions for part of it.
Download a model the first time
The Whisper models are not part of the installer. Download one once, and SnazzyCut keeps it in its data folder for every project after that. The download is the only step that needs the internet.
| Model | Download | What it is like |
|---|---|---|
| Tiny | 74 MB | Fastest draft, any language. |
| Base | 141 MB | The sweet spot: solid captions, any language. |
| Small | 465 MB | Noticeably better wording; a few times slower. |
- Click Download beside a model. Its row shows the progress, for example downloading… 40% of 141 MB.
- When it says ready, the model can be picked in the Model list.
Until a model is downloaded, the Model list looks empty, and clicking Transcribe just closes the dialog with the message Download a model first. That is normal — download a model and the list fills in.
A downloaded model has a Delete button instead, to free the space again. Not sure which one to take? Start with Base.
Languages
The Language list offers Detect automatically, English, Indonesian, Chinese, Japanese, Korean, Spanish, French, German, Russian, Portuguese, Arabic and Hindi. Every model works with every language in the list.
If the captions come out in the wrong language, run it again with the spoken language chosen instead of Detect automatically.
Colour each word as it is spoken
Tick Colour each word as it is spoken for the "karaoke" style you see on many short videos: the word being said lights up in the colour you pick (yellow to start with). It shows in the monitor and in the exported video.
Where the captions go
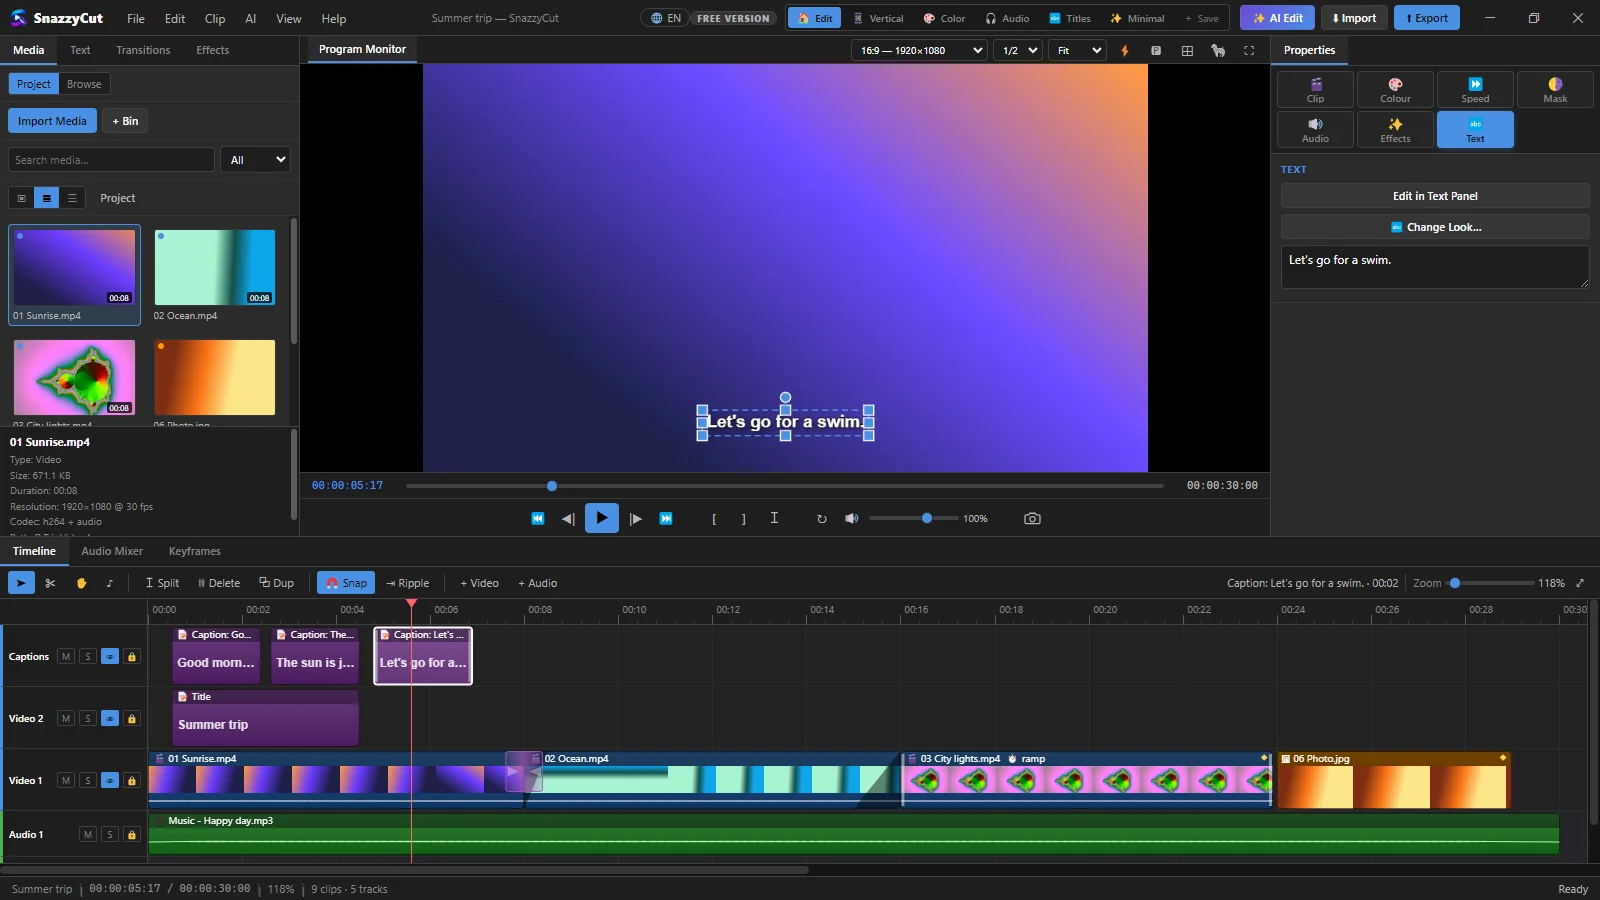 1234
- 1 A track named Captions, at the top of the timeline so the captions sit over everything. It is made the first time; captions from other clips go on the same track when it is unlocked and free there — otherwise a new Captions track is added on top.
- 2 Each caption is short enough to fit across the picture — also in an upright 9:16 project — and sits in the lower part of the frame in white bold letters with a black outline.
- 3 Click a caption, then the Text tab in Properties…
- 4 …to correct its words in the text box, or change how it looks.
All the captions are added as one step: one Ctrl + Z takes them all away again.
Edit and style the captions
Every caption is an ordinary text clip, so everything you can do with titles works here too (see Text and titles).
- Fix a word: click the caption on the timeline and type in the text box of the Text tab in Properties.
- Change the look: 🔤 Change Look… applies one of the ready-made looks, and Edit in Text Panel opens the caption in the Text panel for the font, size and colours.
- Change the timing: drag a caption, or drag its edges, like any clip. Press Delete to remove one.
- Rename or hide the track: the Captions track is a normal track; rename it or switch it off like the others.
Captions are part of the picture, so they are in the exported video. Most people watch short videos with the sound off — captions help them follow along.
Questions
Is my audio sent anywhere?
No. Everything runs on this computer and the audio never leaves it. Only the one-time model download uses the internet.
It says "No speech found in that clip".
Whisper heard no words in the part of the clip on the timeline. Check that the clip's sound is the speech you want (not only music), and try choosing the spoken language instead of Detect automatically.
Transcribe to Captions is greyed out, or says the clip has no audio.
The clip has no sound of its own, or its sound was split off onto an audio clip. Select that audio clip and transcribe it instead.
Some words are wrong.
Click the caption and correct it in the Text tab. For a whole video with many mistakes, download the Small model and transcribe again — it is slower, but its wording is noticeably better. The new captions go on a new Captions track, so delete the old one first.
Can AI Auto-Edit add captions for me?
Yes. In AI Auto-Edit (a Supporter feature) tick Transcribe speech and Captions. It uses the Whisper model you downloaded here.