
Export your video
Turn your edit into a video file: formats, sizes for YouTube, TikTok and Instagram, what the free version exports (720p, or 1080p up to 3 minutes), and saving a single frame.
Exporting turns your edit into a video file you can upload, send or play anywhere. Open the Export dialog, check a few settings, choose where to save, and SnazzyCut renders the file.
Open the Export dialog
Click ⬆ Export at the top right, choose File › Export Video…, or press Ctrl + E.
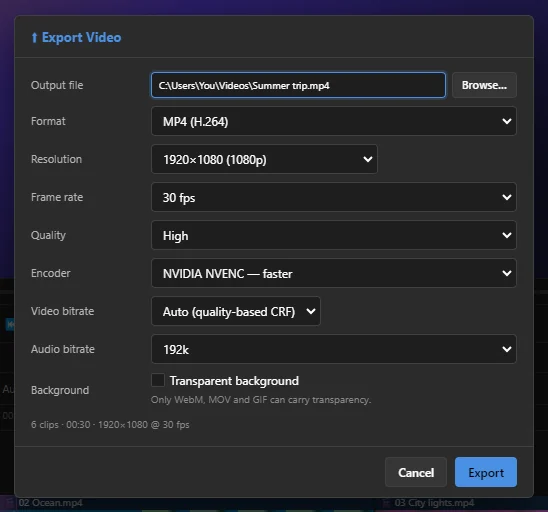 1234567891011
- 1 Output file — where the video is saved. Click Browse… to choose. If you leave it empty, SnazzyCut asks when you press Export.
- 2 Format — the kind of file. MP4 (H.264) plays everywhere and is the right choice for almost everything.
- 3 Resolution — the size of the picture in pixels. It starts at your project's size.
- 4 Frame rate — pictures per second: 24, 25, 30, 50 or 60 fps. It starts at your project's frame rate.
- 5 Quality — High, Medium or Low. Lower means a smaller file.
- 6 Encoder — what does the work. If your computer has a graphics card that can encode video, it is listed first with — faster after its name. Software (x264) — smallest files uses the processor.
- 7 Video bitrate — how much data each second of video may use. Leave it on Auto (quality-based CRF) unless a website asks for a number.
- 8 Audio bitrate — the sound quality, from 96k to 320k. 192k is good for most videos.
- 9 Background — Transparent background, for videos with see-through parts (see below).
- 10 The summary: how many clips, how long, the size and the frame rate of the file you will get.
- 11 Export — starts the render.
Not sure? Keep everything as it is and press Export. The defaults are chosen to look good and upload well.
Export step by step
- Press Ctrl + S to save your project first. It is a good habit before any long job.
- Open the Export dialog with Ctrl + E.
- Choose a Format and a Resolution. For most videos, keep MP4 (H.264) and the size the dialog suggests.
- Click Export. If you have not chosen an output file yet, a Save window opens. Pick a folder, type a name and click Save.
- Wait for the progress window to finish. You can keep it on screen or watch the details (see While it exports).
- When ✅ Export Complete appears, click Open Video to watch it, or Show in Folder to find the file.
Which format?
| Format | Use it for |
|---|---|
| MP4 (H.264) | Uploading to YouTube, TikTok, Instagram or Facebook, sending to friends, playing on a phone or TV. The best choice for almost everything. |
| MOV (QuickTime) | Macs and other editing programs. With a transparent background it becomes a large, lossless file for another editor. |
| MKV (Matroska) | Players such as VLC. Not every website or phone accepts it. |
| AVI | Older programs and devices that ask for AVI. |
| WebM (VP9) | Web pages and streaming overlays, also with a transparent background. |
| GIF (animation) | Short looping animations without sound. |
| MP3 (audio only) | Just the sound, as a small file. |
| WAV (audio only) | Just the sound, uncompressed, for music or audio programs. |
With MP3 or WAV there is no picture, so Resolution, Frame rate, Quality and Video bitrate are greyed out.
Resolution and shape
The Resolution list has the common sizes. The shape (aspect ratio — how wide the picture is compared to its height) is in the name:
| Choice | Shape | Use it for |
|---|---|---|
| 3840×2160 (4K UHD) | 16:9 landscape | 4K YouTube or TV |
| 2560×1440 (1440p) | 16:9 landscape | Sharp YouTube uploads |
| 1920×1080 (1080p) | 16:9 landscape | YouTube, Facebook, most screens |
| 1280×720 (720p) | 16:9 landscape | Smaller files, quick sharing |
| 854×480 (480p), 640×360 (360p) | 16:9 landscape | Very small files, previews |
| 1080×1920 (Vertical 9:16) | Upright | TikTok, Reels, Shorts, Stories |
| 1080×1080 (Square 1:1) | Square | Feed posts |
| 1080×1350 (Portrait 4:5) | Slightly upright | Instagram feed |
| Custom… | Any | Type a width and height yourself |
Pick a size with the same shape as your project. The shape of the project itself is set when you start it, or with the size menu above the monitor (see Start a project in the right shape).
What the free version exports
In the free version, the size of the video depends on how long it is:
- 720p for a video of any length: the shorter side of the picture is at most 720 pixels.
- 1080p for a video of up to 3 minutes: the shorter side is at most 1080 pixels.
The length is what you export: the part between the in and out points when they are set (see Exporting only part of the timeline), otherwise the whole timeline. Bigger sizes (1440p, 4K) and 1080p for longer videos are for a Supporter. The shape always stays the same. Everything else — every editing feature, no watermark — is the same as for a Supporter.
| You choose | Free, video up to 3 minutes | Free, longer video |
|---|---|---|
| 1920×1080 (1080p) | 1920×1080 | 1280×720 |
| 2560×1440 or 3840×2160 (landscape) | 1920×1080 | 1280×720 |
| 1080×1920 (Vertical 9:16) | 1080×1920 | 720×1280 |
| 1080×1080 (Square 1:1) | 1080×1080 | 720×720 |
| 1080×1350 (Portrait 4:5) | 1080×1350 | 720×900 |
 1
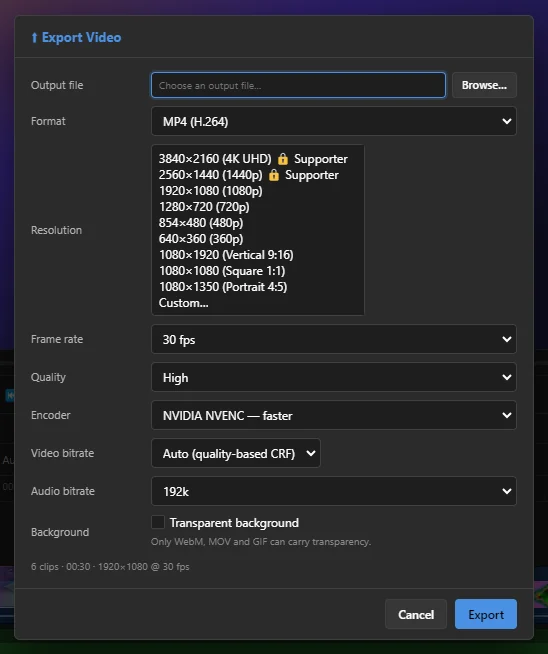
The 🔒 Supporter labels follow the length of your video. For a video longer than 3 minutes, the 1080p sizes are marked too. The dialog opens on your project's size, made smaller if the free version does not allow it for this length. If a bigger size is chosen, the summary says — bigger than the free version allows for this length and shows the size you will get.
If you pick a size marked 🔒 Supporter, SnazzyCut asks what you want to do:
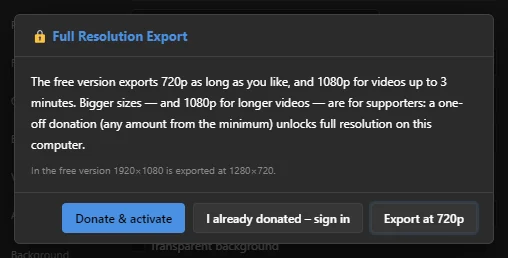 123
- 1 Donate & activate — opens your browser to donate. When you are done, SnazzyCut is activated and exports the size you chose.
- 2 I already donated – sign in — signs in with the account you donated with.
- 3 Export at 720p — keeps the free version and switches to the biggest size it allows for this length. For a video of up to 3 minutes the button says Export at 1080p.
Closing the window without choosing puts the size back to what it was. See Free and Supporter for how donating works.
The limit is for video only. MP3 and WAV sound exports and Export Frame pictures are never limited.
Exporting only part of the timeline
If you set an in point and an out point on the timeline (I and O), only the part between them is exported. The dialog tells you so:
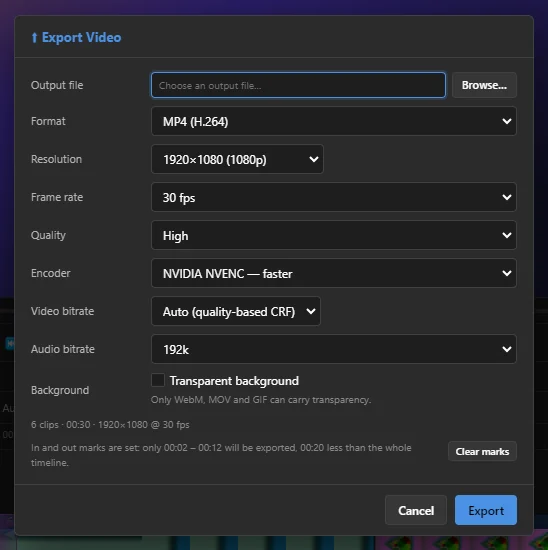 1
- To export the whole timeline, click Clear marks in the dialog, or press Alt + X in the editor (Clip › Clear In and Out).
- The marks are saved with the project, so check this line if a video comes out shorter than you expected.
Transparent background
Tick Transparent background to export a video with see-through parts, for example a title or a logo to lay over other footage in another program. Only three formats can carry transparency:
- WebM — VP9 with an alpha channel, for web pages and overlays.
- MOV — QuickTime RLE: lossless and large, for handing to another editor.
- GIF — edges are hard rather than soft.
With any other format the box is greyed out. With transparency on, the Encoder is greyed out too: the processor does this job.
While it exports
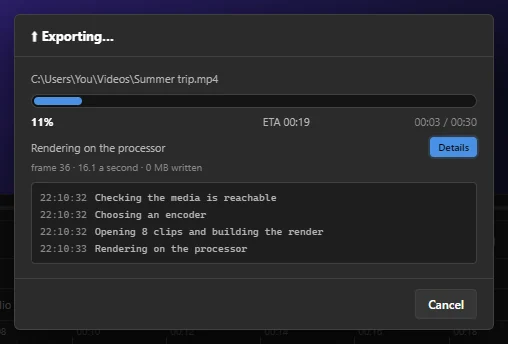 12345
- 1 The progress bar. A long video may be rendered in several parts at once; then the bar shows each part filling up.
- 2 How far it is, the time left (ETA), and how much of the video is done.
- 3 Details — shows or hides a list of every step with the time it started. SnazzyCut remembers your choice.
- 4 The details list.
- 5 Cancel — stops the export.
Some steps are quiet for a while, such as wiring up the render on a big project. The line under the step keeps counting the seconds, so you can see it is still working.
You can keep using your computer while it exports, but heavy programs slow it down. If you close SnazzyCut during an export, it asks first, because quitting cancels the export.
When it is done
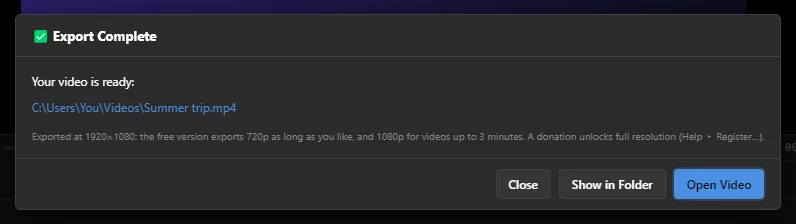 123
- 1 In the free version, a line says when the video was made smaller, and to what size.
- 2 Show in Folder — opens the folder with the file selected.
- 3 Open Video — plays it in your usual video player.
If the graphics card's encoder stopped part-way, SnazzyCut finishes the video on the processor and says so here. The file is complete. Choose Software (x264) — smallest files as the encoder next time to skip the failed first try.
If something goes wrong
- Nothing to Export — the timeline is empty. Add clips first.
- ⚠ Offline Media in This Export — some files on the timeline have moved or been deleted. Click Relink… to find them; exporting anyway gives black pictures or fails. See Moving a project and relinking media.
- ⚠ Export Failed — FFmpeg, the engine that writes the video, stopped with an error. Click 📋 Copy Log to copy the whole report, then see Export failed.
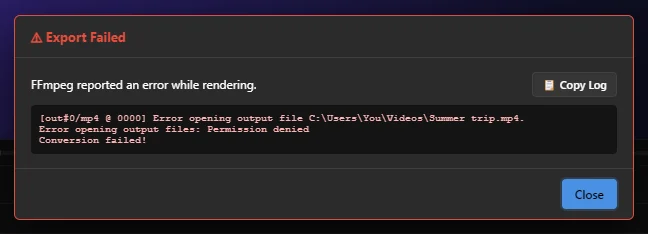 12
Export a single frame as a picture
To save the picture under the playhead — for a thumbnail, for example:
- Move the playhead to the frame you want. ← and → step one frame at a time.
- Choose File › Export Frame…, press Ctrl + Shift + E, or click the camera button under the monitor.
- A Save window opens with the project name and the time already filled in. Keep
.pngfor the best quality, or choose JPEG for a smaller file, and click Save.
The picture is saved at your project's full size, also in the free version.
Recommended settings
Start your project in the right shape (see the Home screen), then export with these settings. Leave Video bitrate on Auto (quality-based CRF).
| Where it goes | Format | Resolution | Frame rate | Quality · Audio |
|---|---|---|---|---|
| YouTube | MP4 (H.264) | 1920×1080 (1080p), or 3840×2160 (4K UHD) for 4K footage. Free version: 1920×1080 up to 3 minutes, 1280×720 for longer videos. | The same as your footage (often 30 or 60) | High · 192k (320k for music videos) |
| TikTok, Reels, Shorts | MP4 (H.264) | 1080×1920 (Vertical 9:16). Free version: the same up to 3 minutes, 720×1280 for longer videos. | 30 fps | High · 192k |
| Instagram feed | MP4 (H.264) | 1080×1350 (Portrait 4:5) or 1080×1080 (Square 1:1). Free version: the same up to 3 minutes, 720×900 or 720×720 for longer videos. | 30 fps | High · 192k |
| WhatsApp or email | MP4 (H.264) | 1280×720 (720p) | 30 fps | Medium · 128k |
Keep the frame rate the same as the footage you filmed. Changing 30 fps footage to 60 fps does not make it smoother; it only makes the file bigger.