
Picture-in-picture, blend modes and colour clips
Stack clips on video tracks, resize and place them, blend them, and add solid colour and gradient clips.
Every video track is a layer. A clip on a higher track sits in front of the ones below, so you can shrink it into a corner (picture-in-picture), blend it into the shot underneath, or put a colour or gradient behind your titles. This page shows the controls for size, position and blending, and the colour clips.
How layers work
- Video 2 is in front of Video 1, Video 3 in front of both, and so on. Where a clip covers the whole frame, you only see it; make it smaller or see-through and the layers below show.
- Add a track with + Video above the timeline (Ctrl + Shift + N), or right-click a track's name › Add Track Above.
- Click a clip on the monitor to select it. If several layers are under the mouse, you get the one in front (or the one already selected).
Picture-in-picture
A small video in a corner of another one, for a reaction, a face cam or a product close-up.
- Put the main video on Video 1.
- Drag the second clip onto Video 2, at the moment it should appear.
- Select it. On the monitor, drag a corner handle inwards to make it smaller, then drag the middle of the box to a corner. Or type the numbers in Properties › Clip (below).
- Optional: give it a soft edge or a round shape with a mask, or a transition so it does not just pop in (see Add a transition).
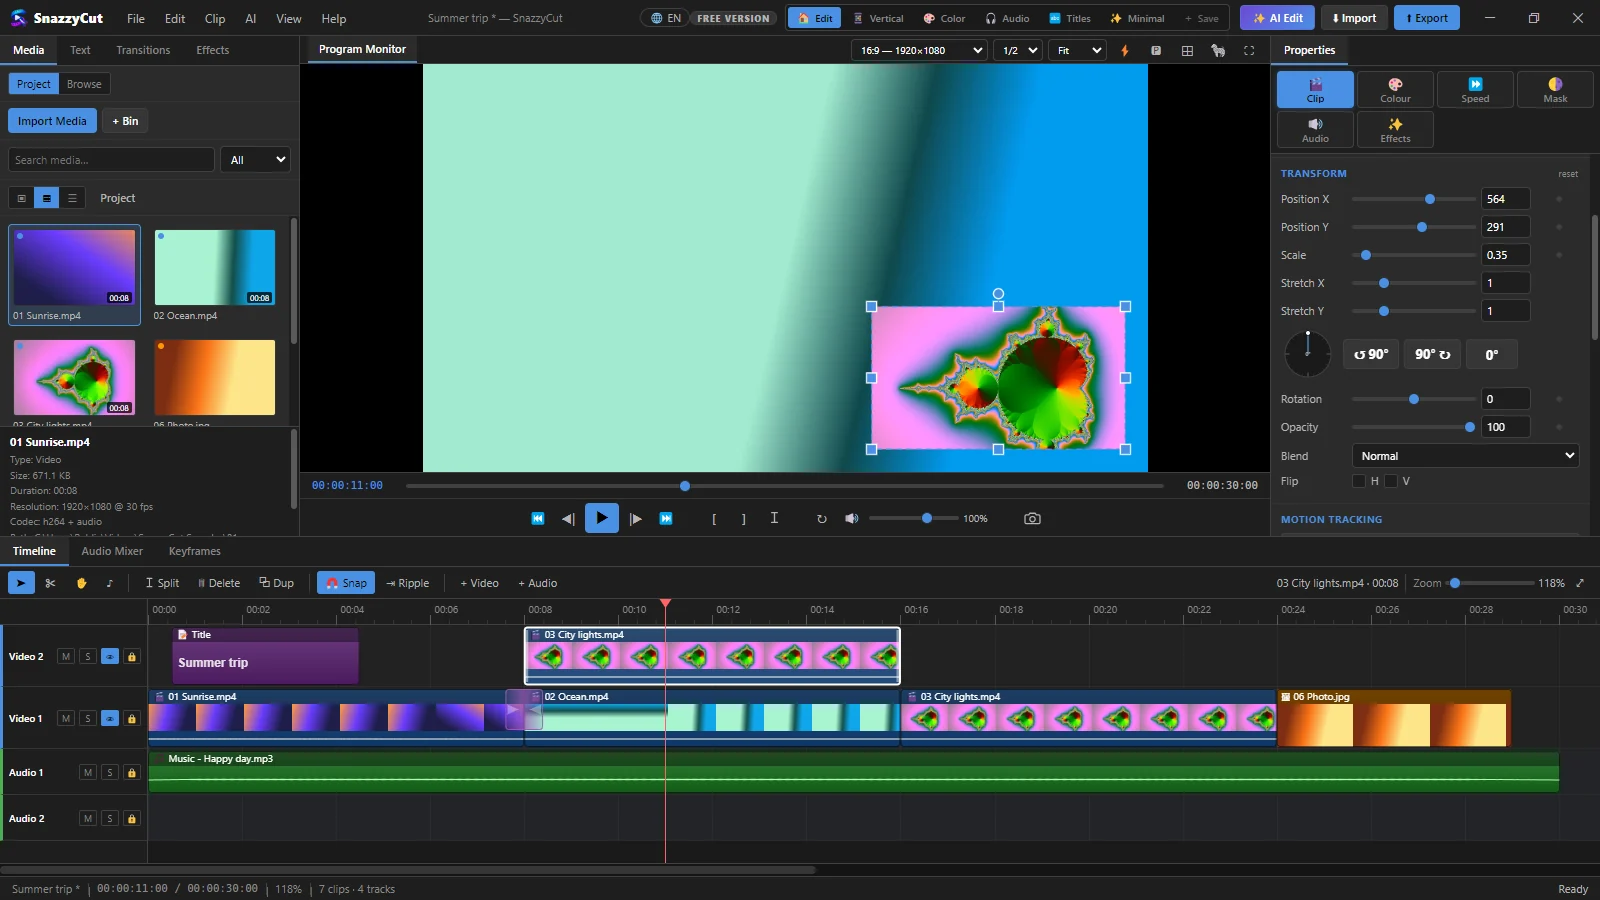 123456789
- 1 The monitor — the selected layer has a box with handles: drag the middle to move it, a corner to resize it, the round dot on top to rotate it (see Move it on the monitor).
- 2 The small clip on Video 2, above the main one.
- 3 Position X and Position Y — where the middle of the clip is, in pixels from the middle of the frame. A bigger X moves it right, a bigger Y moves it down.
- 4 Scale — the size: 1 is full size, 0.35 is about a third.
- 5 Stretch X and Stretch Y — make it wider or taller only, which squashes the picture.
- 6 Rotation and Opacity — turn the clip, or make it see-through (100 is solid). The dial above them turns it by dragging; ↺ 90° and 90° ↻ turn it a quarter, and 0° puts it upright again. Handy for a phone video shot sideways.
- 7 Blend — how the clip mixes with the layers under it (see Blend modes).
- 8 Flip — H mirrors it left to right, V upside down.
- 9 reset — puts the whole group back: full size, in the middle, upright.
Position, scale, rotation and opacity have a ◆, so they can change over time — for example a picture-in-picture that slides in. See Keyframes.
Quick fixes on the monitor
Right-click a clip on the monitor for one-click fixes:
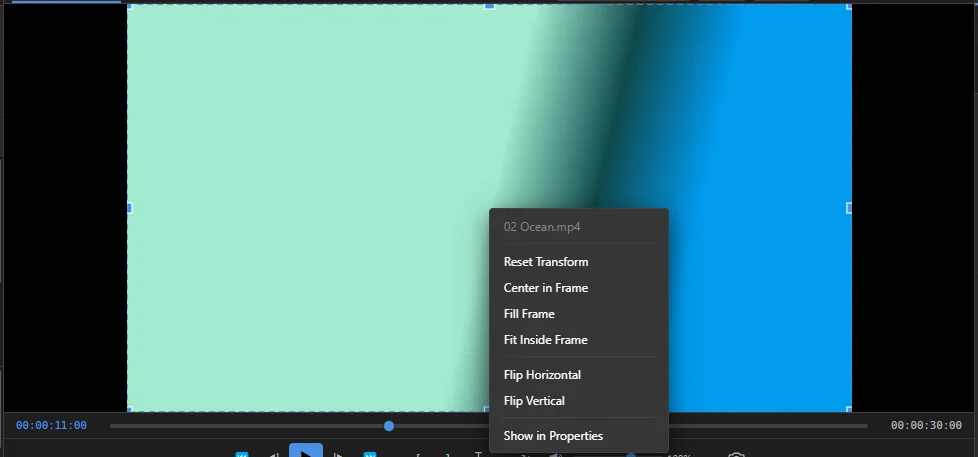 123
- 1 The menu, with the clip's name at the top. Show in Properties at the bottom opens its settings (on a title: Edit Text…).
- 2 Reset Transform (back to full size, in the middle), Center in Frame, Fill Frame (fills the whole frame; the edges that stick out are cut off) and Fit Inside Frame (the whole picture fits, with bars where the shapes differ).
- 3 Flip Horizontal and Flip Vertical.
Clip › Reset Transform does the same as the first item for the selected clip. Right-click an empty part of the monitor for Fit Preview to Window, safe margins, Export Frame… and Fullscreen.
Filmed upright for a landscape video? Fill Frame zooms it until there are no black bars. Fit Inside Frame keeps all of it, and a blurred copy of the same clip on the track below (scaled up with Fill Frame and a Gaussian Blur effect) fills the bars nicely.
Blend modes
Blend, under Opacity in Properties › Clip, decides how a clip's colours mix with the layers below it. Normal simply covers them. The others are grouped by what they do:
| Group | Modes | Good for |
|---|---|---|
| Darken | Darken, Multiply, Color Burn | Keeping the dark parts: black text on paper, shadows, a texture over footage. White disappears. |
| Lighten | Lighten, Screen, Color Dodge, Linear Dodge (Add) | Keeping the light parts: light leaks, sparks, fire or snow shot on black. Black disappears. |
| Contrast | Overlay, Soft Light, Hard Light | Adding punch, a texture or a colour wash while both layers stay visible. |
| Comparative | Difference, Exclusion | Graphic, inverted looks. |
Lower Opacity to make any blend gentler. Blend modes show on the monitor and come out the same in the exported video.
Colour and gradient clips
A colour clip is a plain colour or a gradient, made by SnazzyCut: no file needed. Use it as a background for titles, a coloured bar behind a lower third, a fade to a colour, or (with a blend mode) a colour wash over your footage.
- Move the playhead to where it should start.
- Choose Clip › Add Solid Colour… or Clip › Add Gradient….
- Pick the colours (see below) and click Add to Timeline.
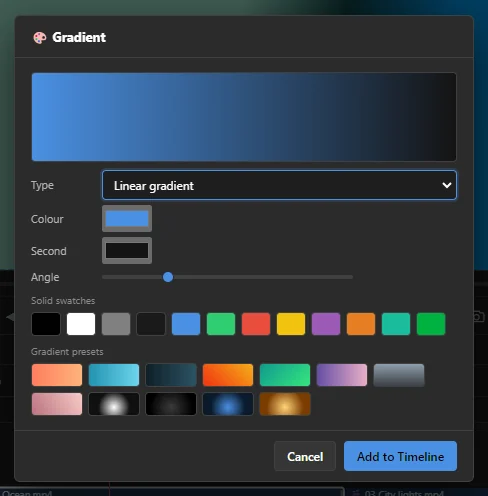 123456
- 1 A preview of the fill.
- 2 Type — Solid colour, Linear gradient (from one side to the other) or Radial gradient (from the middle outwards).
- 3 Colour and Second (the other end of a gradient). Angle turns a linear gradient; Size sets how far a radial one spreads.
- 4 Solid swatches — one click for a common colour, including chroma-key green.
- 5 Gradient presets — ready-made gradients such as Sunset, Ocean or Spotlight (hover a swatch to see its name).
- 6 Add to Timeline — adds a 5-second clip at the playhead.
- The clip goes on the track whose name you clicked (the target track) if it is free there; otherwise on the nearest free video track, or on a new track if none is free. It never lands on top of another clip on the same track.
- To put it behind other clips, drag it down to a lower track.
- Change it later: select it and use the Fill group in Properties › Clip, or right-click it › Edit Colour…. Drag its edges to make it longer or shorter.
Where no clip covers the frame at all, you see the project's background colour, set in File › Project Settings…. A colour clip is for a background that only some parts of the video have.
More ways to layer
- One look on everything below: an adjustment layer.
- Remove a green screen: chroma key.
- Show only part of a layer: masks.
- A layer that follows something moving, or sits on a surface: motion tracking and corner pin.
- Treat several layers as one clip: nested clips.