
Timeline basics
Tracks, placing and moving clips, trimming, splitting, deleting, selecting, playback, zoom, markers and undo.
The timeline, at the bottom of the window, is where your video is put together: clips are laid out from left to right in the order they play. This page covers placing, moving, trimming and splitting clips, playing your edit and getting around.
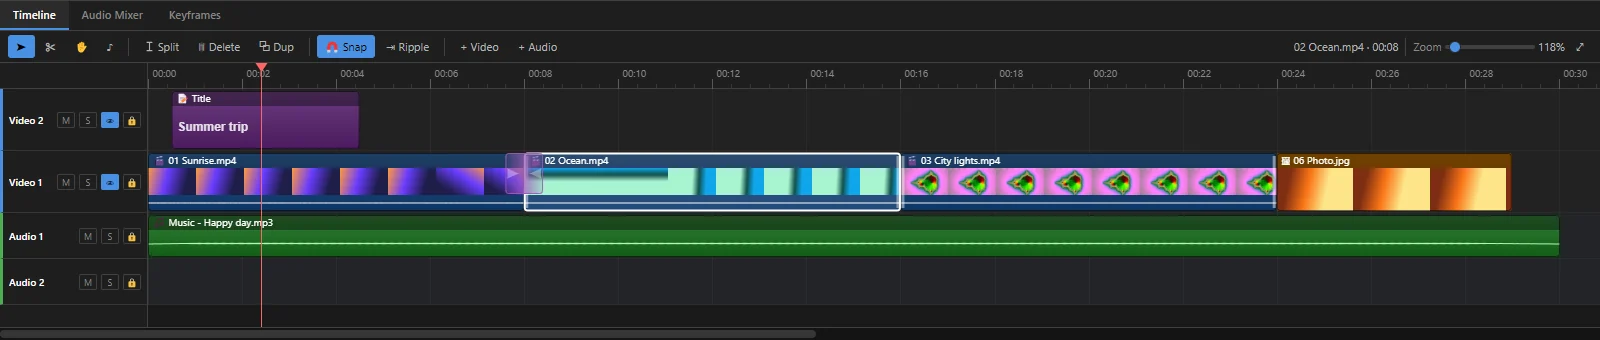 12345678
- 1 Tools — ➤ Selection (V), ✂ Razor for cutting (C), ✋ Hand for scrolling (H) and ♪ Remix for fitting music to a length (R, see Sound and music).
- 2 Video tracks — videos, photos and titles. A clip on a higher track covers the ones below it, which is how a title sits on top of your footage.
- 3 Audio tracks — music, voice and other sound.
- 4 Ruler — the time, in minutes and seconds. Click it to move the playhead there.
- 5 Playhead — the red line. The monitor shows the frame under it, and splitting and pasting happen here.
- 6 A clip — a piece of a file on the timeline. The selected clip has a white outline.
- 7 Snap — clips stick to each other's edges, the playhead and markers (N turns it on and off).
- 8 Zoom — the slider zooms in and out; ⤢ fits the whole edit in view.
Tracks
A new project has two video tracks and two audio tracks. Add more whenever you need another layer.
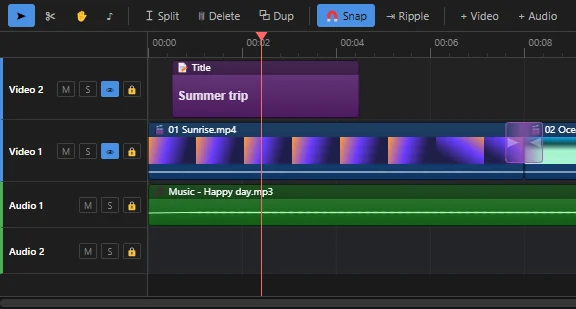 123456
- 1 Name — double-click to rename the track. A single click makes it the target track: pasted clips land there. Click it again to undo that.
- 2 M (Mute) — silences the track.
- 3 S (Solo) — plays only this track's sound.
- 4 👁 (Visibility) — hides the pictures on a video track, in the monitor and in the export.
- 5 🔒 (Lock) — stops the clips on it from being moved, trimmed, split or deleted by accident. If you press Del on one of its clips, the clip stays and the status bar says Track is locked.
- 6 + Video and + Audio — add a track (Ctrl + Shift + N for video, Ctrl + Alt + N for audio).
Right-click a track's name for Rename Track…, Add Track Above, Add Track Below and Delete Track. Drag the bottom edge of a track's name area to make the track taller or shorter; double-click that edge to reset it.
Place and move clips
- Place — drag a file from the Media panel, the Browse tab or Explorer onto a track (see Put a file on the timeline). Videos, photos and titles go on video tracks; music and other sound go on audio tracks. A photo starts 5 seconds long.
- Move — drag a clip left or right, or up and down to another track of the same kind.
- Copy while moving — hold Alt while you drag. The original stays where it was and you drop a copy.
- New clips never cover old ones — media you drop from the Media panel, Browse or Explorer, and clips you paste, do not land on top of a clip that is already there. With Ripple off, nothing else moves: the new clips go to the nearest free track above (below, for sound), or onto a new track.
- Ripple — with the Ripple button on, dropped media and pasted clips make room instead: a clip they land inside is cut there, and its second part and everything after it are pushed along.
- Moving clips — a clip you drag along the timeline can still be dropped on top of another one when Ripple is off, so check where it lands. With Ripple on, it pushes the clips after it along.
Snapping makes clips meet exactly, with no gap and no overlap. For one fiddly move, press N to turn it off, drag, then press N again.
Trim a clip
Trimming shortens a clip from the start or the end, to cut away a slow beginning or a shaky ending.
- Move the mouse to the left or right edge of the clip. The pointer changes to a trim handle.
- Drag the edge inwards to shorten the clip, or outwards to bring back footage you trimmed off before.
A video clip cannot be longer than its file. Photos and titles can be stretched to any length. With Ripple on, the clips after it move along as you trim, so no gap opens.
Holding Alt while you drag an edge changes the clip's speed instead of trimming it: the whole clip still plays, faster or slower. See Speed.
Split a clip
Splitting cuts one clip into two at a moment you choose, so you can delete the middle, move a part or put a transition between them.
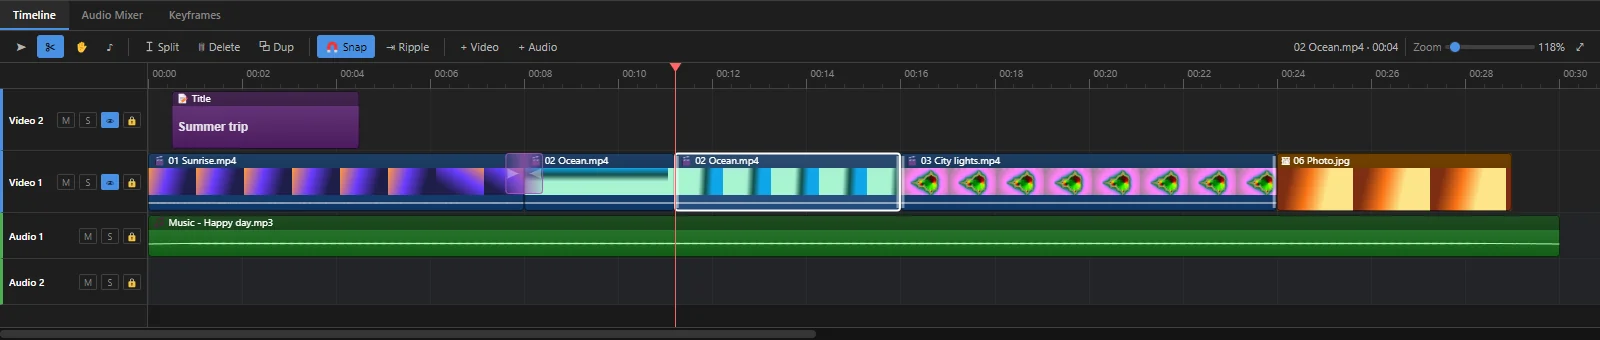 1234
- 1 Split — put the playhead where you want the cut and press S (or click Split, or ⌶ under the monitor). The selected clips are split at the playhead. With nothing selected, every clip under the playhead is split, on all tracks.
- 2 Razor — press C, then click a clip exactly where you want to cut it. Press V to go back to the Selection tool.
- 3 The cut — the two halves are now separate clips. The right half is selected.
- 4 Delete — removes the selected clip (see below).
You can also right-click a clip and choose Split Here or Split at Playhead.
Delete and ripple delete
| Action | Keys | What happens |
|---|---|---|
| Delete Selected | Del | The clip is removed and leaves an empty gap. |
| Ripple Delete | Shift + Del | The clip is removed and the clips after it on the same track slide left to close the gap. |
| Close All Gaps | Ctrl + G | Every clip on every track slides left until nothing is left between them. |
Close All Gaps moves the clips on every track, including titles and music you placed at a certain moment. If something ends up in the wrong place, press Ctrl + Z.
Select clips
- Click a clip to select it. Ctrl+click adds or removes one clip; Shift+click selects everything between the selected clip and this one.
- Drag across empty space to draw a box around several clips.
- Ctrl + A selects all clips; Esc selects nothing. ↑ and ↓ select the previous or next clip.
Above the right end of the timeline you can see what is selected, for example the clip's name and length.
Copy, paste and duplicate
- Ctrl + C copies and Ctrl + X cuts the selected clips.
- Ctrl + V pastes them at the playhead, on their own tracks (or on the target track, if you clicked a track's name).
- Ctrl + D (or Dup) puts a copy straight after the original, on the same track. Clips that were there move along to make room.
Colour-code your clips
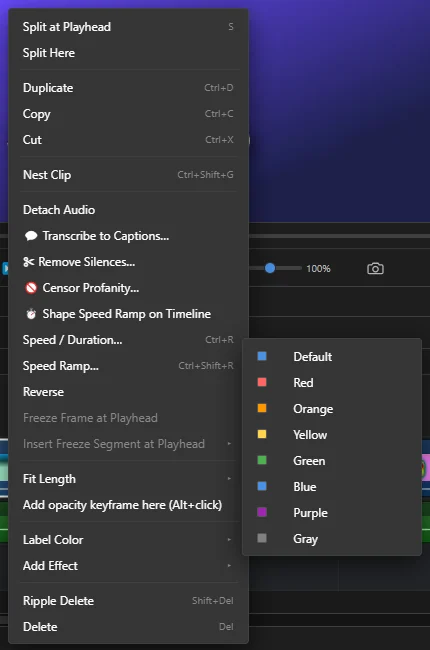
Each kind of clip has its own colour on the timeline: videos blue, titles purple, music green and so on. To mark clips your own way, for example all the interview clips red, select them, right-click one › Label Color, and pick a colour. Default goes back to the usual colour. The label only changes the timeline, never the video.
 12
Play your edit and move around
 12345
- 1 Time — where the playhead is (hours:minutes:seconds:frames). The total length is on the right.
- 2 Position bar — drag it to look through the whole edit.
- 3 Playback — go to start, one frame back, play/pause, one frame forward, go to end.
- 4 [ and ] — set the in and out points (see Markers and the in/out range).
- 5 ⌶ — split at the playhead.
| Keys | What they do |
|---|---|
| Space or K | Play / pause |
| J / L | Jump one second back / forward (hold L to keep going) |
| ← / → | One frame back / forward |
| Shift + ← / → | Jump 5 seconds |
| Home / End | Go to the start / end |
You can also click the ruler to move the playhead, or drag the playhead's red head along the ruler to scrub through the video.
Zoom and scroll
- Drag the Zoom slider, or press Ctrl + = and Ctrl + -.
- Ctrl + 0 (or F, or ⤢) fits the whole edit in the window.
- Ctrl + mouse wheel zooms at the mouse pointer. Dragging left or right on the ruler zooms too.
- Scroll with the bar under the tracks, or hold the Hand tool (H) and drag. Dragging an end of the scroll bar also zooms.
Markers and the in/out range
 12
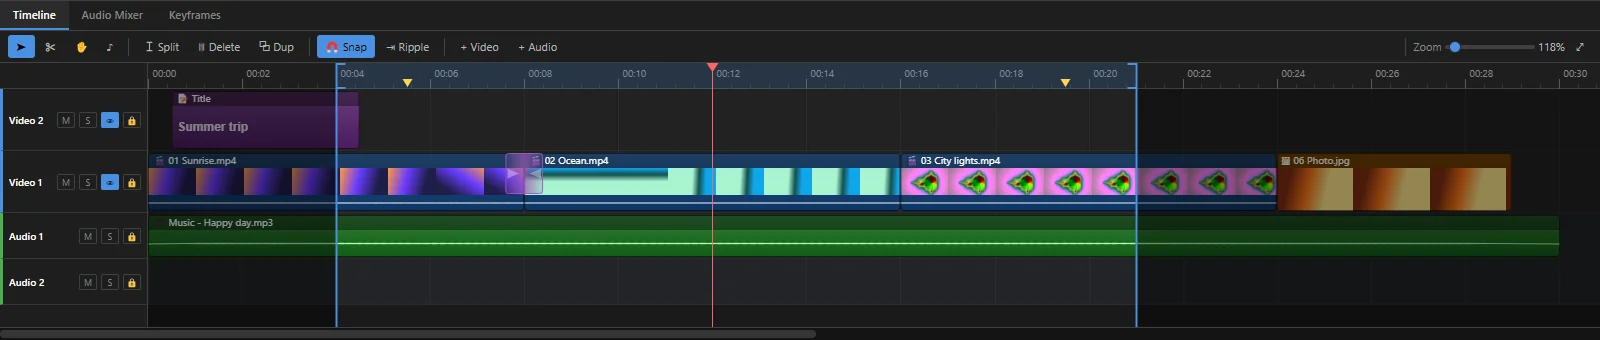
1 Markers are yellow flags on the ruler, for remembering a moment, such as a beat in the music. Press M to add one at the playhead, and Alt + M to delete the one under the playhead. Right-click the ruler for Add Marker Here, Delete Marker at… and Delete All Markers. Clips snap to markers.
2 The in/out range marks the part of the timeline to export. Press I where it should start and O where it should end. Brackets appear on the ruler (drag them to adjust) and everything outside is dimmed. Nothing is cut: it only limits what is exported and pre-rendered.
A range you forgot about means only that part is exported. Clear it with Alt + X or Clip › Clear In and Out.
Undo and redo
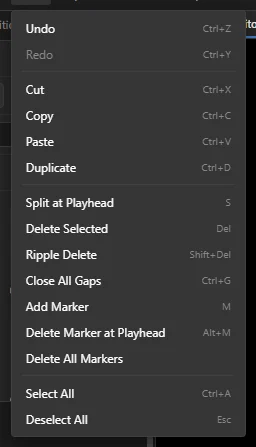
Made a mistake? Press Ctrl + Z to undo (up to 400 steps back), and Ctrl + Y (or Ctrl + Shift + Z) to redo. The Edit menu names the step it will undo, for example Undo Split clips.
 123456
Press F1 in SnazzyCut for the full list of keyboard shortcuts. See also Language and shortcuts.