
Sound and music
Set clip volume and fades, mix tracks, clean up voices, fit music to your video and lower it under speech.
Good sound matters as much as a good picture. Here you set how loud each clip is, fade sounds in and out, balance whole tracks in the Audio Mixer, clean up a voice, cut out pauses, bleep swear words, and make music fit your video.
Where the sound is
- Video clips carry their own sound. A clip with sound shows a thin waveform (the shape of the sound) along its bottom edge.
- Audio clips — music, a voice-over, sound effects — go on the audio tracks below the video tracks, and show their waveform across the whole clip.
- To add another audio track, click + Audio in the timeline toolbar, or choose Clip › Add Audio Track (Ctrl + Alt + N).
Click Audio in the workspace bar at the top for a layout made for sound work, with the mixer and big waveforms.
Volume, mute and fades for one clip
Select a clip and open Properties › Audio. Everything here changes only that clip.
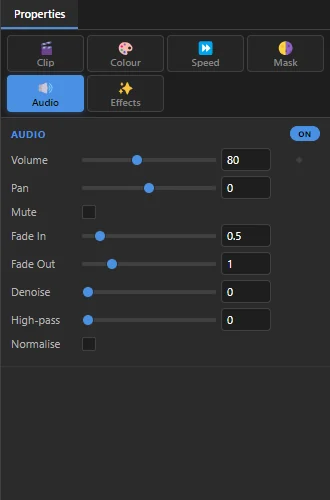 1234567
- 1 Audio — the tab with the clip's sound settings.
- 2 Volume — 100 is the original level. Go up to 200 to make a quiet clip louder, or down to 0 for silence. The ◆ lets the volume change during the clip (see below).
- 3 Pan — moves the sound to the left (−100) or right (100) speaker. 0 is the middle.
- 4 Mute — silences this clip.
- 5 Fade In / Fade Out — seconds (up to 5) for the sound to rise from silence at the start, or sink to silence at the end. On the timeline a fade shows as a dark corner on the clip.
- 6 Clean-up — Denoise, High-pass and Normalise, see Clean up a voice.
- 7 ON / OFF — switches all of this clip's sound settings off to compare. They are kept.
A short fade of 0.3–0.5 seconds at the start and end of a clip stops clicks at the cuts. For music, a 2–3 second fade-out at the end sounds natural.
Change the volume during a clip
Sometimes a clip should get quieter in one place only, for example the music while someone speaks.
- On the timeline: hover an audio clip and a dashed line appears: the volume. Hold Alt and click the line to add a point, then drag points up or down. You can also right-click the clip and choose Add volume keyframe here (Alt+click).
- In Properties: move the playhead, click ◆ next to Volume, move the playhead again and change the volume. SnazzyCut makes the change smoothly between the two points. See Keyframes.
Clean up a voice
Three tools at the bottom of Properties › Audio help with recordings made on a phone or a cheap microphone:
| Tool | What it does | Try |
|---|---|---|
| Denoise | Reduces steady background noise such as hiss, a fan or air conditioning. | 20–40. Too much makes a voice sound watery. |
| High-pass | Cuts the deep sounds below the number you set (in Hz): rumble, wind and handling noise. | 80–100 for a voice. |
| Normalise | Brings the clip to a standard loudness, so quiet and loud recordings end up similar. | Tick it for voices and interviews. |
While you edit, Denoise is only approximated, and Normalise is not heard. The full noise reduction and loudness levelling are done when you export, so listen to the exported file to judge them.
Separate the sound from a video clip
To move, trim or replace a video's sound on its own, select the video clip and choose Clip › Detach Audio (or right-click the clip › Detach Audio, or press Ctrl + Shift + D).
- The sound becomes its own clip on a free audio track (a new track is made if they are all busy), named after the video with "(audio)".
- The video clip is then silent: its waveform goes and its audio settings are greyed out. Change the sound on the new audio clip instead.
- Changed your mind? Edit › Undo (Ctrl + Z).
Cut out the pauses: Remove Silences
For a talk to camera, a vlog or a podcast: SnazzyCut finds the quiet stretches in a clip and cuts them out, so the speech runs on without long pauses (a "jump cut" edit).
- Right-click the clip with the speech › ✂ Remove Silences….
- Check the settings (below) and click Find Silences. The status bar says Listening for silences….
- A window says how many silent stretches it found, how many seconds that is, and where they are. Click Cut … to remove them, or Cancel.
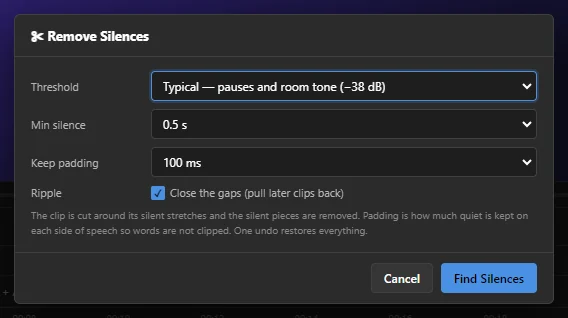 1234
- 1 Threshold — what counts as silence: Cautious (only near-total silence), Typical (pauses and room tone) or Aggressive (quiet talk counts as silence too).
- 2 Min silence — only pauses at least this long are cut, from 0.3 to 2 seconds. Longer keeps natural short breaths.
- 3 Keep padding — how much quiet stays on each side of the speech, so the first and last sounds of a word are not clipped.
- 4 Ripple — Close the gaps (pull later clips back). Untick it to leave the gaps where the pauses were.
The clip is split around each pause and the silent pieces are deleted; one Ctrl + Z brings everything back. It works on video clips with sound and on audio clips, but not on a clip that is reversed, frozen, speed-ramped or whose sound was detached.
Bleep or mute swear words: Censor Profanity
SnazzyCut listens to a clip word by word on your computer, finds the words on a list, and bleeps or mutes each one you choose. Nothing is uploaded.
- Right-click the clip › 🚫 Censor Profanity….
- Choose the settings (below) and click Scan. The status bar says Scanning speech for listed words….
- A list shows every word found and when it is said, all ticked. Untick any you want to keep, then click Bleep Them (or Mute Them).
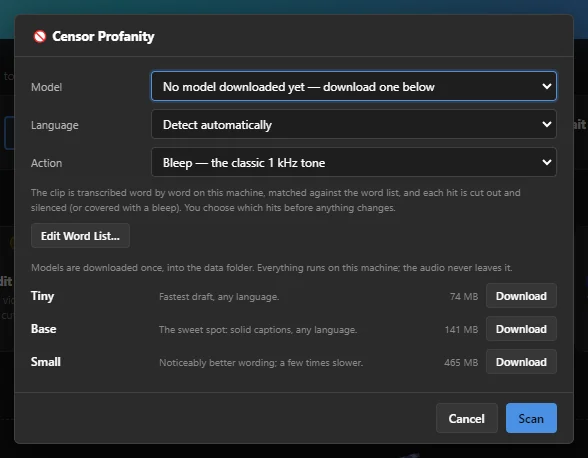 12345
- 1 Model — the Whisper speech model, the same one captions use. Until one is downloaded it says No model downloaded yet — download one below.
- 2 Language — Detect automatically, English or Indonesian.
- 3 Action — Bleep — the classic 1 kHz tone, or Mute — the word goes silent.
- 4 Edit Word List… — opens the list of words in your text editor: one word per line. Add or remove words, save, and scan again.
- 5 The models — Tiny, Base and Small, each with its size and a Download button (Delete once it is downloaded). A model is downloaded once and shared with Transcribe to Captions; Base is a good start.
- Each censored word becomes its own short piece of the clip with its sound muted, marked 🔇 on the timeline. The picture is not touched.
- With bleeps, a short Bleep clip is also put on a free audio track under each word (a new track named Bleeps is added when none is free). Delete a bleep clip if you would rather have silence there.
- The list starts with common English and Indonesian swear words.
- The same limits as Remove Silences apply: not on reversed, frozen, speed-ramped or detached clips.
The Audio Mixer
The Audio Mixer tab (next to Timeline at the bottom) sets the level of whole tracks rather than single clips. It is the quickest way to make all the music quieter at once.
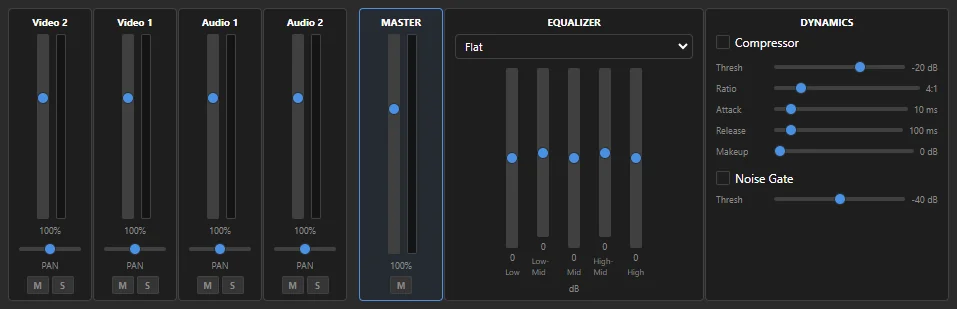 1234567
- 1 A track — one strip per track, video tracks included, with the track's name on top.
- 2 Fader — the track's volume, 0–150%. The bar beside it moves while the track plays.
- 3 PAN — moves the whole track left or right.
- 4 M mutes the track. S (solo) plays only the soloed tracks, so you can listen to one on its own.
- 5 MASTER — the volume of everything together, and M to mute it all.
- 6 EQUALIZER — presets such as Vocal, Podcast or Bass Boost, and five sliders from Low to High that make each band of the sound (deep to bright) louder or quieter by up to 20 dB.
- 7 DYNAMICS — a Compressor and a Noise Gate, each switched on with its tick box. See below.
Track volume, pan, mute, solo and the master volume are all in the exported video. So are the EQUALIZER and DYNAMICS: you hear them while you edit, and they are applied to the export the same way. Unlike the faders, they work on the whole mix (every track together), not on one track.
Compressor and Noise Gate
- Compressor — evens out the loudness: sound louder than Thresh (threshold) is turned down. Ratio sets how strongly (4:1 is a common start), Attack and Release how quickly it reacts and lets go (in milliseconds), and Makeup raises everything again afterwards so the result is not quieter overall.
- Noise Gate — silences the mix whenever it is quieter than its Thresh, which hides hiss or room noise in the pauses between words. Set it just above the noise; too high and it cuts off quiet words.
Because these act on everything together, use them for a final polish. To clean up one recording, start with that clip's own Denoise, High-pass and Normalise.
Music that fits your video
Right-click a music clip on an audio track for the music tools.
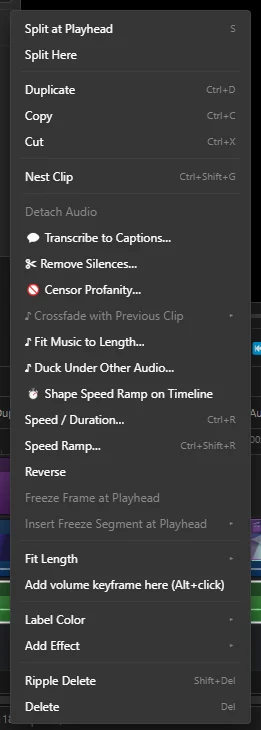 123
- 1 Crossfade with Previous Clip › 0.5, 1 or 2 seconds — when two audio clips touch, the first fades out while the second fades in. Greyed out when nothing sits right before the clip.
- 2 Fit Music to Length… — makes a song end exactly where your video ends, see below.
- 3 Duck Under Other Audio… — lowers the music automatically while someone speaks, see below.
Fit music to the length of the video
- Right-click the music clip › Fit Music to Length….
- In Fit to choose The video, Clip start to the playhead, or Custom… and type a length.
- Click Fit.
The video counts from where the music clip starts: music that starts 5 seconds in, under a 60-second video, becomes 55 seconds long, so it ends with the last picture.
The song keeps its real beginning and ending. To shorten it, SnazzyCut takes a piece out of the middle; to lengthen it, it repeats a quiet part. The joins are placed where the music is quietest and smoothed with a crossfade. To get the original back, right-click › Reset Music to Original Length.
The ♪ Remix tool in the timeline toolbar (R) does the same by dragging: drag the end of a music clip and the music recuts itself to that length.
Fit Music only works on music at normal speed: not on a clip that is sped up, slowed down, ramped or reversed.
Lower the music under speech (ducking)
Ducking makes the music dip while something else with sound plays at the same time, such as a voice-over or a video clip with someone talking, and come back up afterwards.
- Put the voice on a different track from the music.
- Right-click the music clip › Duck Under Other Audio….
- Choose how low it goes in Duck to (30% is a classic background level) and how fast in Ramp, then click Duck.
The result is ordinary volume points on the music clip. You can drag them afterwards, or run Duck again to rebuild them (it replaces the clip's existing volume points).