
Speed, reverse and freeze frames
Speed clips up or slow them down, play them backwards, hold a frame, build speed ramps and fit a clip to a length.
Change how fast a clip plays: slow motion for a big moment, fast-forward for a long walk, a clip played backwards, a frozen frame, or a speed ramp that slows down and speeds up again within one clip.
Speed up or slow down a clip
Speed is written as a multiple: 1 is normal, 2 is twice as fast, 0.5 is half speed (slow motion). You can choose from 0.1 to 10.
The same footage still plays, so the clip changes length on the timeline: an 8-second clip at 2 lasts 4 seconds, and at 0.5 it lasts 16 seconds.
In Properties › Speed
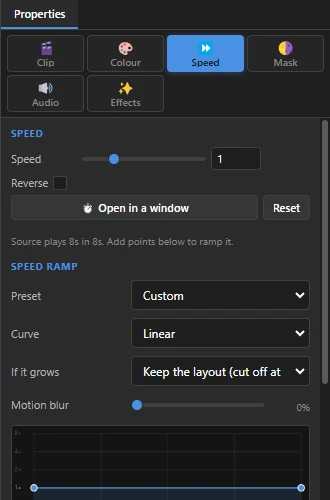 123456
- 1 Speed — the tab with all the timing tools.
- 2 Speed — drag the slider or type a number, then press Enter.
- 3 Reverse — plays the clip backwards.
- 4 Open in a window — the speed ramp editor in a larger window (see Speed ramps).
- 5 Reset — back to normal speed (or removes a speed ramp).
- 6 How many seconds of footage play in how many seconds on the timeline.
The Clip tab in Properties also has a Speed box and a Reverse tick box.
With the Speed / Duration dialog
Select a clip and press Ctrl + R, or choose Clip › Speed / Duration…. This is handy when the clip must last an exact time.
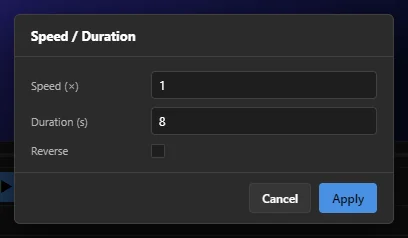 123
- 1 Type a Speed (×) and the duration is worked out for you.
- 2 Or type the Duration (s) you want and the speed is worked out.
- 3 Reverse plays it backwards. Click Apply.
Slowing a clip down makes it longer. The clips that follow it on the same track move along to make room, so nothing is covered. Speeding a clip up leaves a gap after it instead.
Right-click a clip
All the timing tools are also in the clip's right-click menu on the timeline.
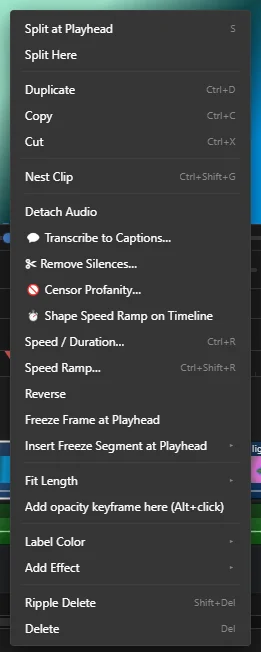 123456
- 1 Speed / Duration… — the dialog above.
- 2 Speed Ramp… — the speed ramp editor in a window.
- 3 Reverse — plays the clip backwards. On a reversed clip it says Unreverse.
- 4 Freeze Frame at Playhead — see Freeze frames.
- 5 Insert Freeze Segment at Playhead — see Freeze frames.
- 6 Fit Length — see Fit a clip to a length.
Play a clip backwards
Use any of these: the Reverse tick box in Properties, right-click › Reverse, or Clip › Toggle Reverse. Do the same again to play it forwards. Things like people jumping into a pool or pouring a drink look fun in reverse.
Freeze frames
A freeze frame holds one picture still, for example to show a name or end on a dramatic moment. Freeze frames work on video clips. First put the playhead on the frame you want inside the clip.
- Freeze Frame at Playhead — the whole clip shows that one picture, for its whole length. To play it normally again, right-click › Unfreeze (play again).
- Insert Freeze Segment at Playhead › 2, 3 or 5 seconds — cuts the clip at the playhead and puts a still picture of that length in between. Everything after it on that track moves along to make room, then the clip carries on playing.
A frozen picture has no sound. If you need sound under it, add music or a voice-over on an audio track.
Speed ramps: change speed within a clip
A speed ramp changes the speed during the clip: fast, then slow motion for the key moment, then fast again. The same footage still plays from start to end; only its timing changes.
Select the clip and open Properties › Speed. Below the speed controls is the Speed ramp editor. Changes there apply straight away.
A clip without a ramp shows a flat line at its own speed. It becomes a ramp only when you drag or add a point, or pick a preset; changing If it grows or Motion blur on their own leaves the clip at one speed.
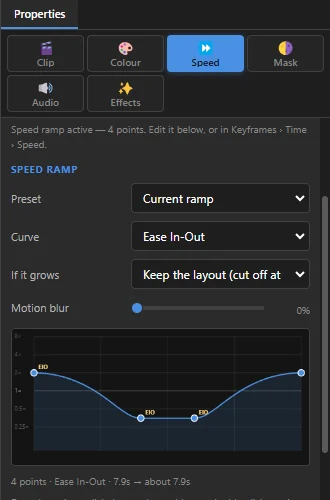 123
- 1 Preset — a ready-made shape to start from, such as Speed dip in the middle, Ramp up — slow to fast or Constant 0.5× (slow-mo).
- 2 The graph — left to right is the clip from start to end; higher is faster. The brighter line is normal speed (1×). Drag a point to change the speed there. Click the graph to add a point; double-click a point to delete it.
- 3 A summary: how many points, the curve, and how long the clip will be. It warns you when the clip would grow into the next one.
The other settings:
- Curve — how the speed changes between points. Ease In-Out gives smooth, natural ramps. Right-click a point to set the curve to the next point, or right-click the graph › Smooth Every Segment.
- If it grows — a slower ramp makes the clip longer. Keep the layout (cut off at the next clip) stops it at the next clip; Push neighbours along moves the following clips later.
- Motion blur — smears the fast parts the way a camera would, so they do not look jerky.
Prefer a bigger editor? Click Open in a window, or choose Clip › Speed Ramp… (Ctrl + Shift + R). In the window, click Apply to keep your ramp, or Remove Ramp to go back to one speed.
You can also shape a ramp right on the timeline: right-click the clip › Shape Speed Ramp on Timeline. An orange speed line appears on the clip; hold Alt and click to add a point, then drag it. A speed ramp is a set of keyframes on speed, so it also appears in the Keyframes tab under Time › Speed.
Fit a clip to a length
Right-click a clip › Fit Length to make it end exactly where you need:
| Choice | What happens |
|---|---|
| Fit to Video (stretch) | Changes the speed so the clip ends where the video ends. |
| Fit to Video (loop) | Repeats the clip one after another until it reaches the end of the video. |
| Fit to Video (trim) | Cuts the clip shorter, or makes it longer if there is footage left. The speed stays the same. |
| Extend to Playhead | Makes the clip end at the playhead, at the same speed. |
| Stretch to Playhead | Makes the clip end at the playhead by changing its speed. |
| Custom… | Type a Target length and choose a Method. |
"The end of the video" is the end of the last picture on the timeline, counted from where the clip starts: a clip that starts 10 seconds in, under a 60-second video, becomes 50 seconds long. The "Fit to Video" choices are greyed out for a clip that starts after the video ends. When a clip gets longer, the clips after it on the same track move along to make room.
For songs, Fit Music to Length is usually better: it keeps the real ending of the song.