
Importing media
Bring in videos, photos and music, keep them tidy in the Media panel, browse your computer, and relink files that have moved.
Before you can edit, SnazzyCut needs your videos, photos and music. This page shows the ways to bring them in, how the Media panel keeps them in order, and what to do when a file has moved.
Bring your files in
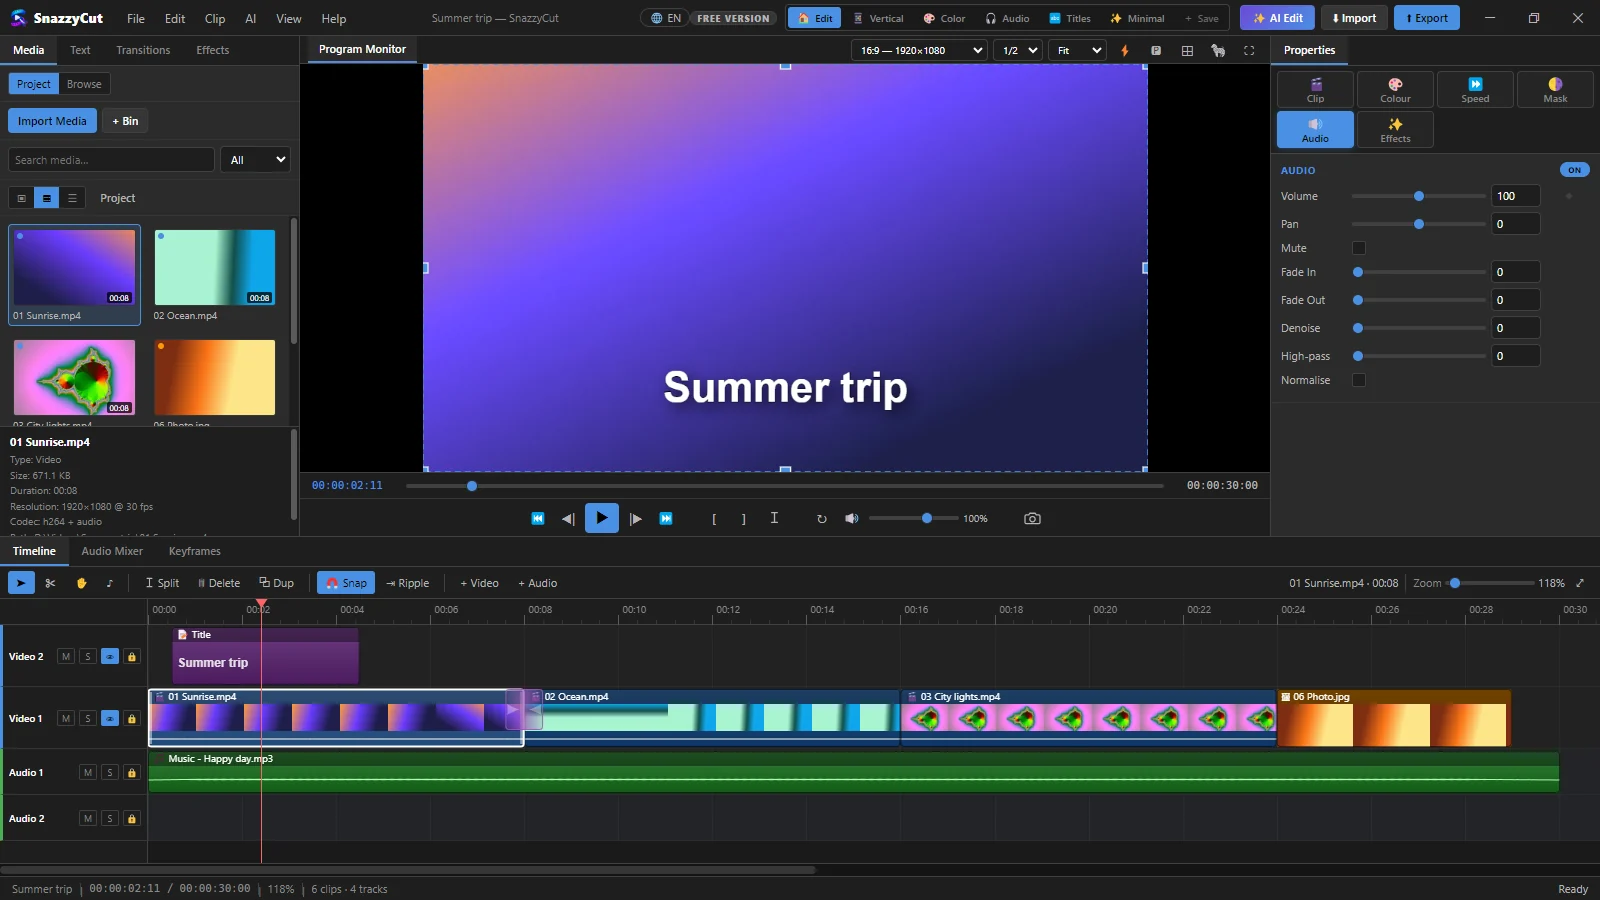 123
- 1 Import at the top right (or File › Import Media…, Ctrl + I). Pick one file or many, then click Open.
- 2 Drag files from Explorer onto the Media panel. Dropping them anywhere else in the window (except the timeline) does the same.
- 3 Drag files from Explorer straight onto the timeline. They are added to the project and placed where you let go, one after another.
Importing does not copy or change your files. The project only remembers where each file is, so leave your footage where it is while you work on the edit (see When a file has moved).
A file that is already in the project is not added twice. The status bar says No new files imported.
Which files work
| Kind | File types |
|---|---|
| Video | MP4, MOV, MKV, AVI, WMV, FLV, WebM, M4V, MPG/MPEG, TS, MTS |
| Sound | MP3, WAV, AAC, FLAC, OGG, M4A, WMA, OPUS, AIFF |
| Photos | JPG, PNG, BMP, TIFF, GIF, WebP, AVIF, HEIC/HEIF (iPhone) |
All of these show up in the Import window under All Media, the list it starts with.
iPhone photos (HEIC/HEIF) work too. The first time you bring one in, SnazzyCut makes a JPEG copy of it in its own data folder (the status bar shows Converting 1 HEIC photo…) and uses that copy. Your original photo is never changed. If a photo still cannot be read, save it as JPG on the phone (Settings › Camera › Formats › Most Compatible) and import it again.
The Media panel
Everything you import is listed in the Media panel on the left.
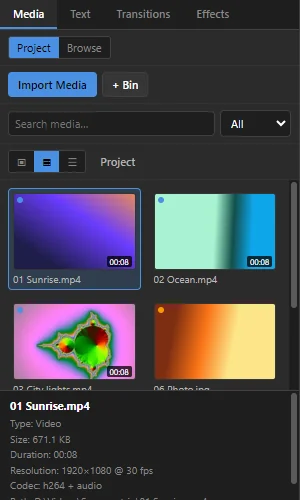 12345678
- 1 Project / Browse — Project shows the files in this project. Browse looks around your computer without importing anything (see Browse your computer).
- 2 Import Media — the same as the Import button.
- 3 + Bin — makes a bin, a folder inside the project for grouping files (for example "Music" or "Day 1").
- 4 Search media… — type part of a file name.
- 5 Filter — show All, or only Video, Audio or Images.
- 6 View — large thumbnails, grid or list. The line beside it shows which bin you are in; click Project there to go back to the top.
- 7 Your files — the number on a thumbnail is its length.
- 8 Info — type, size, length, resolution, codec and where the file is on your computer, for the file you clicked.
Put a file on the timeline
- Drag it onto the timeline, to the track and moment you want.
- Double-click it, or right-click it and choose Insert at Playhead. It goes on the main video track — the lowest one, Video 1, so titles above it stay in front (sound goes on the first audio track) — at the playhead. A clip running across the playhead is split there, and everything after it on that track moves along to make room.
- Right-click › Append to Timeline puts it after the last clip on that track.
Keep things tidy
- Double-click a bin to open it. Right-click a bin to Rename… or Delete Bin; the files inside move up a level, nothing is deleted.
- Right-click a file › Move to Bin to put it in a bin. New imports go into the bin you have open.
- Right-click a file for Reveal in Explorer, Re-scan Media (read the file again) and Remove from Project.
Remove from Project also deletes every clip on the timeline that uses that file. SnazzyCut asks first and tells you how many clips. The file on your disk is not touched, and Ctrl + Z brings it all back.
Browse your computer
The Browse tab is a file browser inside SnazzyCut. You can watch your clips and take only the part you need. Nothing is imported until you put it on the timeline.
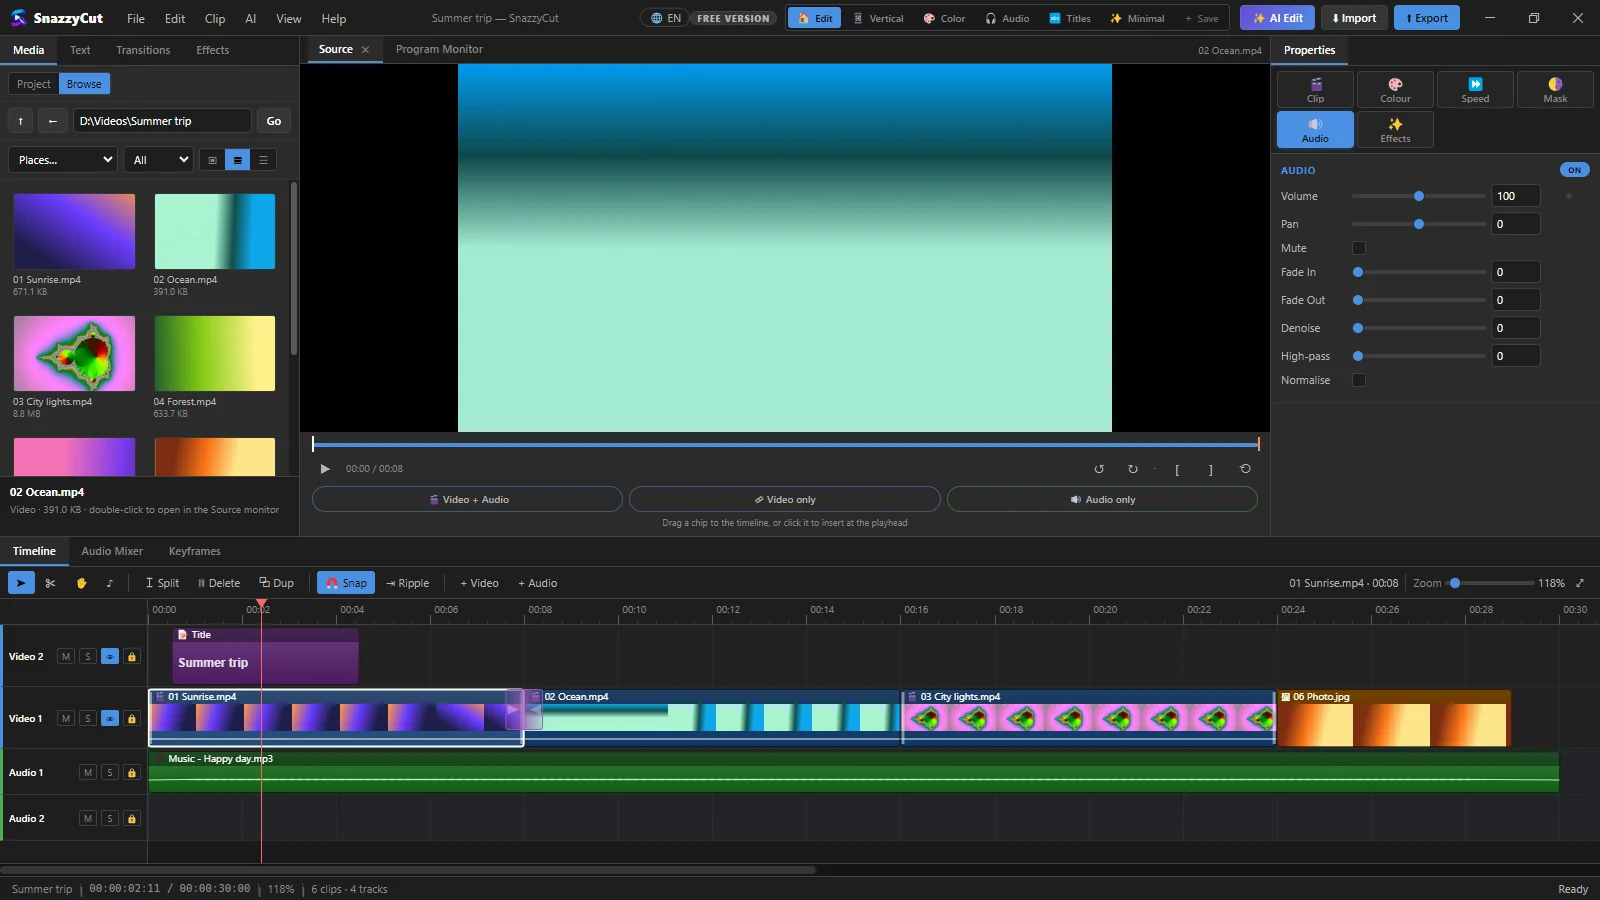 123456
- 1 Browse — opens your Videos folder the first time.
- 2 Folder path — type a folder and press Enter (or click Go). ↑ goes up one folder, ← goes back, and Places… jumps to Desktop, Documents, Downloads, Videos or a drive.
- 3 Files — click one to see its type and size. Ctrl+click and Shift+click select several. Drag them onto the timeline and they land one after another, in the folder's order.
- 4 Source — double-click a file to open it here, next to Program Monitor. Press Space to play, drag the bar to look through it, and use ← / → to step.
- 5 [ and ] — mark where the part you want starts and ends (or press I and O). ⟲ clears the marks. The two round arrows beside them turn the view for footage shot sideways; this changes only the view, not the clip.
- 6 Video + Audio · Video only · Audio only — drag one of these onto the timeline, or click it to insert at the playhead. Video only comes in silent; Audio only goes on an audio track.
To go back to your edit, click Program Monitor or press Esc. The ✕ on the Source tab closes the file. While Source is showing, Space, I, O and the arrow keys control the Source view, not the timeline.
When a file has moved: offline media
If you move, rename or delete a file, or unplug the drive it is on, the project cannot find it. That file is offline. Your edit is still safe: every cut, effect and title is kept, the file just needs to be found again.
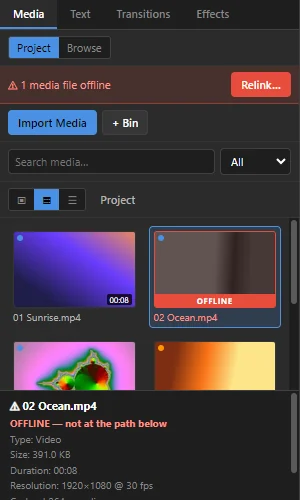 123
- 1 A red bar counts the offline files. Its Relink… button opens the relink window.
- 2 The file's thumbnail is marked OFFLINE. On the timeline its clips are striped red, and the monitor names the missing file instead of showing black.
- 3 The info box shows the place where the project expected the file.
Relink (find the files again)
Open the relink window in any of these ways: Ctrl + Shift + L, File › Relink Offline Media…, the Relink… button, a double-click on an offline file, or right-click an offline clip on the timeline › Relink Offline Media…. It also opens by itself when you open a project with missing files.
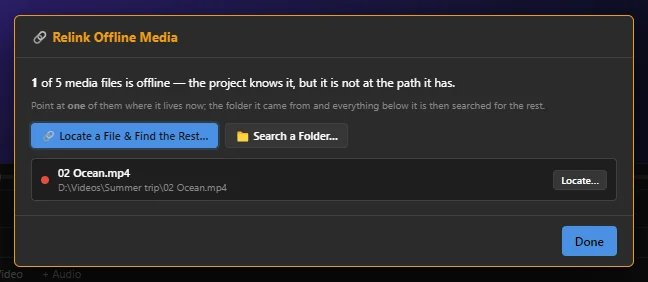 123
- Click 1 Locate a File & Find the Rest…. The window that opens names one of the missing files: find it in its new place and open it.
- SnazzyCut then searches that folder, and every folder inside it, for the other missing files. Files that moved together come back in one go.
- If they are somewhere else, click 2 Search a Folder… and choose the folder to search, or click Locate… on one row 3 to point at that file yourself. Found files turn green.
- Click Done. SnazzyCut offers to save: choose Save (or Save As… to keep a separate copy of the project). If you choose Not Now, the same files are offline again next time you open the project.
To swap a clip for a different take, right-click its file in the Media panel › Relink to Another File…. Every clip that uses it keeps its trims, effects and keyframes; only the picture and sound come from the new file.
If you export while clips on the timeline are offline, SnazzyCut stops first, names the missing files and offers Relink….
Smoother playback with proxies
Big files, such as 4K footage, can stutter while you edit. A proxy is a small copy of a clip that SnazzyCut plays in the monitor instead. Your export always uses the original files, so proxies never lower the quality of the finished video.
- Click 🅿 above the monitor to switch proxy editing on or off. When it is on, the missing proxies are made in the background, with progress shown on the monitor.
- Right-click 🅿 for Build Missing Proxies, Cancel Build and Proxy Settings… (also in Clip › Proxy Editing…).
- In the settings you choose the Proxy size (270p, 540p, 720p or 1080p; in the free version a 1080p proxy is made at 720p), whether to Build on import, and the Folder. By default proxies are saved in a folder next to the project file. Clear Proxies deletes them to free disk space.